Before You Begin
Purpose
This tutorial covers how to create a mobile web application using Oracle Application Express 5.1.
Time to Complete
Approximately 45 minutes.
Overview
Oracle Application Express (Oracle APEX) is a rapid web application development tool for the Oracle database. Using only a web browser and limited programming experience, you can develop and deploy professional applications that are both fast and secure. Oracle Application Express is available with the Oracle Database, whether it's on-premises or in the Oracle Cloud.
In this tutorial, you use Oracle Application Express Release 5.1 to create and modify a mobile web application.
Please keep in mind the following while running this tutorial:
- Logging into your Oracle Application
Express workspace: Your Oracle
Application Express workspace may reside in an
on-premises Oracle Database or in Oracle Database
Cloud Services. The login credentials differ
depending on where your workspace is located:
- Logging into Oracle Application Express in a Oracle Database Cloud Service: Reference the Oracle Help Center for your Oracle Database Cloud Service. To do this, go to the Oracle Help Center for Cloud, and select Platform or Infrastructure (depending on your service). From here, select your Database Cloud Service and the Get Started page will appear.
- Logging in to Oracle Application Express on-premises: From your browser, go to the location of your on-premises installation of your Oracle Application Express workspace provided by your Workspace Administrator.
- Application ID: Screenshots in this tutorial show a blurred Application ID. Your Application ID can be any value assigned automatically while creating the application.
- Schema: If you are accessing an Oracle Application Express workspace in Database Schema Service, you have one schema assigned to you with a schema name that you cannot change. If you are accessing the workspace in an on-premises Oracle database, you may have more than one schema assigned to your workspace by the Oracle Application Express Instance Administrator.
What Do You Need?
- Visit Oracle Help Center for Cloud.
- Access to an Oracle Database 11g or later release, either on-premises or in a Database Cloud Service.
- Oracle Application Express Release 5.1 into your Oracle Database (for on-premises only).
- At least one Oracle Application Express user provisioned. See Creating New User Accounts in Oracle Application Express Administration Guide.
- The files.zip file into your working directory.
-
All files for this hands-on activity are located in the
Home/Desktop/APEX_Track/filesfolder. The following files are used in this hands-on activity:
OBE.sql
Running SQL Script to Load Tables
Before you build the application, you should run the SQL Script that is used to load tables into the database. The mobile application is built using loaded tables.
-
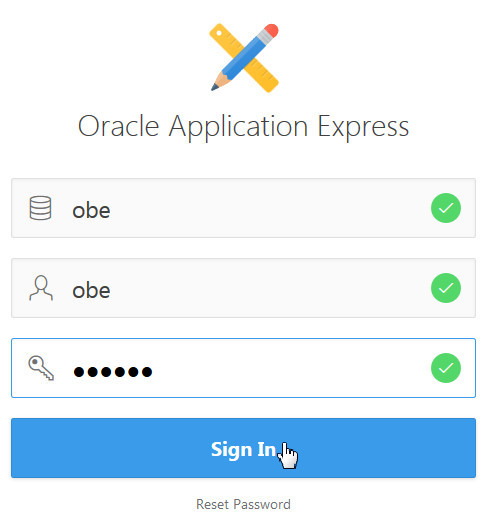
In the Application Express login page, enter the following login credentials and click Sign In:
Workspace: obe
Username: obe
Password: oracle
Description of this image -
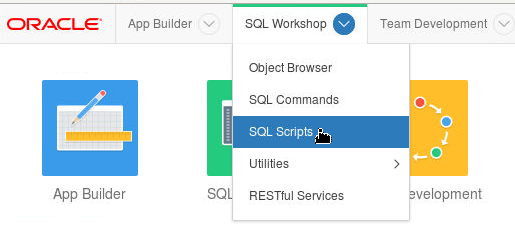
After logging in, click the down arrow next to the SQL Workshop tab, and then select SQL Scripts.
Description of this image -
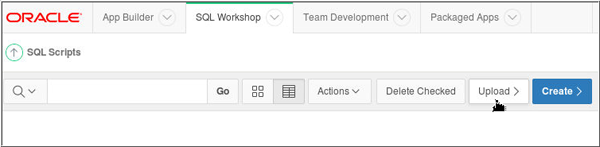
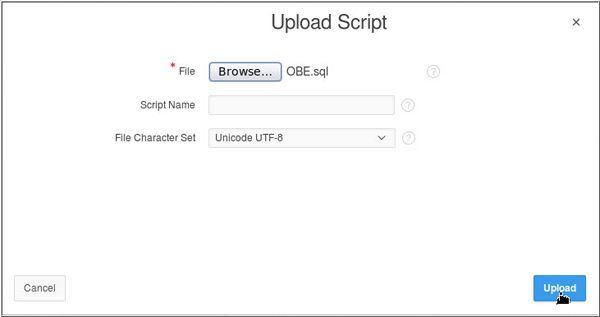
Click Upload.
Description of this image -
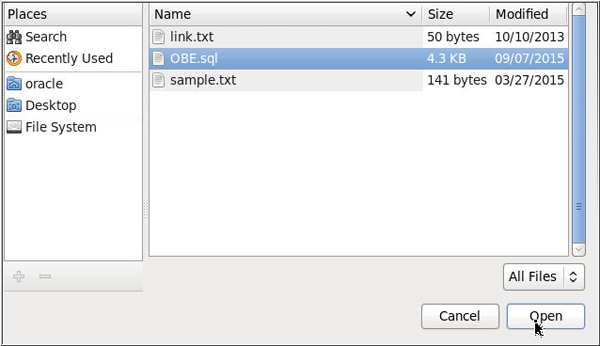
Click Browse.
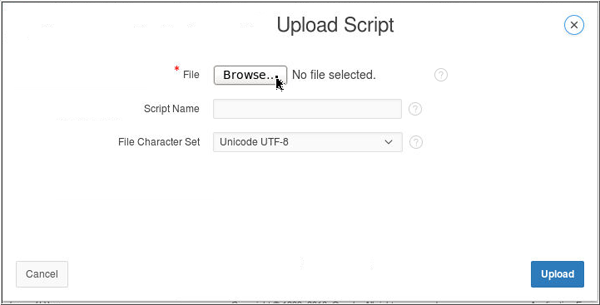
Locate the
OBE.sqlfile from the files folder that you have downloaded into your working directory.Locate the OBE.sql file from the files folder.
-
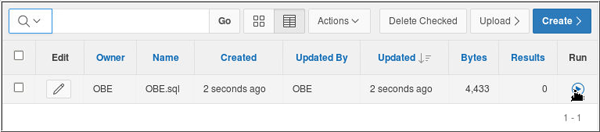
Click Run button.
Description of this image -
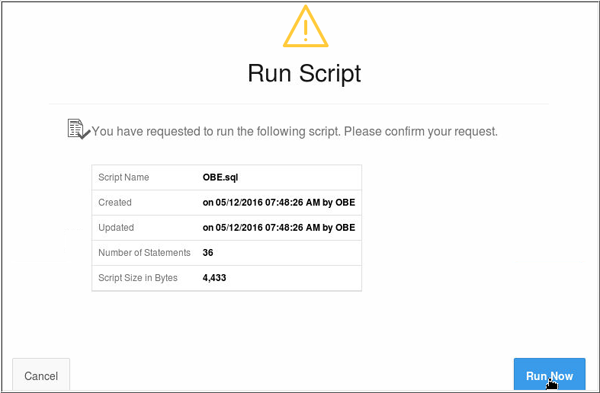
Click Run Now.
Description of this image -
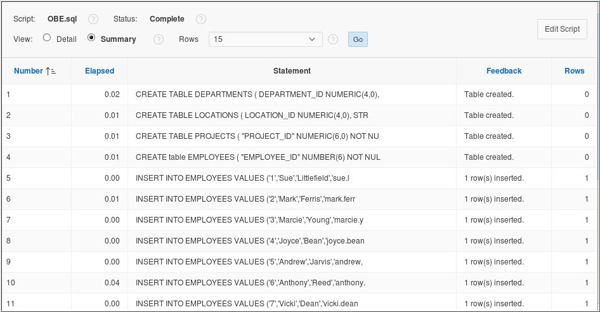
Click View Results

Description of this image -
Your tables have been successfully created and data has been inserted into them.
Description of this image
Creating a Mobile Web Application
In this topic, you create a Mobile application and add list and form pages to the application.
-
Click App Builder and select Create.

Description of this image -
Click Mobile.

Description of this image -
Enter Mobile App for Name. Click the Theme Style select list to view the available theme colors. Select Blue and click Next.

Description of this image -
Click Add Page to add pages in the application.
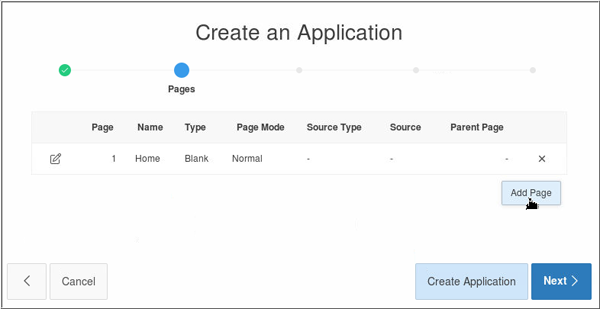
Description of this image -
Select List View and Form page type. List View is optimized to display data and provide easy navigation on Smartphones. This page type builds a two page List View and Form combination of pages. On the first page, you can select a row to update from the List View. On the second page, you can add a new record, and update or delete the selected record.
SelectHome(1)for Parent Page,DEPARTMENTSfor Table Name, andDEPARTMENT_NAMEfor Display Column. Click Add Page.
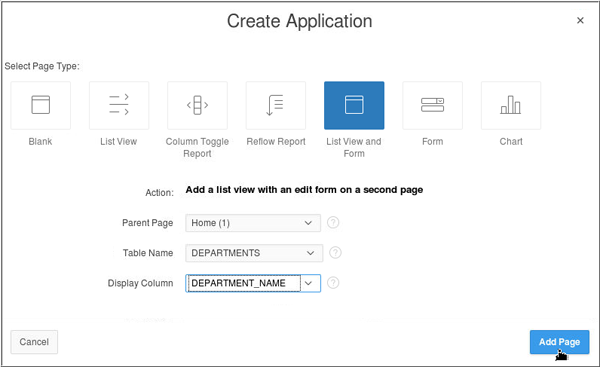
Description of this image -
Click Add Page again to add more pages to the application.

Description of this image -
Select List View and Form. Select
Home(1)for Parent Page,PROJECTSfor Table Name, andPROJECT_NAMEfor Display Column. Click Add Page.

Description of this image -
Click Add Page to add another report page type.

Description of this image -
You want to add a Column Toggle Report. A column Toggle Report hides less important columns at narrower widths and surfaces a button to open a menu allowing the user to choose the columns to be viewed. Click Column Toggle Report. Select
EMPLOYEESfor Table Name. Click Add Page.

Description of this image -
You want to add another report page type. Click Add Page.

Description of this image -
A Reflow report collapses the table columns into a stacked presentation. Click Reflow Report. Select
EMPLOYEESfor Table Name. Click Add Page.

Description of this image -
The pages in your application have been created. You want to edit the names of some pages in your application. Click the Edit icon against Page 6 of the Employees of Column Toggle Report page type.

Description of this image -
Change the Name as Employees Column Toggle Report and click Apply Changes.

Description of this image -
You also want to edit the Name of the Employees (7) Reflow Report. Click the Edit icon against this page type.

Description of this image -
Change the Name as Employees Reflow Report and click Apply Changes.

Description of this image -
Click Next.

Description of this image -
Accept the default and click Next.

Description of this image -
Click Next.

Description of this image -
Click Create Application.

Description of this image -
Your application has been successfully created. The application definition is displayed with the various pages that you added using the Create Application wizard.To view your application, click Run Application.

Description of this image -
In the new tab, enter your login credentials and click Login.

Description of this image -
The Navigation List shows the two pages that were created under the Home page.

Description of this image -
Click the panel button icon on the left corner to view the panel that contains the top level pages that were added at the time of creating the application.
Description of this image -
A panel that contains the top level pages is displayed. Clicking any of the top level pages will display its associated subordinate pages. Click Home.

Description of this image -
The subordinate pages Departments and Projects are listed in the list under the Home page are displayed. Click Departments.

Description of this image -
A List View containing the Department Names is displayed. The Create button is available to create a new record. Click Administration to view the Administration department details.

Description of this image -
The Department details such as the Department Name and Location Id are displayed. The Save and Delete buttons are available to save the modified record and delete the selected record. Similarly, to view the Projects list view and Projects form details, click the panel icon.

Description of this image -
Click the right arrow next to Home.

Description of this image -
Click Projects.

Description of this image -
A list view of Projects is displayed. The Create button is available to create a new record. Click one of the Project Names to view the Project Details. In this case, click Maintain Support Systems.

Description of this image -
The Project Details pertaining to that particular project is displayed. The Save and Delete buttons are available to save the modified record and delete the selected record.

Description of this image -
Click the Application Builder tab to navigate back to the application and modify the application pages.
Adding a New Page to the Panel Menu
In this section, you add a new page of type chart to the Panel menu using the Create Page wizard.
-
In the Application Builder Home page, click Create Page.

Description of this image -
Click Chart.

Description of this image -
Click Pie.

Description of this image -
Enter EmpDept Chart for Page Name. Click Next >.

Description of this image -
Select Create a new navigation menu entry and click Next >.

Description of this image -
Select SQL Query radio button and copy and paste the following query into the query field. Click Next.
select null
                                  link, d.department_name label, e.emp_count
                                  value from (select department_id, count(*)
                                  emp_count from employees group by
                                  department_id) e, departments d where
                                  e.department_id = d.department_id
Description of this image -
Select LABEL for Label Column and VALUE for Value Column. Click Create.

Description of this image -
Click Save and Run Page icon.

Description of this image -
The Employees per Department chart is displayed. Click the panel list button icon.

Description of this image -
Notice that the EmpDept Chart list entry is listed in the navigation list along with page link to the navigation list.
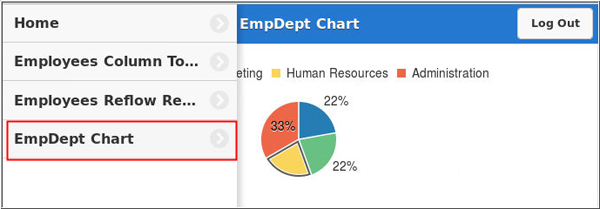
Description of this image
Modifying Departments List View and Departments Form pages
In this section, you modify the Name, Title, Region, and Query definitions of the Departments List View and Departments Form pages appropriately. You can make use of the settings available in the List View attributes to display the report based on your requirement. The List View supports the following features:
Advanced Formatting: This feature allows you to include text formatting conventions for common list patterns like header/descriptions, secondary information and counts through semantic HTML markup.
Show Image:You can add an image inside a list item as the first child element.
Show List Divider: This feature allows List items to be turned into dividers to organize and group the list items.
Has Split Button: In cases where there is more than one possible action per list item, you can use a split button to offer two independently clickable items - the list item and a small arrow icon in the far right.
Enable Search: jQuery Mobile provides a very easy way to filter a list with a simple client side search feature. The framework will have a search box above the list to filter out list items that do not contain the current search string as the user types.
Is Nested List View: This feature can be used to populate a new page with the title of the parent in the header and the list of child elements when a list item with a child list is clicked.
Inset List: You can use this feature if lists are embedded in a page with other types of content. An inset list packages the list into a block that sits inside the content area with a bit of margin and rounded corners.
-
Click the Go To Page icon.

Description of this image
Select Page 2 (Departments) page from the Popup List of Values of Page Finder.

Description of this image -
Click the
DEPARTMENTSList View region in the Rendering section of the Page Designer.
Description of this image -
In the Property Editor - Region section of the Page Designer, replace the SQL Statement with the query provided below.
select department_name, department_id,
                                (select count(*) from PROJECTS p where
                                p.project_dept = d.department_id) Projects from
                                DEPARTMENTS d
Description of this image -
Next, click Attributes to modify the Settings for this region.

Description of this image -
In the Property Editor - Attributes section of the Paqe Designer, under Settings, uncheck the Enable Search feature. In the Counter Column, select Projects. In the Number of Rows text box, enter
10and click Save.
Description of this image -
Next,you want to modify the Departments Form page. Click Go to Page icon.

Description of this image -
In the Popup List of Values of Page Finder, select Page Number 3 - Departments.

Description of this image -
In the Property Editor - Page section of the Page Designer of Page 3, change the Name and Title to Maintain Departments and click Save.

Description of this image -
Next, you will modify the Items in the Page. Currently, the item
Department_Idis a hidden item and you want to change it to a Number field so that you can add a newDepartment Idin the form. In the Rendering section of the Page Designer, clickP3_DEPARTMENT_ID
Description of this image -
In the Property Editor - Page Item section of the Page Designer, change the Type as Number Field and Label as
Department Id. Click Save.
Description of this image -
Next, select
P3_LOCATION_IDin the Rendering section of the Page Designer.
Description of this image -
In the Property Editor - Page Item section of the Page Designer, notice that the Type is Number Field. However, you can change it to a Select List where you can select the Location Names from the locations table to be displayed in the form. To do this, change the Number Field to Select List in the Type property. Change the Label to Location. In the List of Values property, select SQL Query for Type and enter the below given SQL Statement. Click Save and Run Page.
select city d, location_id r from locations -

Description of this image - Click the Panel List icon.

Description of this image -
Click Home.

Description of this image -
Click Departments.

Description of this image -
Notice that the Label has been changed to Departments and a counter column with the number of projects associated with each Department is displayed.
Click Administration.
Description of this image -
You will be taken to the Maintain Departments page where the Department Details of the department that you have selected is displayed. Notice that the Department Id (which was a Hidden item, but later changed to a Number Field) is displayed and also notice that the Location item is a Select List. You can modify the Department Details by changing any of these items. Click the down arrow in the Select List of the
Locationfield and change the location toBombay. Click Save.
Description of this image -
The changes have been applied. Click Administration again to view the changes you made to the Location of that department.

Description of this image -
Notice that the modified record is displayed. Click the panel list button icon to navigate back to the Home page.

Description of this image -
Select the right arrow next to Home.

Description of this image -
Select Departments.

Description of this image -
You now want to create a new Department. Click Create.

Description of this image -
Enter
50for Department Id,ITfor Department Name, and selectSouth San Franciscofor Location. Click Create.
Description of this image -
Notice that a new department IT has been added.

Description of this image
Modifying Projects List View and Projects Form pages
In this section, you modify the Name, Title, Region, and Query definitions of the Projects List View and Projects Form pages appropriately.
-
Navigate back to the Page Designer tab of the Application of Page 3.
-
Click the Go To Page icon.

Description of this image
Select Page Number 4 (Projects) from the Popup List of Values of Page Finder.

Description of this image -
In the Rendering section of the Page Designer section, click Attributes.

Description of this image -
In the property editor, under Settings, check Advanced Formatting and Show List Divider features, and enter the code given below for Text Formatting.
<h1>&PROJECT_NAME.</h1><p>Start Date: &PROJECT_START_DATE.</p><p>End Date: &PROJECT_END_DATE.</p>
Description of this image -
Select PROJECT_DEPT for List Divider Column, Server:Like & Ignore Case for Search Type, PROJECT_NAME for Search Column. Enter Search by Project Name for Search Box Placeholder, 10 for Number of Rows, and click Save.

Description of this image -
Next, you select the Projects form page to make changes to the items. Click the Go

Description of this image
Select Page Number 5 - Projects in the Popup List of Values of Page Finder.

Description of this image
-
In the Property Editor - Page section of the Page Designer of Page Number 5 (Projects), change the Name and Title as
Maintain Projects. Click Save.
Description of this image -
In the Rendering section of the page, select
P5_PROJECT_DEPT.
Description of this image -
You want to change the Type of this item to be a select list so that you can select the Departments that are available and modify the Projects with a different Department if needed. In the Property Editor - Page Item section of the Page Designer, select the Type to Select List in the Identification property. Select Type as SQL Query in the List of Values property and enter the SQL Statement given below. Click Save.
select
                                    department_name d, department_id r from
                                    departments
Description of this image -
You want to change P5_STATUS also to a select list with status types. Click P5_STATUS under the Rendering tab.

Description of this image -
In the property editor, under Identification, select Select List for Type. Under List of Values, select SQL Query for Type, and enter the below given query for SQL Query. Then, click the Save and Run Page icon.
select
                                    distinct status d, status r

                                      from projects
Description of this image -
Click the Panel list button icon on the page to go back to the Home page.

Description of this image -
Click the right arrow icon next to Home.

Description of this image -
Click Projects.

Description of this image -
Notice that the projects have been divided based on the Department Id.

Description of this image -
Enter a term in the Search field to search the Projects based on the Search item. Type
Maintainin the Search field and press Enter key. Notice that the Projects are displayed based on the Search field.
Description of this image -
Click Maintain Support Systems to view the details of this project.

Description of this image -
Change the Status of the project from Open to Planned. Click Save.

Description of this image

Description of this image -
The changes have been saved. To verify the changes, click Maintain Support Systems again. Notice that the Status has changed.

Description of this image
Enhancing the Projects Form page by Adding a New Page Item and Dynamic Action
In this section, you add a new page item called LOCATION to
the Projects form page. You will then associate the
P5_PROJECT_DEPT
item with a Dynamic Action that will display the
Location based on the Department selected.
Dynamic Actions are used to define complex client-side behavior declaratively without the need for JavaScript. Using the Dynamic Actions, you specify an action that is performed when a defined set of conditions occur. You can also specify which elements are affected by the action, and when and how they are affected.
-
In the Rendering section of the Maintain Projects page, right-click Items and select Create Page Item.

Description of this image -
In the property editor of the new page item, set the following properties as per the below given table:
Property Group
Property
Value
Identification
Name
P5_LOCATION
Identification
Type
Display Only
Label
Label Location
Settings Save Session State No Source Type Item Source Item P5_LOCATION -
Next, you want to create a Dynamic Action for the P5_PROJECT_DEPT item which will display the appropriate Location of the Department whenever the Department Name is changed. Right-click P5_PROJECT_DEPT and select Create Dynamic Action.

Description of this image -
In the Property Editor - Dynamic Action section of the Page Designer, enter Name as
Get
                                    Location
and click Show All button.
Description of this image -
Navigate to the Rendering section, expand Get Location, select True. Click Show.
Description of this image -
In the Property Editor - Action section, change Action property to Set Value. Expand Settings and select Set Type as SQL Statement and enter the SQL Statement given below. Select
P5_PROJECT_DEPTfor Page Items to Submit. Note that under the Affected Elements,P5_LOCATIONis selected with Selection Type as Item(s). Click Save and Run.
select
                                    city from locations where location_id =
                                    (select location_id from departments where
                                    department_id = :P5_PROJECT_DEPT)
Description of this image -
Click the panel list button icon.

Description of this image -
Click the right arrow next to Home.

Description of this image -
Click Projects.

Description of this image -
Click Maintain Support Systems.

Description of this image -
Click Maintain Support Systems project. Notice that the Location is being displayed.

Description of this image -
Change the Project Dept select list to a different department. Select IT from the select list.

Description of this image -
The Location changes based on the Department Name selected. Click panel

Description of this image
Viewing the Employees Column Toggle Report
In this topic, you view the Employees Column Toggle report. In this report, you can toggle the columns and hide the columns which are less important in the report thereby allowing the user to choose the columns to be viewed.
-
Click Employees Column Toggle Report in the panel list.

Description of this image -
Notice that all the columns in the report are displayed. You can choose to display only columns that are of importance to you by clicking the Columns button on the top right corner of the screen. Click Columns...

Description of this image -
All the columns that are available are displayed here. You can uncheck the columns that you do not want in your report. Click Employee Id and Email columns to deselect and not display in the report.

Description of this image -
Notice that the Employee Id and Email columns are not displayed.

Description of this image -
A Toggle report can also be used to assign priorities to different columns in the report. Navigate back to the page designer, and click Popup List of Values: Page Finder.

Description of this image -
Select Employees Column Toggle Report page.

Description of this image -
In the Rendering section of the Page Designer, click the arrow head against Columns to expand the columns available in the report.

Description of this image -
The available columns are displayed. Click
FIRST_NAME.
Description of this image -
In the Property Editor - Column section of the Page Designer, select 3 for Priority.

Description of this image -
In the Rendering section of Page Designer, click
LAST_NAME.
Description of this image -
In the Property Editor - Column section of the Page Designer, select 3 for Priority.

Description of this image -
In the Rendering section of Page Designer, click
EMAIL.
Description of this image -
In the Property Editor - Column section of the Page Designer, select 2 for Priority.

Description of this image -
In the Rendering section of Page Designer, click
HIRE_DATE.
Description of this image -
In the Property Editor - Column section of the Page Designer, select 1 - Hide Last for Priority.

Description of this image -
In the Rendering section of Page Designer, click
EMPLOYEE_ID.In the Property Editor - Column section of the Page Designer, make sure 1 - Hide Last for Priority is selected. Click Save and Run Page.
Description of this image -
Notice that all the columns are displayed. To view the columns based on priority, resize the browser.

Description of this image -
Notice that the columns are displayed in the report based on the priority specified.

Description of this image -
By resizing the browser to the size of a mobile device will display only the columns of highest priority.

Description of this image
Viewing the Employees Reflow Report
In this topic, you view the Employees Reflow report. In this report, the table columns are in a stacked presentation that look like block of label/data pair for each row.
-
Click the panel list button icon.

Description of this image -
Click Employees Reflow Report from the panel list.

Description of this image -
Notice that the report is displayed with all the columns available next to each other when displayed on a tablet or desktop.

Description of this image -
Resize the browser to a size of a smart phone and notice that the horizontal report reflows to a stacked vertical report.

Description of this image
Viewing your Mobile Application by Resizing the Browser
In this topic, you resize your browser to experience the look and feel of a mobile screen.
-
Click the maximize button of your browser and reduce the width to look like a mobile screen.

Description of this image -
Click Departments.

Description of this image -
The Departments page is displayed. Click one of the Departments to view the department details.

Description of this image -
Notice that the labels have shifted above the items thereby providing a look and feel of a mobile device's browser.

Description of this image -
Click the Panel icon, and click Home.
Description of this image -
Click Projects.

Description of this image -
Click one of the Projects.

Description of this image -
Notice that the labels have shifted above the items thereby providing a look and feel of a mobile device's browser.

Description of this image -
Change the Project End Date to a different date, and click Save.
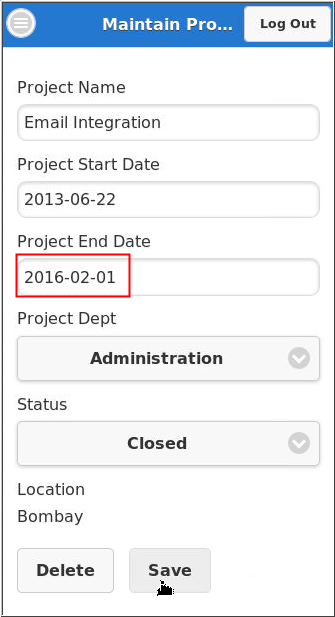
Description of this image -
The date has been updated.

Description of this image