Before You Begin
Purpose
In this tutorial, you use Oracle Application Express 5.1 to perform the following tasks:
-
Initializing Migration
-
Updating Navigation
-
Improving the Home Page
-
Improving the Customer Pages
-
Improving the Product Pages
Time to Complete
Approximately 1 hour
Background
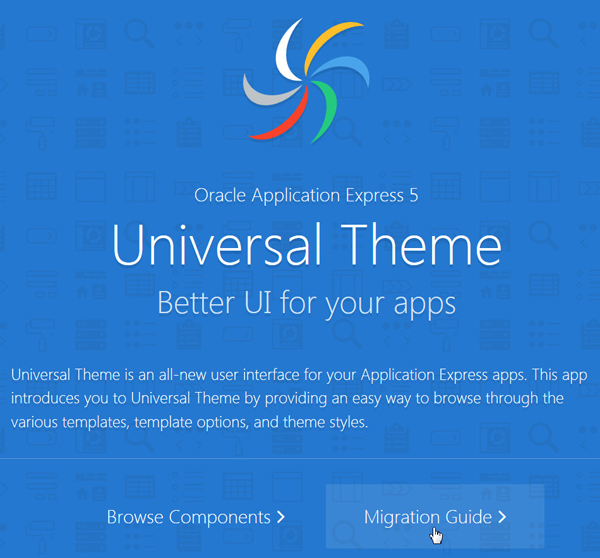
Oracle Application Express is a rapid web application development tool for the Oracle database. Using only a web browser and limited programming experience, you can develop and deploy professional applications that are both fast and secure. Oracle Application Express is a fully supported, no cost option of the Oracle database.
In this tutorial, you use Oracle Application Express 5.1 to migrate an application from a previous release of Application Express to the Universal Theme in Application Express 5.1.
What Do You Need?
-
Access to an Oracle Database 11g or later release, either on-premises or in a Database Cloud Service
-
Oracle Application Express Release 5.1 into your Oracle Database (for on-premise only)
-
All files for this hands-on activity are located in the
Home/Desktop/APEX_Track/filesfolder. -
The following files are used in this hands-on activity:
Sample DB App 4.2.sql
Initializing Migration
In this section, you install an Application Express 4.2 application and follow the Universal Theme Migration Guide to update the application.
You should always Export your application before migrating to another theme. However, in this tutorial we will skip this step.
Checking the Sample Database Application (V5.1)
This tutorial relies on the tables installed as part of the Sample Database Application. By default this application is installed into a new workspace. You need to check if the Version 5.1 of this application was recently installed. If it was installed over a month ago then it is recommended to uninstall and re-install the application so that the data is refreshed.
-
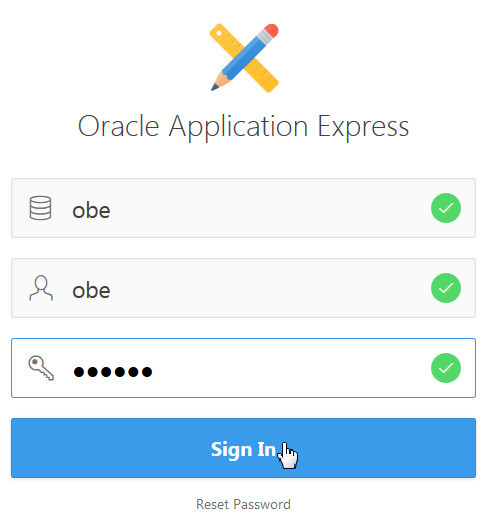
In the Application Express login page, enter the following login credentials and click Sign In:
Workspace: obe
Username: obe
Password: oracle
Description of this image -
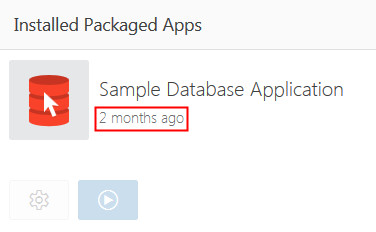
In the Oracle Application Express home page, click Packaged Apps, and review if the Sample Database Application is installed and when it was installed.
Description of this image -
If the Sample Database Application is installed, but more than one month ago, remove the application. To remove the application, click the Manage icon (
 )
under Sample Database Application, then
click Remove, and click Remove
Application.
)
under Sample Database Application, then
click Remove, and click Remove
Application.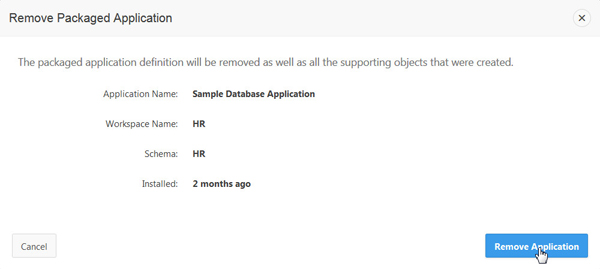
Description of this image -
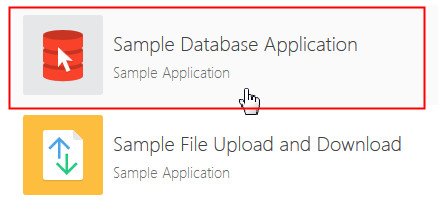
If the Sample Database Application was not installed, or you just removed it, install the application. To install the application, click Packaged Apps Gallery, then click Sample Database Application. Click Install Application, click Next, and then click Install Application.
Description of this image 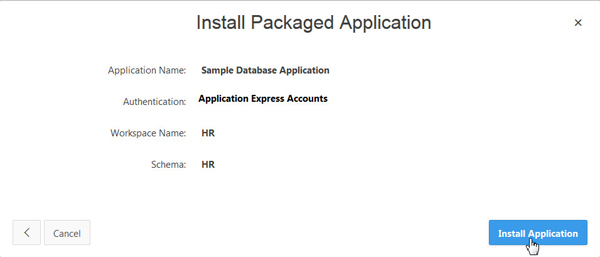
Description of this image
Importing the Sample Database Application (V4.2)
Import the Sample Database Application (V4.2) to your workspace. This application will use the tables, views, triggers and other database objects created in the previous section.
-
Click the Application Builder drop down and select Import.
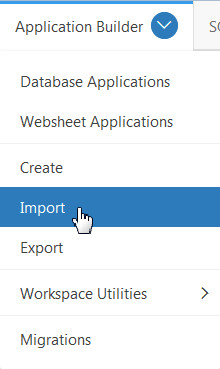
Description of this image -
Click Browse... and select the Sample DB App 4.2.sql file from your working directorythe files folder and click Open. Then, click Next.
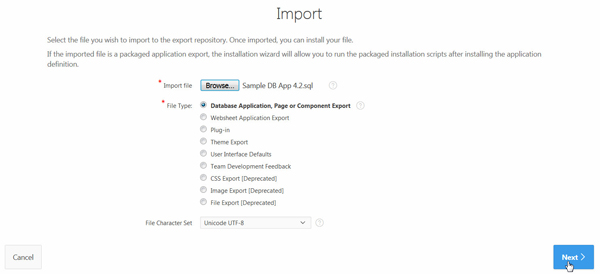
Description of this image -
Click Next to confirm the file import. Then, click Install Application.
Description of this image -
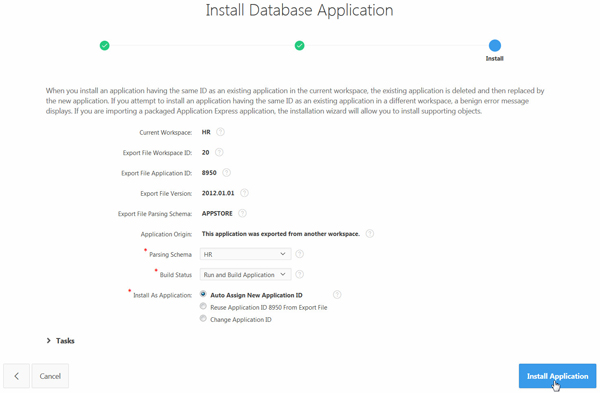
Given the supporting objects (like tables) are already installed, change Upgrade Supporting Objects to No. Click Next.
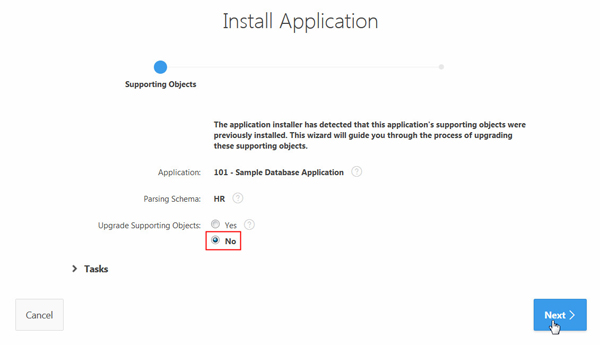
Description of this image -
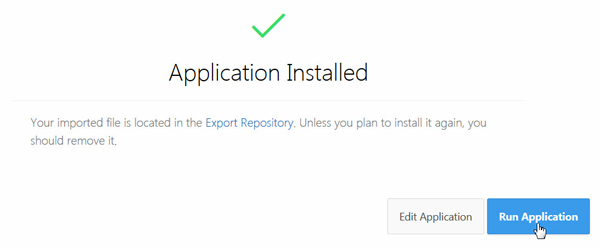
The application is now installed. Click Run Application to review how the application looks prior to migrating it to the Universal Theme.
Description of this image -
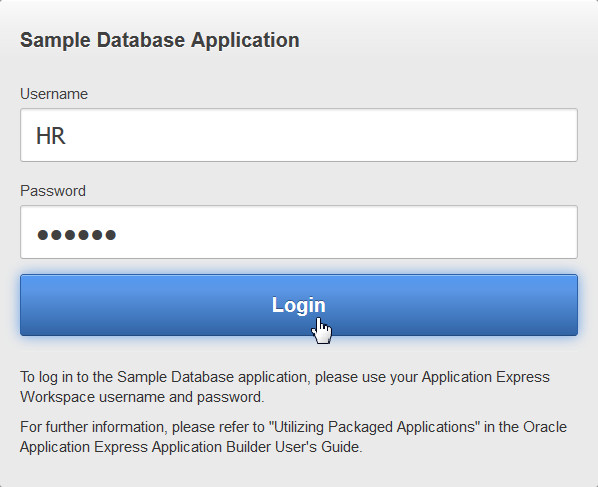
Enter your login credentials, and click Login.
Description of this image -
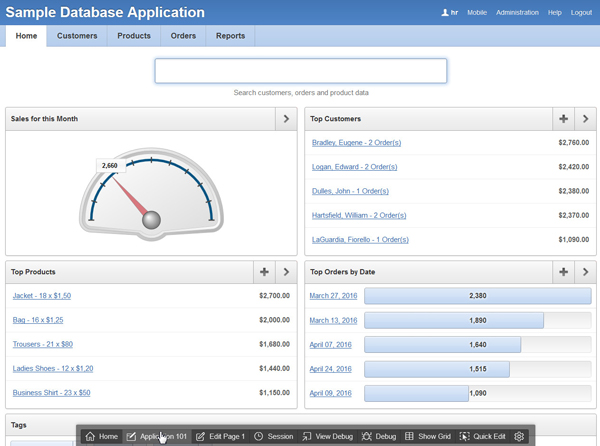
Now you need to edit the application. Click Application xxx in the Developer Toolbar.
Description of this image
Installing the Bookmarklet
In this section, you install the Bookmarklet from the Universal Theme Migration Guide.
-
Open the Universal Theme Migration Guide in a new tab in your browser (link is in the "What Do You Need?" section). Then, click the Migration Guide > button.
Description of this image -
Navigate to the Bookmarklet section and drag Universal Theme Migration Helper V1.1 to the bookmark bar for Firefox. Alternatively, you can bookmark the Universal Theme Migration Helper V1.1 page by right-clicking the link and selecting Bookmark This Link on Firefox.

Description of this image Note: The remainder of this tutorial will follow the guidance outlined in Steps to Migrate section of the Universal Theme Migration Guide.
Migrating the Theme
In this section, you install the Universal Theme into your application and then switch your application theme.
-
The first step in migrating the theme is to install the Universal Theme into your application.
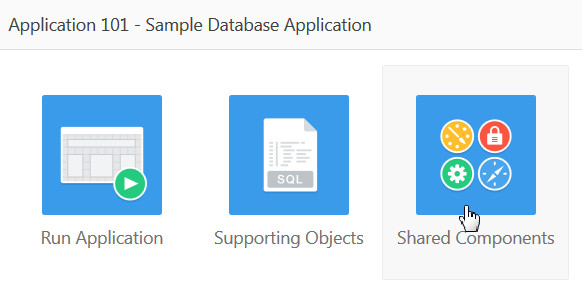
In the browser, navigate to the Application Express tab. From the Application Builder, with your application loaded, click Shared Components.
Description of this image -
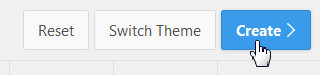
Click Themes, and then click Create >.
Description of this image -
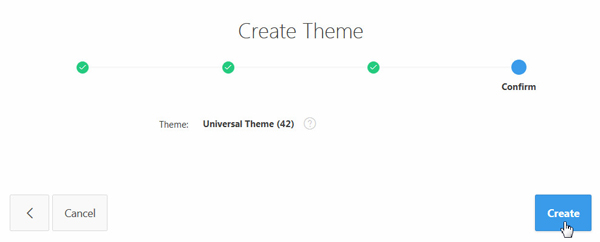
Accept the default and click Next for the first three steps of the wizard (Method, User Interface, and Identify Theme). Then, click Create.
Description of this image -
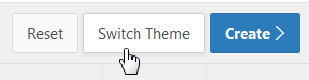
The next step is to switch your application theme. Click Switch Theme.
Description of this image -
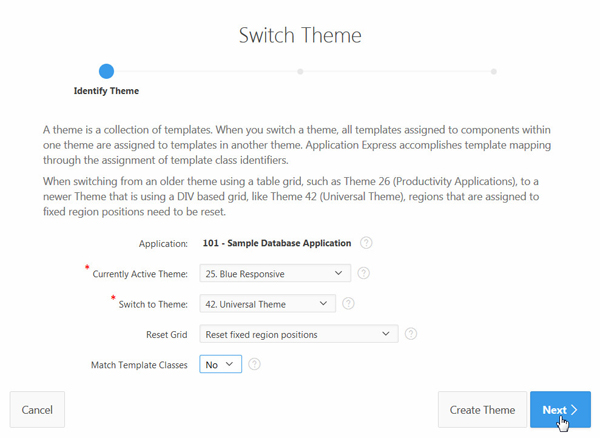
Enter the following details, and click Next >.
-
Current Active Theme: 25. Blue Responsive
-
Switch to Theme: 42. Universal Theme
-
Reset Grid: Reset fixed region positions
-
Match Template Classes: No
Description of this image -
-
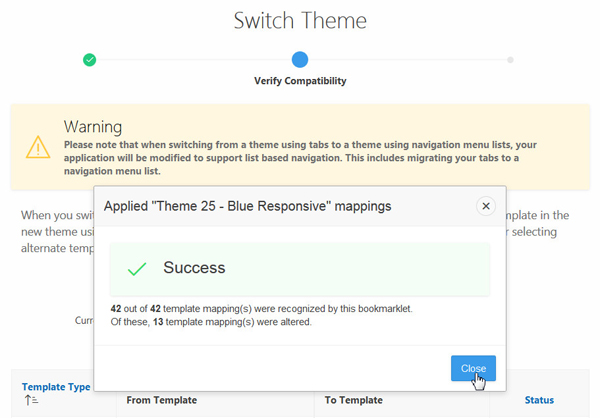
Click the Universal Theme Migration Helper V1.1 bookmark. The popup will display the number of templates corrected. Click Close on the popup dialog. Then, click Next >.
Description of this image -
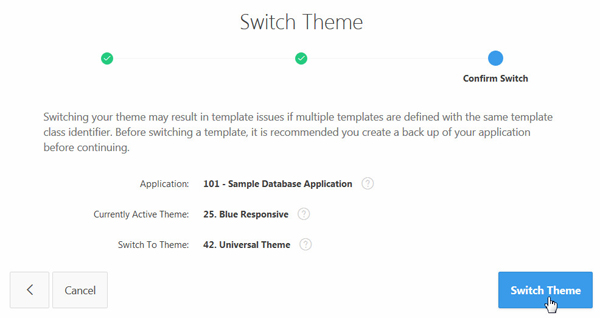
Click Switch Theme.
Description of this image
Upgrading Application Components
In this topic, you will review Application Express 4.2 components that can be upgraded to Application Express 5.1 components.
-
Go to the application home page in Application Builder. Select Utilities, then Upgrade Application.
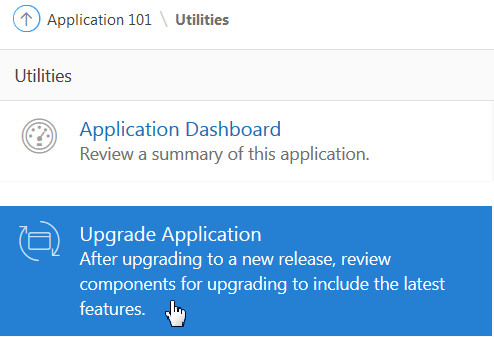
Description of this image -
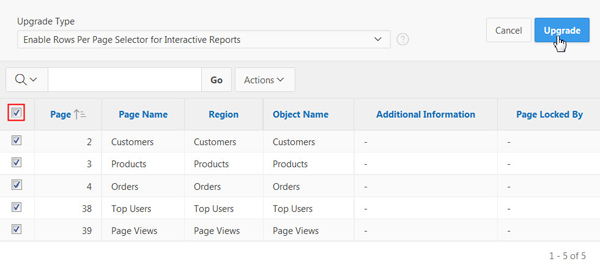
Click the number corresponding to the Enable Rows Per Page Selector for Interactive Report row, click the "Select All" checkbox, and then click Upgrade.
Description of this image -
Repeat step 2 for the following Upgrade Type:
-
Convert theme based Calendar to CSS Calendar
-
Upgrade jsTree region to new Tree
-
Enable fixed report headers to the top of the page, for Interactive Reports
-
Numeric, Required, and Date Picker Item updates based upon conditional validations: For this upgrade type, you will have to upgrade the components page-by-page. The Upgrade Application wizard will guide you through the upgrade process.
Note: You can upgrade the remaining application objects as well.
-
Improving Navigation
When you switch an application to the Universal Theme the previous one-level Tabs are updated to use a Navigation List. In this topic, you will enhance the Navigation Menu and also the Navigation Bar.
Adding Icons to Navigation Menu
First, you will add icons to each of the menu options.
-
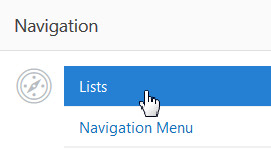
Click Shared Components, then click on Lists.
Description of this image -
Select the Navigation Menu list.
Description of this image -
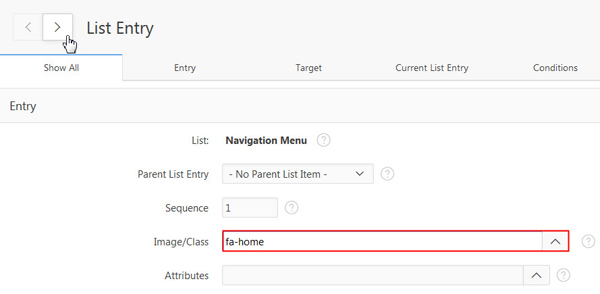
Edit the Home list entry. Enter fa-home for Image/Class, then go the next list item.
Description of this image -
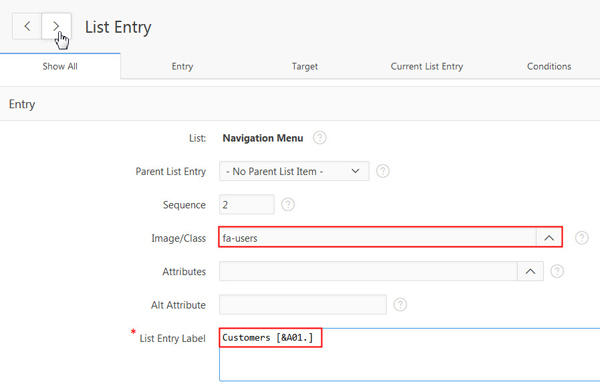
Edit the Customer list entry. Enter fa-users for Image/Class, and Customers [&A01.] for List Entry Label, then go to the next list item.
Description of this image -
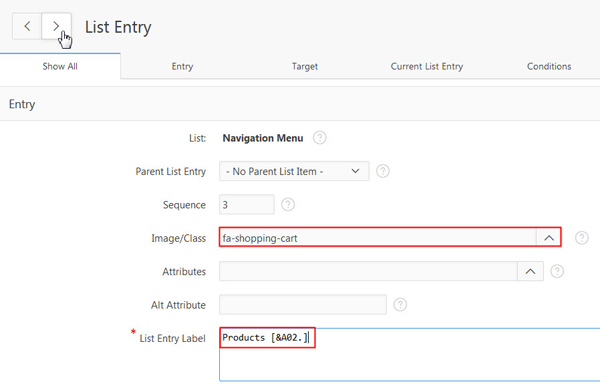
Edit the Products list entry. Enter fa-shopping-cart for Image/Class, and Products [&A02.] for List Entry Label, then go to the next list item.
Description of this image -
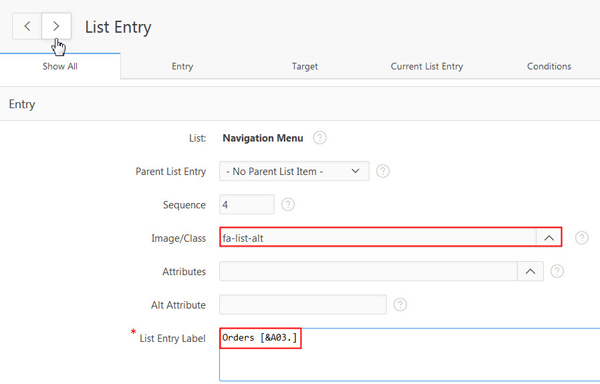
Edit the Orders list entry. Enter fa-list-alt for Image/Class, and Orders [&A03.] for List Entry Label, then go to the next list item.
Description of this image -
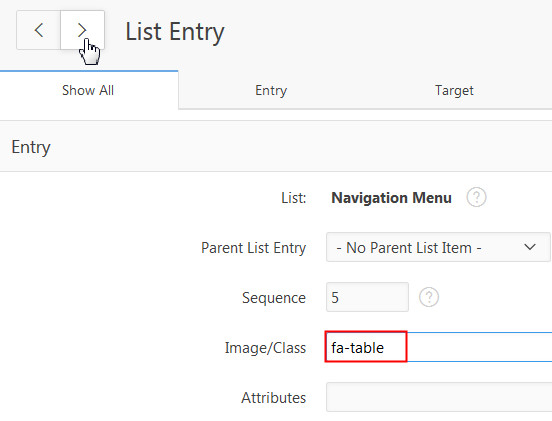
Edit the Reports list entry. Enter fa-table for Image/Class , then go to the next list item.
Description of this image -
Edit the Administration list entry. Select the LOV icon for Image/Class, select an appropriate icon, such as fa-gear, then click Apply Changes to save the list entry.
Creating Application Items
Now you will add the application items for the counters in the list.
-
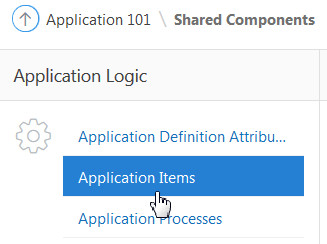
Click Shared Components, then click Application Items.
Description of this image -
Click Create.
-
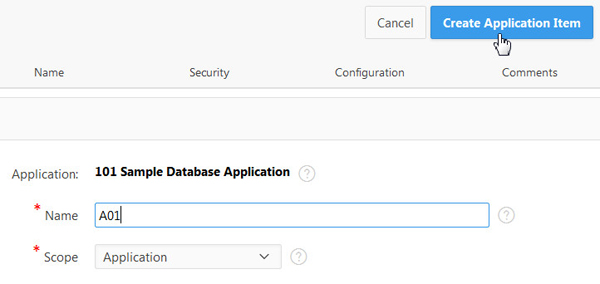
Enter Name as A01, and then click Create Application Item.
Description of this image -
Create two additional Applications Items - A02 and A03.

Description of this image
Defining Application Computations
Next you need to define application computations to populate the application items.
-
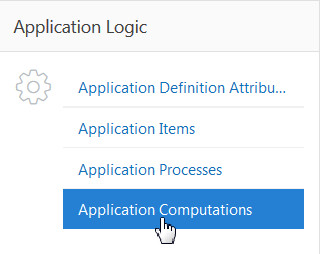
Click Shared Components, then click Application Computations.
Description of this image -
Click Create.
-
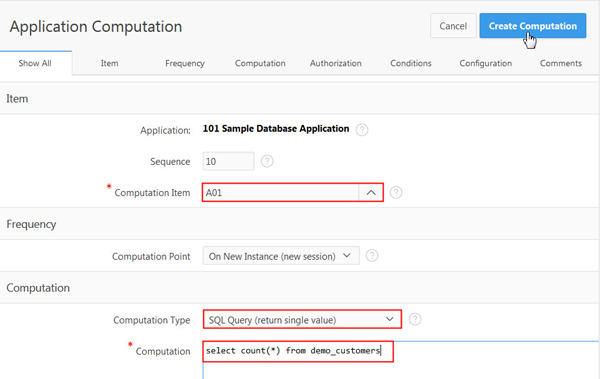
Enter the following details, and then click Create Computation.
-
Computation Item: A01
-
Computation Type: SQL Query (return single value)
-
Computation:
select count(*)
                                          from demo_customers
Description of this image -
-
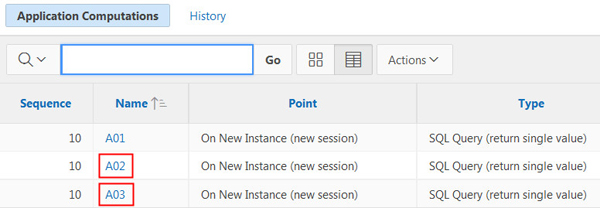
Create two additional Application Computations -
-
Computation Item: A02, Computation Type: SQL Query (return single value), Computation:
select count(*) from demo_product_info -
Computation Item: A03, Computation Type: SQL Query (return single value), Computation:
select count(*) from
                                          demo_orders
Description of this image -
-
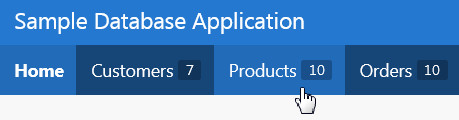
The navigation menu is now complete. Click Run Application to review how the navigation menu looks.
Description of this image 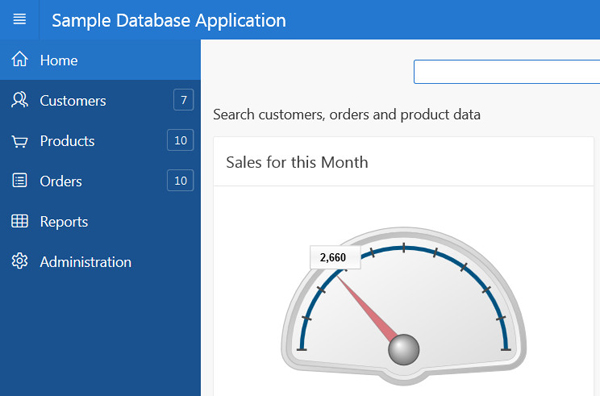
Description of this image
Changing to Top Navigation (optional)
By default the menu is displayed on the left side of the page. If you wish to move the menu to the top of the page, as it was when using Tabs, then perform the following steps:
-
Click Shared Components, then click User Interface Attributes.
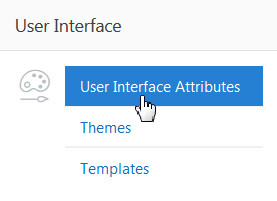
Description of this image -
Click the Edit Desktop icon.
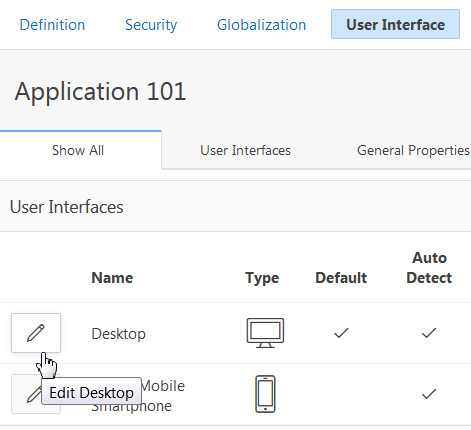
Description of this image -
Under the Navigation Menu section, select Top for Position, and Top Navigation Menu for List Template. Then, click Apply Changes.
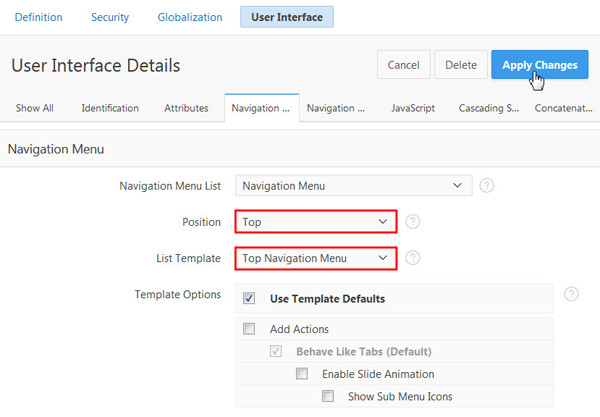
Description of this image Note: The icons are not displayed when the menu is at the top.
Description of this image
Creating and Using List for Navigation
By default, the navigation bar still uses the classic implementation after migrating to the Universal Theme. You will now enter a list for the navigation bar and switch your application to use this new list.
-
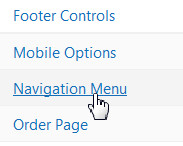
Click Shared Components, then click Lists.
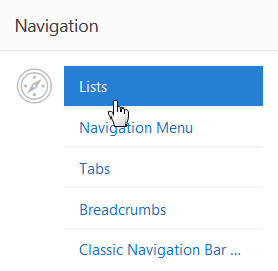
Description of this image -
Click Create >.
-
Accept the default for Source and click Next >. Enter Navigation Bar for Name and click Next >.
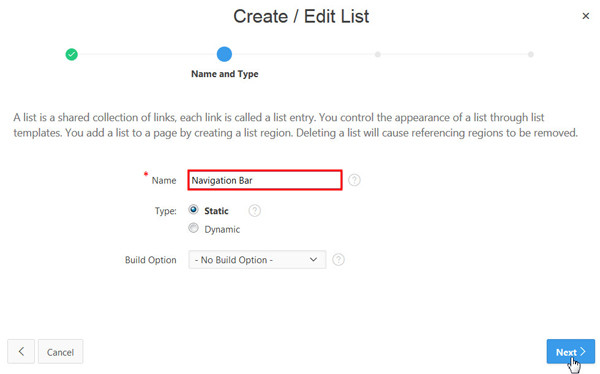
Description of this image -
Enter the following details in the respective fields and click Next >.
-
List Entry Name Mobile, Target Page ID or custom URL 200
-
List Entry Name Help, Target Page ID or custom URL 15
-
List Entry Name Feedback, Target Page ID or custom URL 102
-
List Entry Name &APP_USER., Target Page ID or custom URL #
-
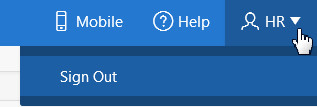
List Entry Name Sign Out, Target Page ID or custom URL &LOGOUT_URL.
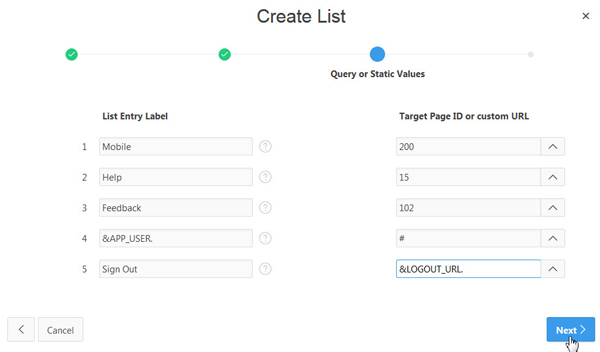
Description of this image -
-
Click Create List.
-
From the Lists page, click the Navigation Bar list entry to edit it.
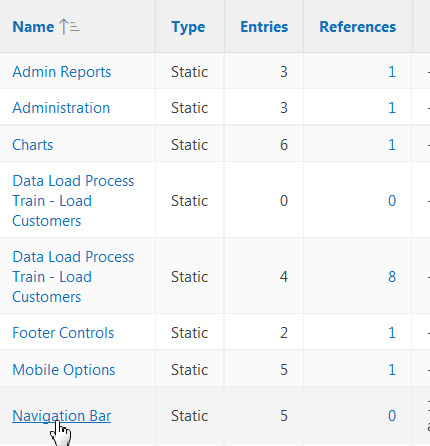
Description of this image -
Edit the list entries and add the following Image/Class for each list entry:
-
Mobile: a-Icon icon-mobile
-
Help: a-Icon icon-help
-
Feedback: fa-bullhorn
-
&APP_USER.: a-Icon icon-user
-
-
Edit the Feedback list entry. Under the Conditions section, select PL/SQL Expression for Condition Type, enter
nvl(:ENABLE_FEEDBACK,
                                      'NO') = 'YES'
for Expression 1, and then click Apply Changes.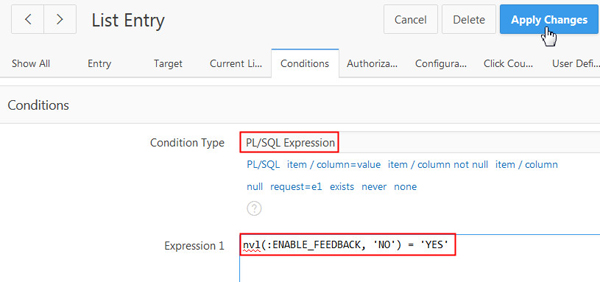
Description of this image -
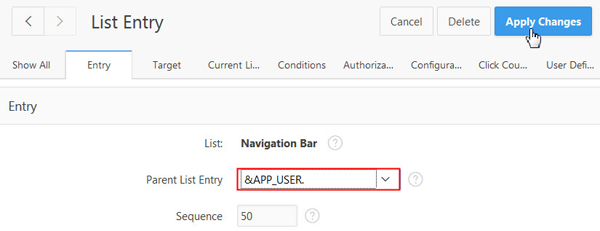
Edit the Sign Out list entry. Select &APP_USER. for Parent List Entry, and then click Apply Changes.
Description of this image -
Now you have created the list, you need to update the desktop user interface to use a list. Click Shared Components and then click User Interface Attributes.
Description of this image -
Click the Edit Desktop icon.
Description of this image -
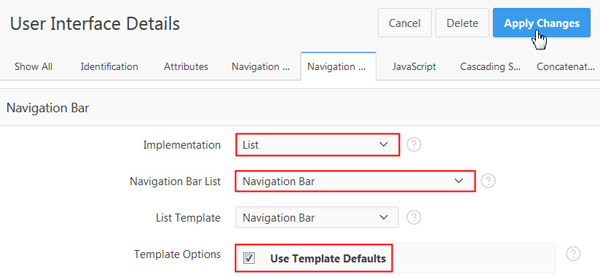
Under the Navigation Bar section, select List for Implementation, select Navigation Bar for Navigation Bar List, and check Use Template Defaults, then click Apply Changes.
Description of this image -
If you had changed to Top Navigation in the previous section, change back to side navigation. Click the Edit Desktop icon. Under the Navigation Menu section, select Side for Position and Side Navigation Menu for List Template, then click Apply Changes.

Description of this image -
The navigation bar is now complete. Click Run Application to review how the navigation bar looks.
Description of this image
Improving the Home Page
In this topic, you enhance various aspects of the home page to make it more visually appealing.
-
First, you address the different size regions on the Home page.
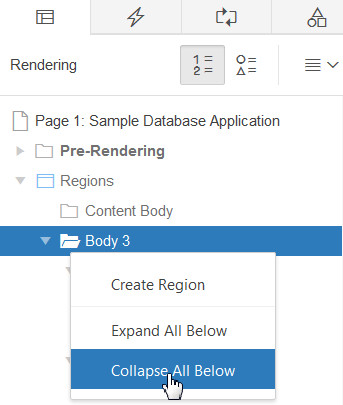
Click Page 1 to load the page using Page Designer. Right-click Body 3, in the Rendering tab, and then select Collapse All Below. Then, expand the Body 3 node.
Description of this image 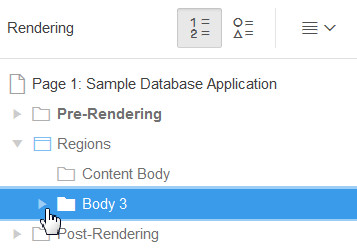
Description of this image -
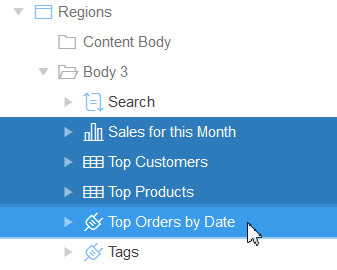
Hold the control key and select the Sales for this Month, Top Customers, Top Products, and Top Orders by Date regions. Enter i-h240 for CSS Classes, in the Property Editor, and then click Save.
Description of this image 
Description of this image -
Now update the various buttons on the page.
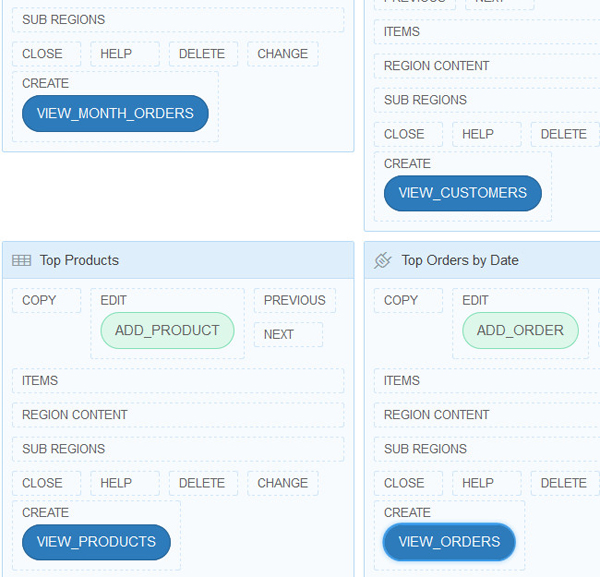
In the Grid Layout, hold the control key and select the VIEW_MONTH_ORDERS, VIEW_CUSTOMERS, VIEW_PRODUCTS, and VIEW_ORDERS buttons. In the Property Editor, select Edit for Button Position, select Icon for Button Template, and enter fa-chevron-right for Icon CSS Classes, and then click Save.
Description of this image 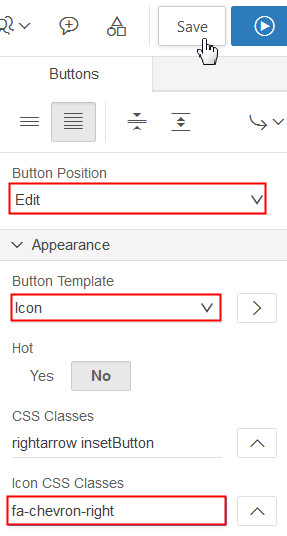
Description of this image -
Similarly, in the Grid Layout, hold the control key and select the ADD_CUSTOMER, ADD_PRODUCT, and ADD_ORDER buttons. In the Property Editor, select Edit for Button Position, select Icon for Button Template, and enter fa-plus for Icon CSS Classes, and then click Save.
-
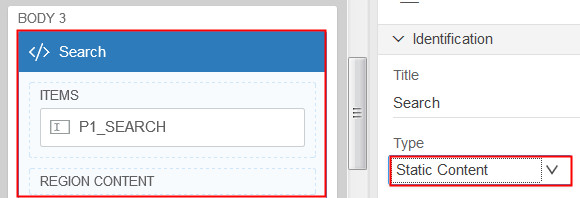
Now, you improve the Search item.
In the Grid Layout, select the Search region, and in the Property Editor, select Static Content for Type. Select P1_SEARCH Item, click Use Template Defaults from Template Options and select X Large for Size, then click OK. In the Property Editor, copy the value from the Label attribute into the Value Placeholder attribute, and then click Save.
Description of this image 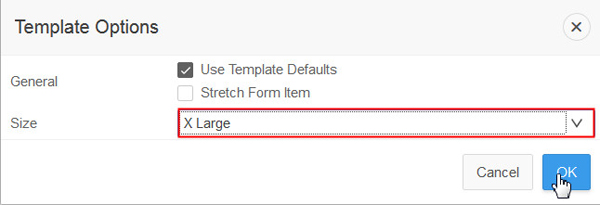
Description of this image 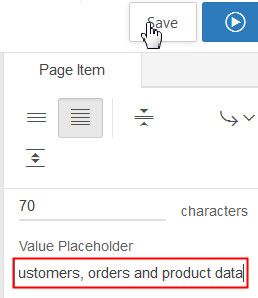
Description of this image -
Click Run Application to review the updated home page. Note that the page could be further improved by importing plug-ins from the Packaged Applications and replacing various dashboard regions.

Description of this image
Improving the Customer Pages
In this section, you update the customer pages.
-
First, you update the Customers Interactive Report.
Click Page 2 to load the page using Page Designer. Hold the control key and select the UPLOAD_DATA and NEW buttons, and then change the Region to Breadcrumb [Global Page], the Button Position to Edit, and the Button Template to Text with Icon.
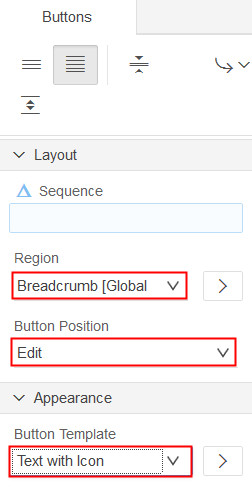
Description of this image -
In the Rendering tab, select just the UPLOAD_DATA button, and then clear the CSS Classes attribute and enter fa-gear for Icon CSS Classes.
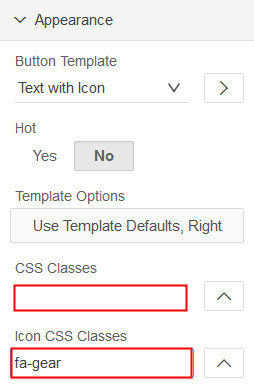
Description of this image -
Similarly, select the NEW button in the Rendering tab, and then clear the CSS Classes attribute and enter fa-chevron-right for Icon CSS Classes. Then, click the Save button.
-
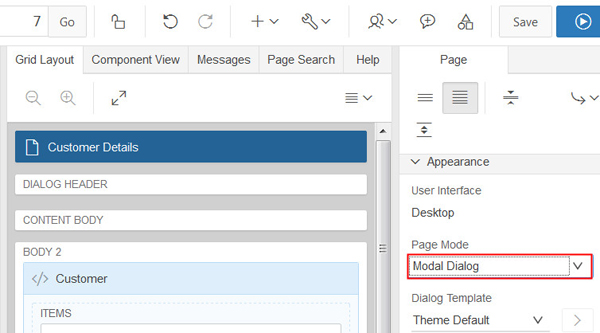
Now update the Customer Details page. Click Page 7 to load the page using Page Designer, then change the Page Mode to Modal Dialog.
Description of this image -
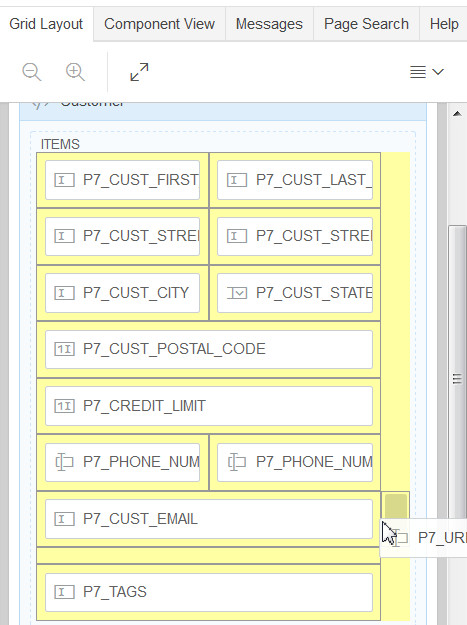
Using the Grid Layout, move the following items to be on the same line as the preceding items:
-
P7_CUST_LAST_NAME
-
P7_CUST_STREET_ADDRESS2
-
P7_CUST_STATE
-
P7_PHONE_NUMBER2
-
P7_URL
Note: Alternatively, you can set the Grid > Start New Row attribute for these items to No.
Description of this image -
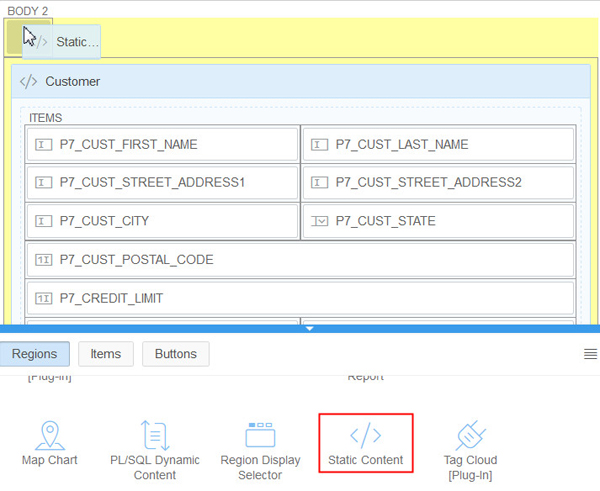
-
Drag a Static Content region from the Gallery and drop it above the Customer region in the Grid Layout. Rename the region Title to Carousel, and update the Template to Carousel Container. Update the Template Options - Check the Remove Body Padding, change the Animation to Spin, and change the Header to Hidden. Then, click OK.
Description of this image 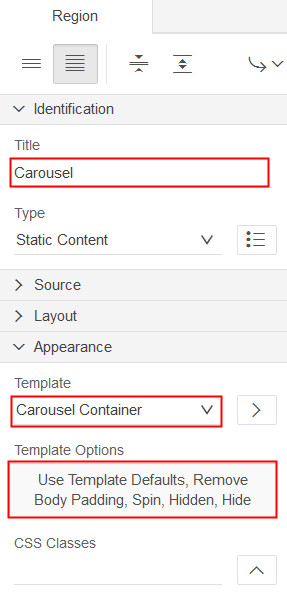
Description of this image -
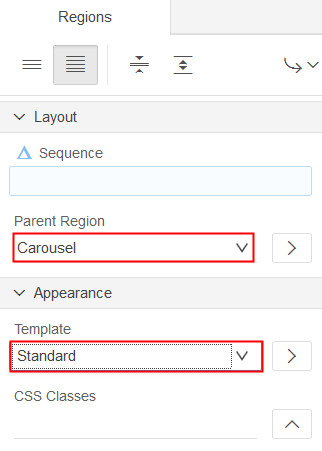
Hold the control key and select the Customer and Orders for this Customer regions, set the Parent Region to Carousel and the Template to Standard.
Description of this image -
Hold the control key and select the CANCEL, DELETE, SAVE, and CREATE buttons, set the Button Position to Bottom of Region and set the Button Template to Text, and then click Save.

Description of this image 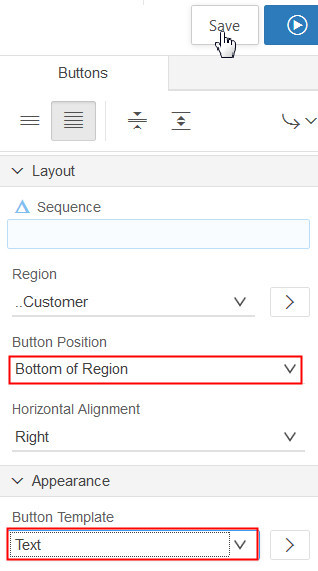
Description of this image -
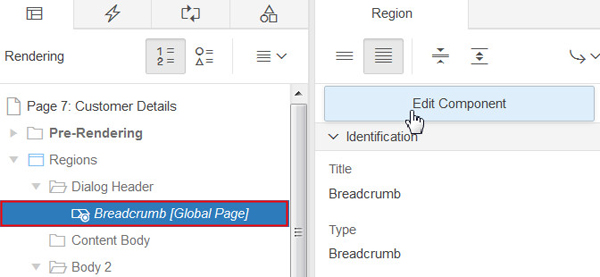
In the Rendering tab, select the Breadcrumb [Global Page] region under the heading Dialog Header, and then click Edit Component. Change the Condition - Pages to 1,6,7,101,102, and then click Save.
Description of this image 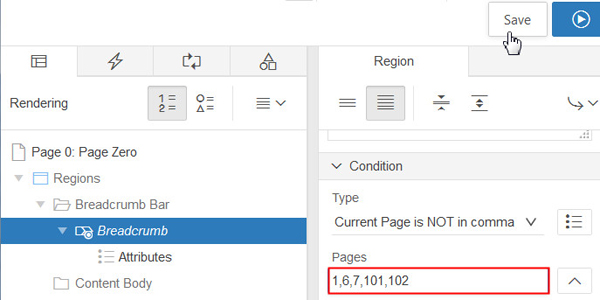
Description of this image -
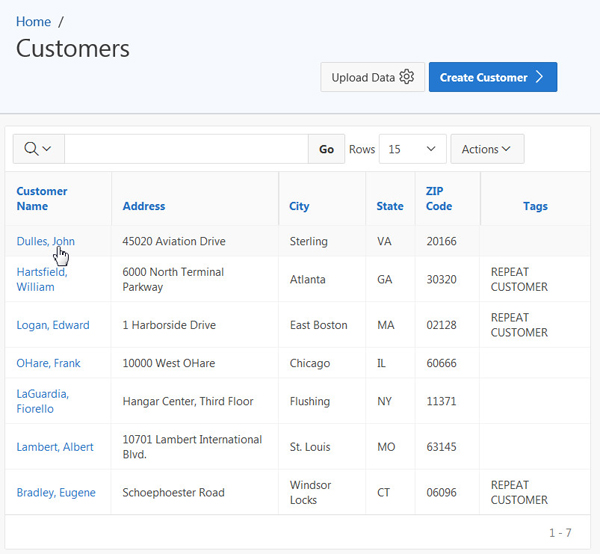
Run the Sample Database Application from Page 2 (Customers page). Click any customer name to load the customer details in a modal window.
Description of this image 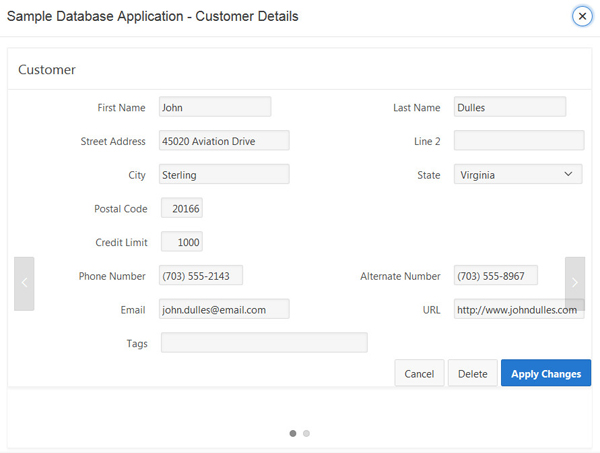
Description of this image
Improving the Product Pages
In this section, you update the product pages.
-
First, you convert the Products Interactive Report into a Card region.
Click Page 3 to load the page using Page Designer. Update the Products region, and set the Type to Classic Report. Replace the SQL Query with the following code:
select p.product_name card_title,
decode(nvl(dbms_lob.getlength(p.product_image),0),0,null,'<img src="'||apex_util.get_blob_file_src('P6_PRODUCT_IMAGE',p.product_id)||'" height="75" width="75" />') card_text,
'Category: '||p.category ||', List Price: $'||p.list_price card_subtext,
apex_util.prepare_url('f?p='||:app_id||':6:'||:app_session||'::::P6_PRODUCT_ID,P6_BRANCH:'||p.product_id||','||3) card_link
from demo_product_info p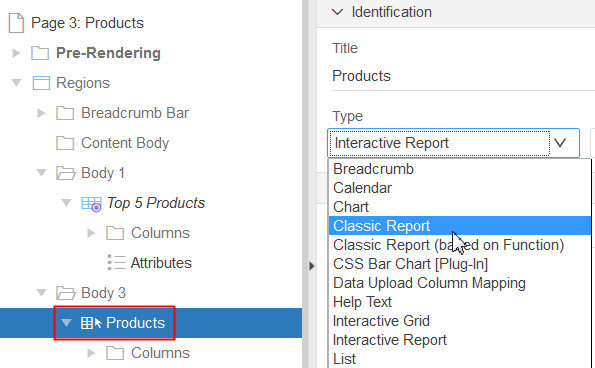
Description of this image 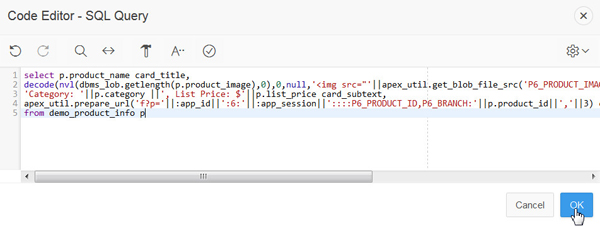
Description of this image -
In the Rendering tab, expand Columns under the Products region and select the CARD_TEXT column. Change the Escape special characters attribute to No.
Description of this image -
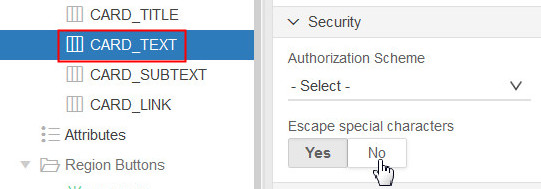
In the Rendering tab, select Attributes under Products region and change the Template to Cards. Update the Template Options and set Layout to 5 columns, and click Save.
Description of this image -
Now update the Product Details page.
Click Page 6 to load the page using Page Designer, then change the Page Mode to Modal Dialog.
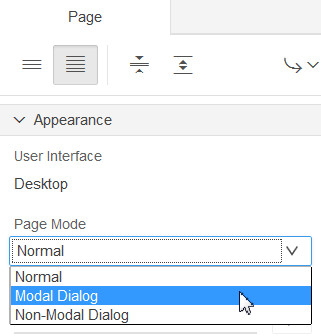
Description of this image -
Select the Product Details region and change the Template to Blank with Attributes.
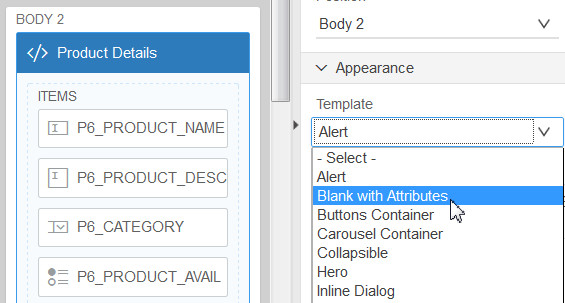
Description of this image -
Hold the control key and select the CANCEL, DELETE, SAVE, and CREATE buttons, set the Button Position to Bottom of Region, and set the Button Template to Text.
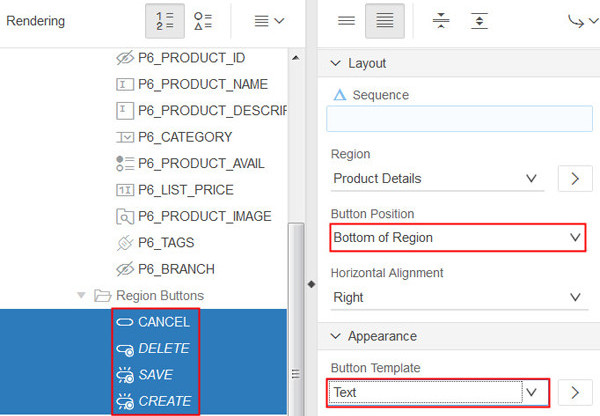
Description of this image -
In the Rendering tab, right-click P6_TAGS and delete it.
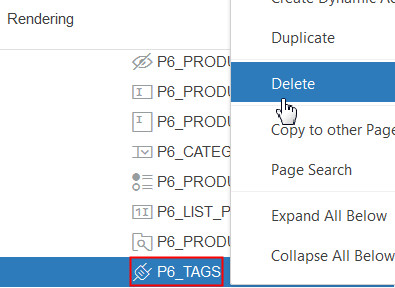
Description of this image -
Save the page and run the Sample Database Application from Page 3 (Products page). Click any product in the Products page to load the Product Details in a modal window.
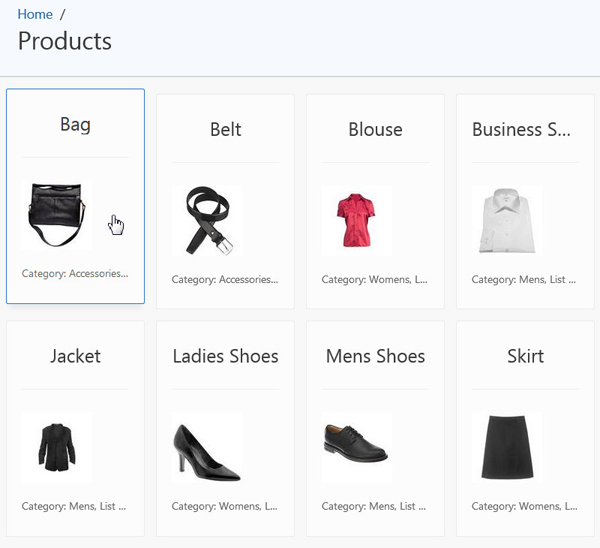
Description of this image 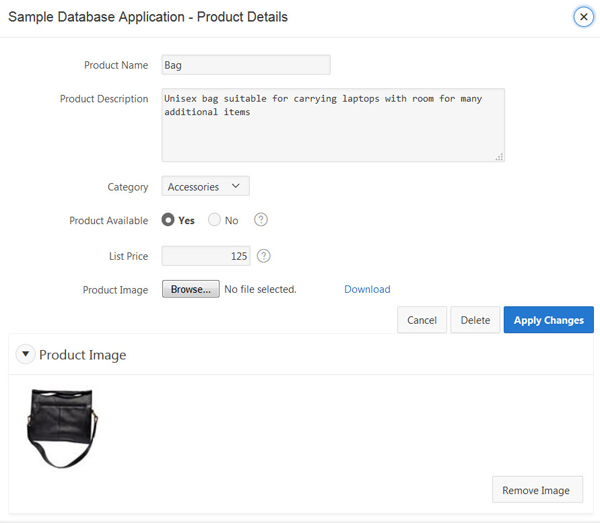
Description of this image