Before You Begin
Purpose
This tutorial describes how to customize the style of your application using the Developer tool and Theme Roller in Oracle Application Express 5.1.
Time to Complete
Approximately 30 minutes.
Background
Oracle Application Express is a rapid web application development tool for the Oracle Database. Using only a web browser and limited programming experience, you can develop and deploy professional applications that are both fast and secure. Oracle Application Express is available with the Oracle Database, whether it's on-premises or in the Oracle Cloud.
In this tutorial, you use Oracle Application Express Release 5.1 to customize the style of your application using Theme Roller. Theme Roller is a live CSS editor that enables developers to quickly change the colors, rounded corners, and other attributes of their applications without touching a line of code.
What Do You Need?
Before starting this tutorial, you should:
- Have access to an Oracle Database 11g or later release, either on-premises or in a Database Cloud Service.
- Install Oracle Application Express Release 5.1 into your Oracle Database (for on-premises only). If you are using Oracle Database Cloud Service, the application is already installed for you.
- Provision at least one Oracle Application Express user. See Creating New User Accounts in Oracle Application Express Administration Guide.
- Download and unzip the files.zip into your working directory.
-
All files for this hands-on activity are located in the
Home/Desktop/APEX_Track/filesfolder. The following files are used in this hands-on activity:
Oracle-logo.png
Installing a Packaged Application
Before editing the style of an application, you need to create or import an application. In this tutorial, you import a packaged Database application that is already available in Oracle Application Express. Perform the following steps:
-
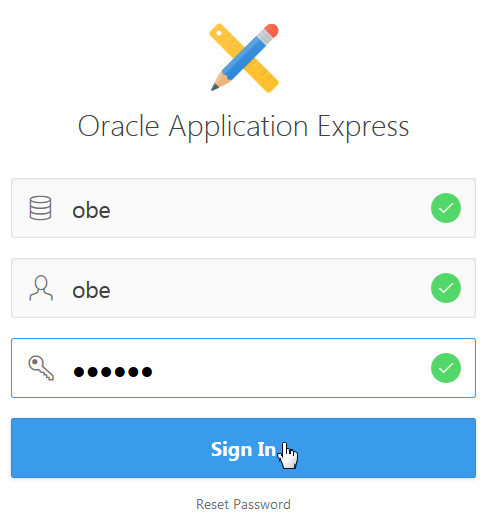
In the Application Express login page, enter the following login credentials and click Sign In:
-
Workspace: obe
-
Username: obe
-
Password: oracle
Description of this image -
-
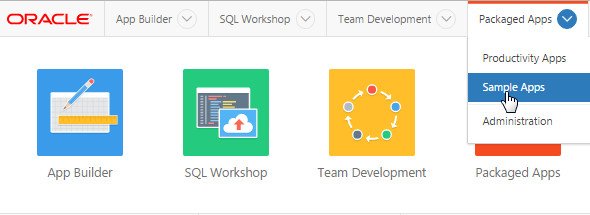
From the Oracle Application Express home page, click the down arrow next to the Packaged Apps tab, and select Sample Apps.
Description of this image -
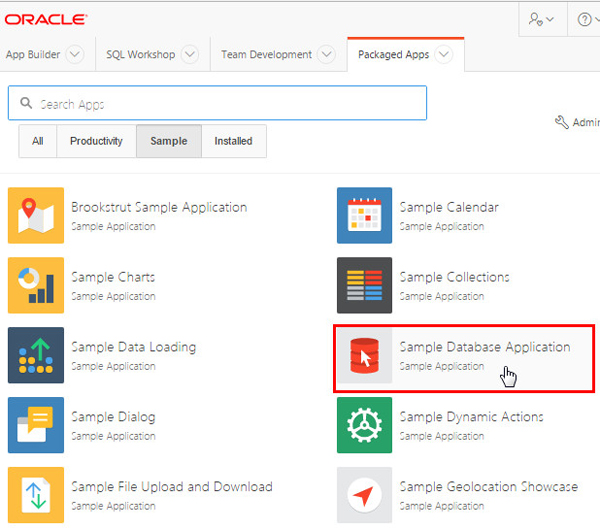
From the list of sample applications, select Sample Database Application.
Description of this image -
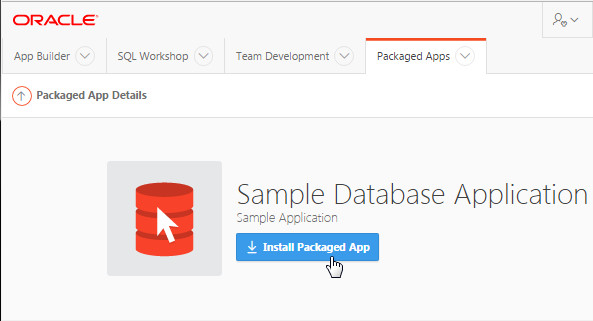
Click Install Packaged App to initiate the process of installing the sample application.
Description of this image -
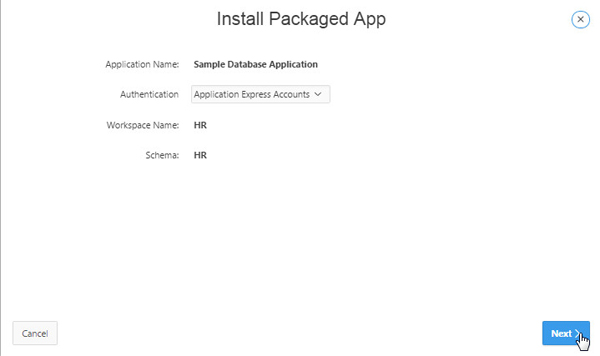
In the Install Packaged App window, accept the defaults and click Next>.
Description of this image -
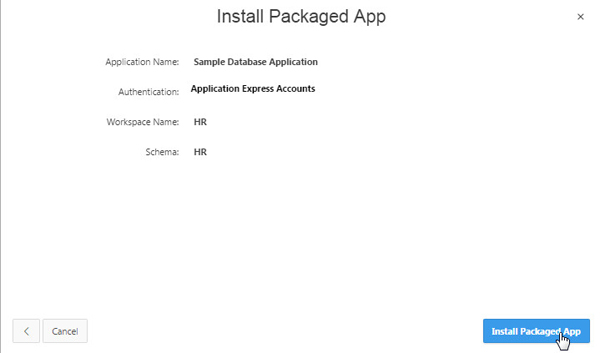
Click Install Packaged App. The application gets installed in your workspace.
Description of this image -
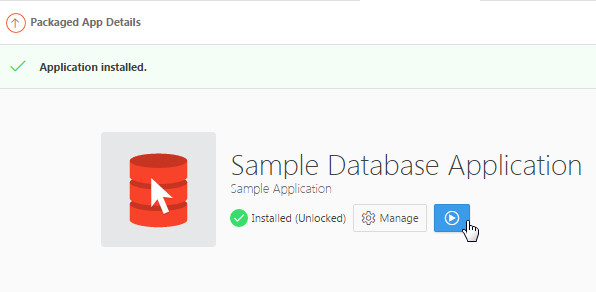
Click the Run icon to run the application.
Description of this image -
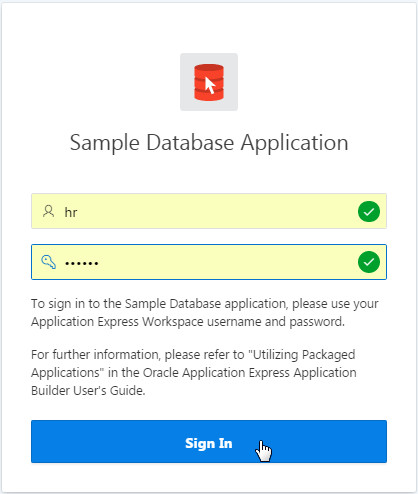
Enter the Log In details and click Sign In.
Description of this image -
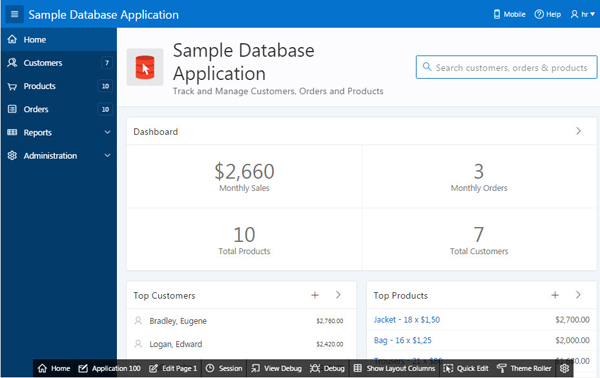
The Sample Database Application is displayed with a default blue theme style named Vita.
Description of this image
Configuring the Header and Footer of the Application
Adding a Header
Perform the following steps to add an Oracle logo to the packages application:
Note: You can download and add any logo of your choice to the application by performing the same set of steps.
-
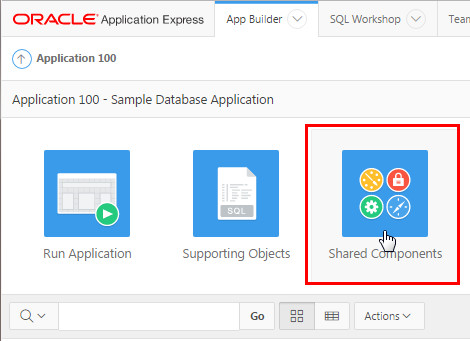
In the Sample Database Application, click Application <n> in the runtime toolbar at the bottom of the screen.

Description of this image -
Click Shared Components.
Description of this image -
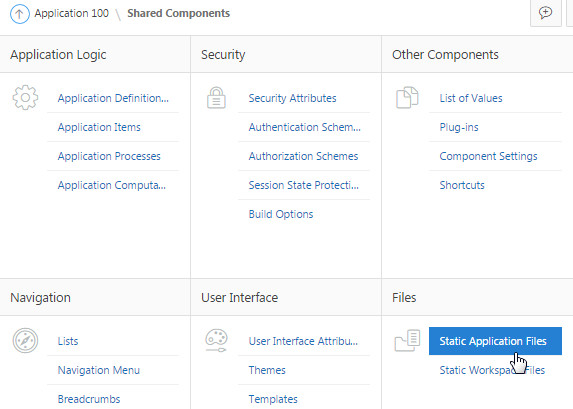
In the Files section, select Static Application Files.
Description of this image -
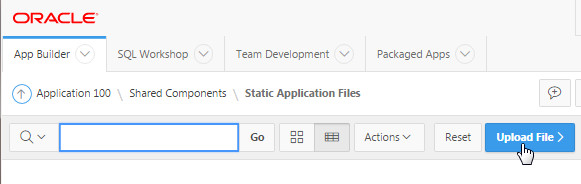
Select Upload File >.
Description of this image -
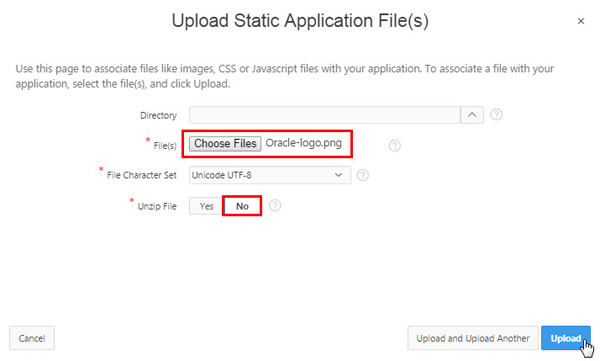
Choose the logo to upload. In this case, select Oracle-Logo.png from the files folder that you downloaded at the start of the OBE. Select No for Unzip File, and click Upload.
Choose the Oracle-Logo.png file from the files folder to upload. Select No for Unzip File, and click Upload.
Description of this image -
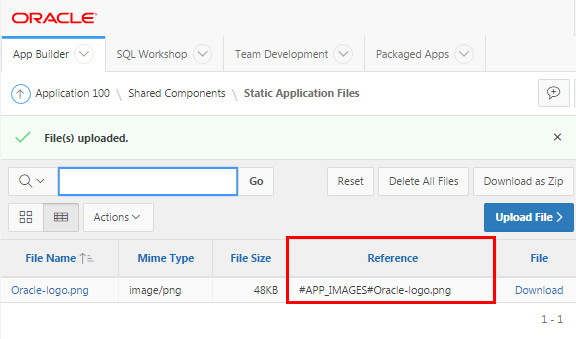
The logo is successfully uploaded as a static application file and is only available to this application. Also, a reference value to the logo is created for you to use in your application. Copy the reference value into any text editor. You will be using it in Step 9.
Description of this image -
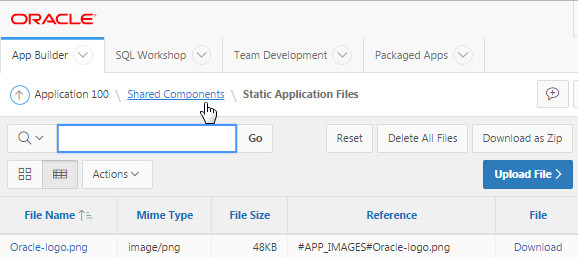
Navigate back to the Shared Components page.
Description of this image -
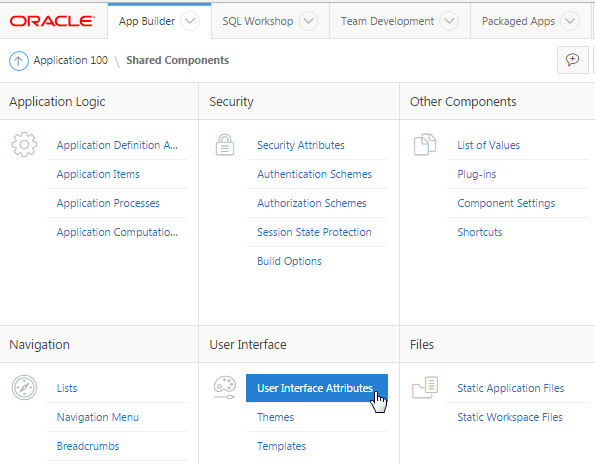
In the Shared Components page, under User Interface, select User Interface Attributes.
Description of this image -
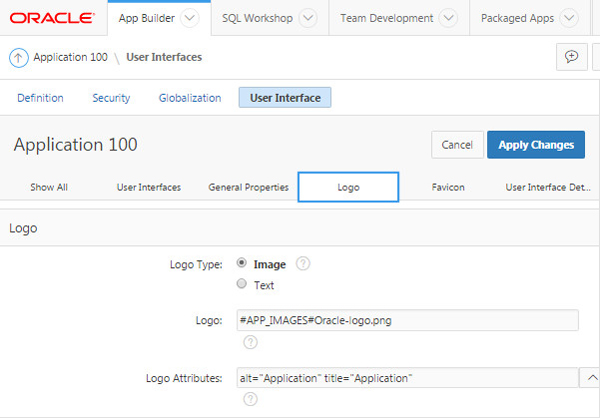
In the User Interface page, select Logo in the header menu and perform the following steps:
- Select Image as the logo type.
- Enter the reference value #APP_IMAGES#Oracle-logo.png in the Logo text field.
- Click the pop-up icon next to the Logo Attributes field, and select Image Attributes.
Description of this image -
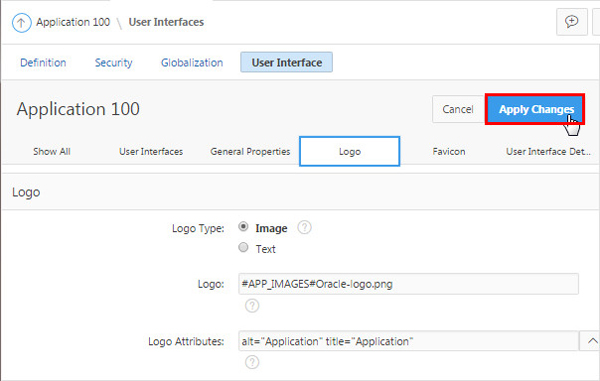
Click Apply Changes to save the changes made to the application.
Description of this image -
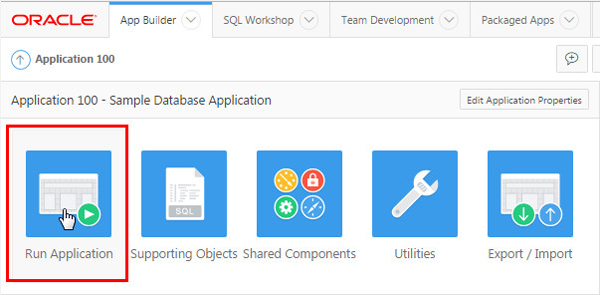
In the Application page, click Run Application.
Description of this image -
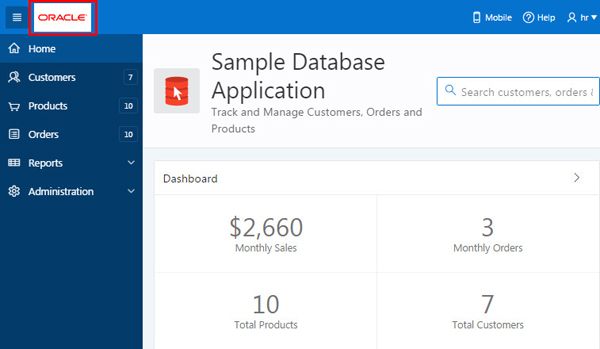
If prompted, Sign In to the application. You see that the Oracle logo appears in the header section.
Description of this image
Adding a Footer
Perform the following steps to edit the footer of the packaged application and add the Oracle copyright information.
-
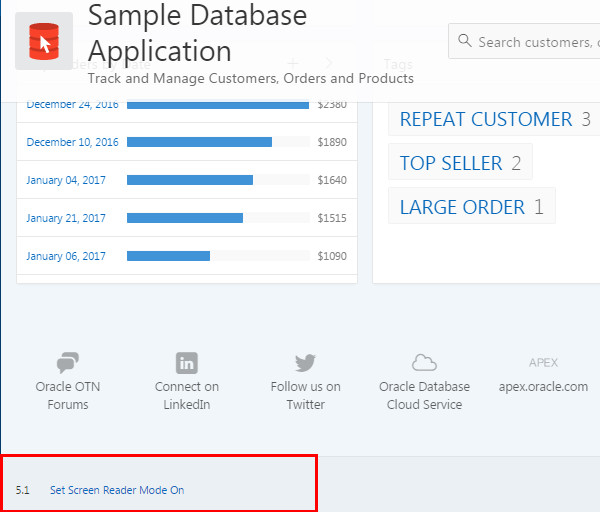
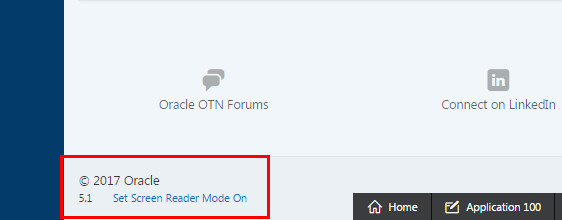
Scroll down to the bottom of the Sample Database application and notice the existing footer. You see that only the screen reader mode information is displayed in the footer.
Description of this image -
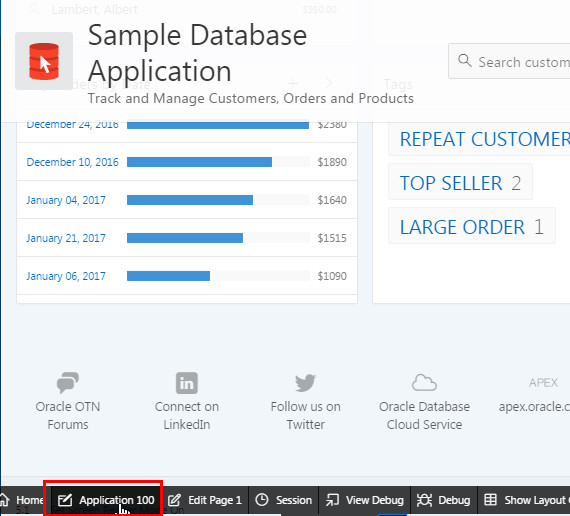
Click Application <n>. in the runtimer toolbar to navigate to the Application Home page.
Description of this image -
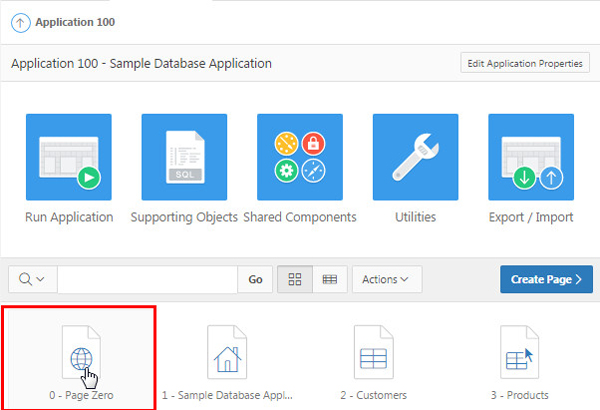
Click the global page titled 0 - Page Zero to edit the attributes.
Description of this image -
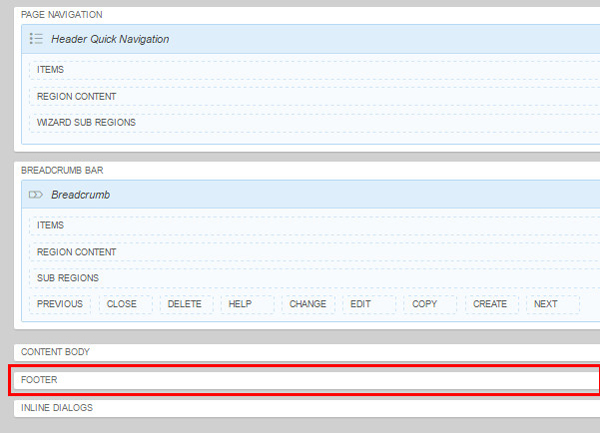
In the Page Layout, scroll down to the footer section. Notice that the footer is empty.
Description of this image -
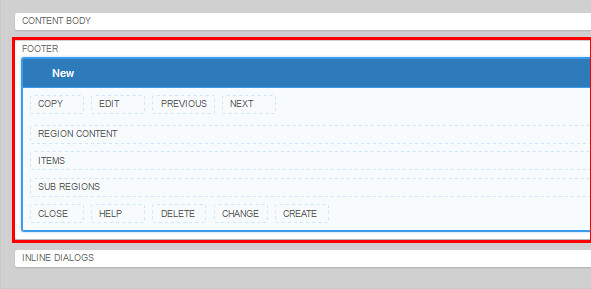
Navigate to Regions, drag and drop a Static Content region container to the footer section.
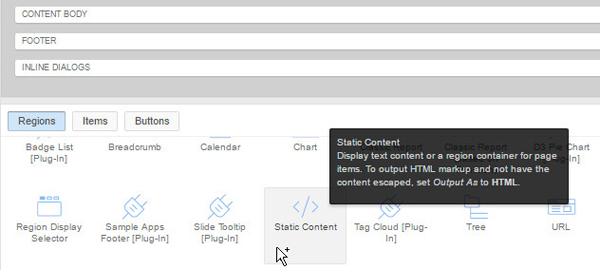
Description of this image The footer now displays a static content region container.
Description of this image -
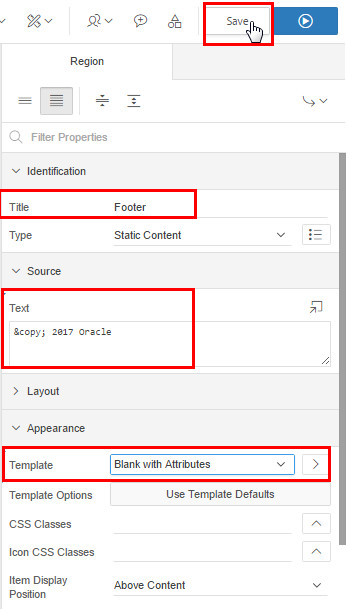
Update the attributes of this region in the Property editor. Perform the following steps:
- Update the title to Footer.
- Scroll down to the Source section and enter © 2017 Oracle in the text field.
- Scroll down to the Appearance section, click the pop-up menu button next to Template and select Blank with Attributes.
- Click Save.
Description of this image -
Navigate back to the application home page and click Run Application.
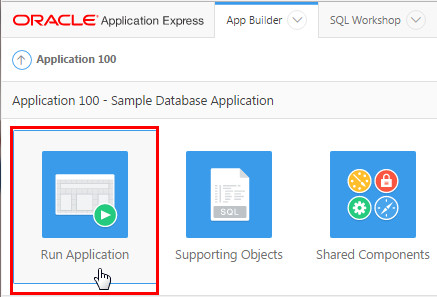
Description of this image -
Sign In to the application if prompted. You see the footer displaying the copyright information.
Description of this image
Using Theme Roller
You use the Theme Roller feature in Oracle Application Express to customize the style of your application during runtime. Perform the following steps to customize the current theme style:
Note: The Theme Roller window is displayed in the Runtime Toolbar only if theme styles have been defined.
-
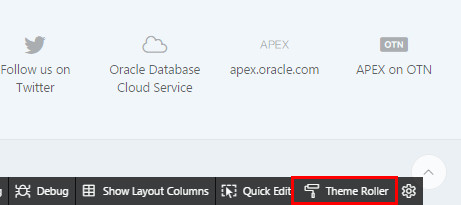
Click Theme Roller in the Runtime Toolbar. Theme Roller fetches the styles for your application and loads them in the editor.
Description of this image -
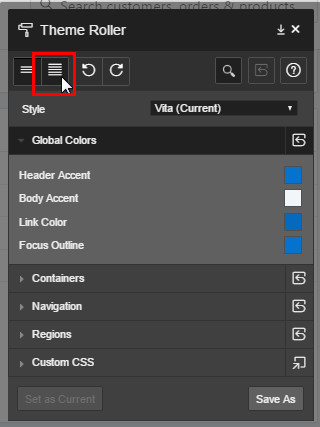
In the Theme Roller dialog, click the Show All button. You will see all attributes that you can modify using Theme Roller.
Description of this image -
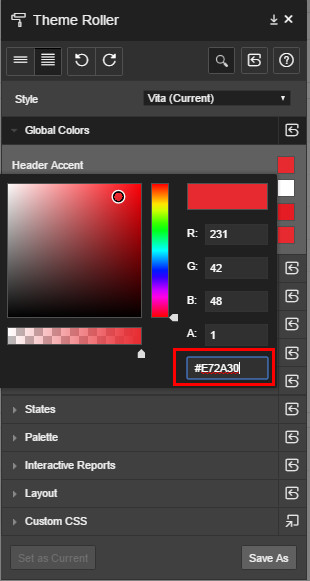
Click the Header Accent color under Global Colors header, and update the color to #E72A30.
Note: You can directly update the color to Red by clicking on the red color in the color chart as an alternate to updating the Header Accent color.
Description of this image -
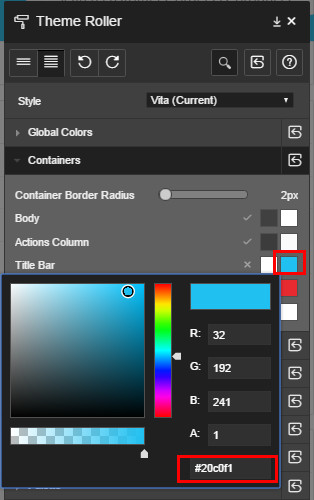
Notice that Oracle Application Express updates the Link Color and the Focus Outline color fields to match the Header Accent color. Also, the application header, links, and focus outline are also updated to red. Expand the Containers heading. Update the Background Color of the Title Bar to #20C0F1.
Description of this image -
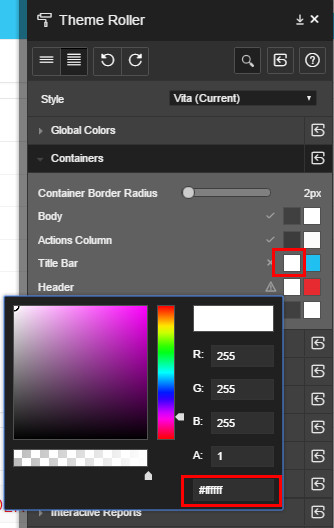
Update the Foreground Color of the Title Bar to #FFFFFF.
Description of this image -
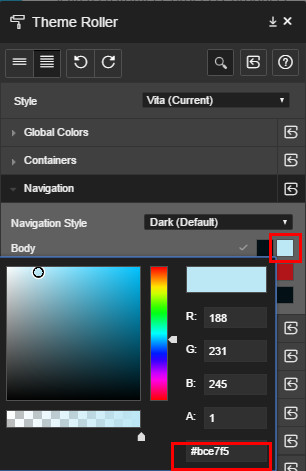
Expand the Navigation heading and update the Body Background color to #BCE7F5.
Description of this image -
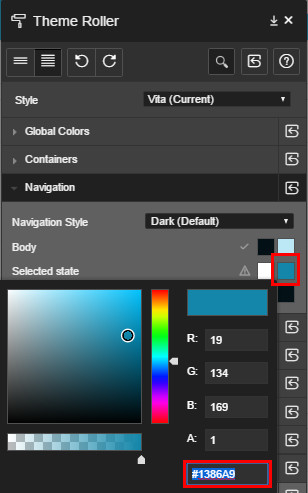
Update the Selected State Background to #1386A9.
Description of this image
Adding Custom CSS to Theme Roller and Saving the Theme
You can also add custom CSS in the Theme Roller dialog to change the style of the application. Perform the following steps to add the following CSS code to Theme Roller:
-
In the Theme Roller dialog box, expand the Custom CSS header and add the following code to the code box:
.t-Header-logo-link span {font-weight: bold;}
.a-TreeView-content {
  box-shadow: 4px 0 0 rgba(0,0,0, 0.25) inset;
}
.a-TreeView-content.is-selected {
  box-shadow: 4px 0 0 rgba(0,0,0, 0.5) inset;
}
.a-TreeView-content.is-selected .a-TreeView-label {
  font-weight: bold;
}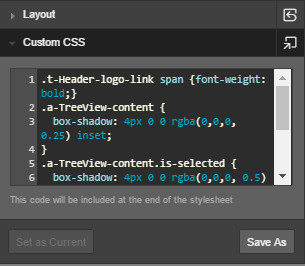
Description of this image -
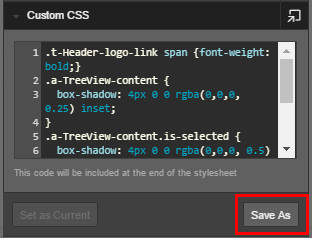
Click the Save As Button to save the changes made to the application theme.
Description of this image -
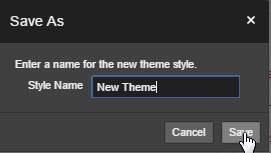
Enter New Theme as the style name and click Save.
Description of this image -
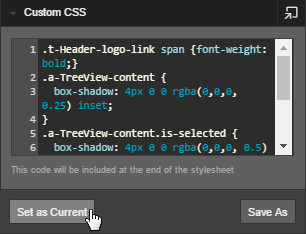
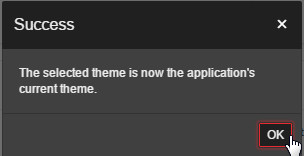
Notice that even though you have saved the theme style, it is not applied to your application. Click the Set as Current button to apply the theme style to this application.
Description of this image -
A pop-up dialog appears indicating that the new theme is now the application's current theme. Click OK.
Description of this image -
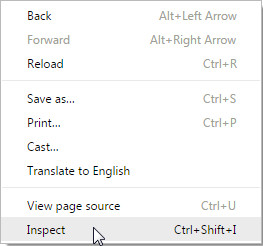
Right click anywhere on the screen and select Inspect to open the Browser's developer tools.
Description of this image -
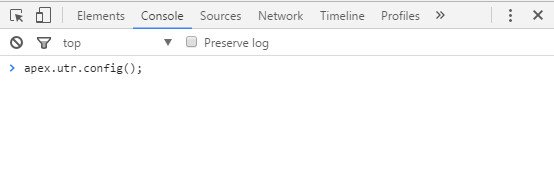
In the developer tools window, click Console, type apex.utr.config(); in the editor, and click Enter.
Description of this image -
The console shows a few lines of code with a comment saying "Paste the following line of code into the JS console to load your current configuration into Theme Roller". Copy the code and paste it in your text editor. The code looks similar to this:
apex.utr.config({"customCSS":".t-Header-logo-link span {font-weight: bold;}\n.a-TreeView-content {\n box-shadow: 4px 0 0 rgba(0,0,0, 0.25) inset;\n}\n.a-TreeView-content.is-selected {\n box-shadow: 4px 0 0 rgba(0,0,0, 0.5) inset;\n}\n.a-TreeView-content.is-selected .a-TreeView-label {\n font-weight: bold;\n}\n","vars":{"@g_Accent-BG":"#e72a30","@g_Body-Title-BG":"#20c0f1","@g_Body-Title-FG":"#ffffff","@g_Nav-BG":"#bce7f5","@g_Nav-Active-BG":"#1386a9"}});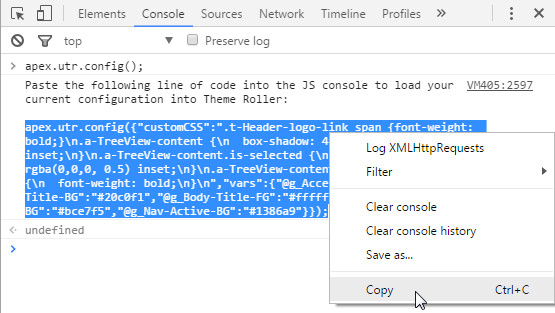
Description of this image You will use the code in the next section of this tutorial to export this theme to another application.
-
Click the Home button in the Application runtime toolbar to navigate to the Application Express Home page.

Description of this image
Exporting the Theme Style to Another Application
Before exporting the new theme style to another application, you need to create a Database application to which you want to import the theme style. Perform the following steps to create a database application:
-
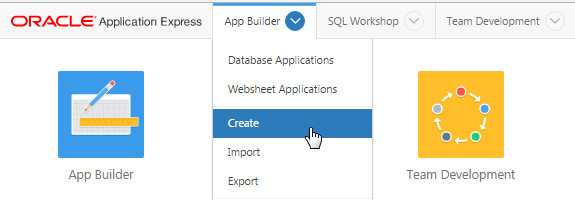
In the Oracle Application Express home page, click the down arrow next to the App Builder tab, and select Create.
Description of this image -
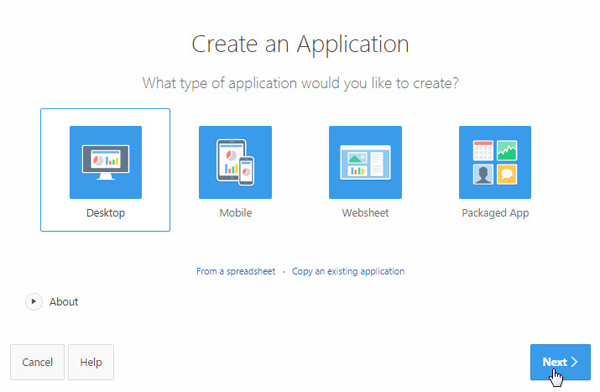
Accept the default and click Next >.
Description of this image -
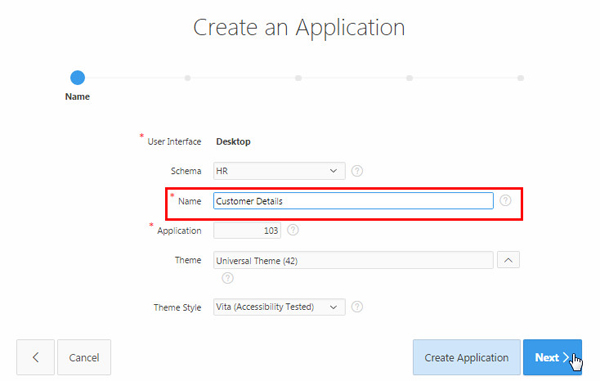
Enter Sample for Name, and click Next >.
Description of this image -
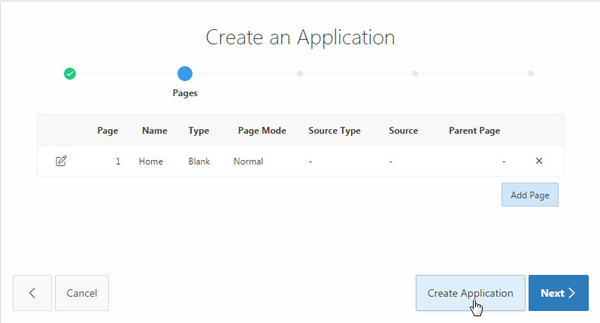
By default, the Home page gets created. Click Create Application to create the sample application.
Description of this image -
Verify the selections made in the previous pages and click Create Application.
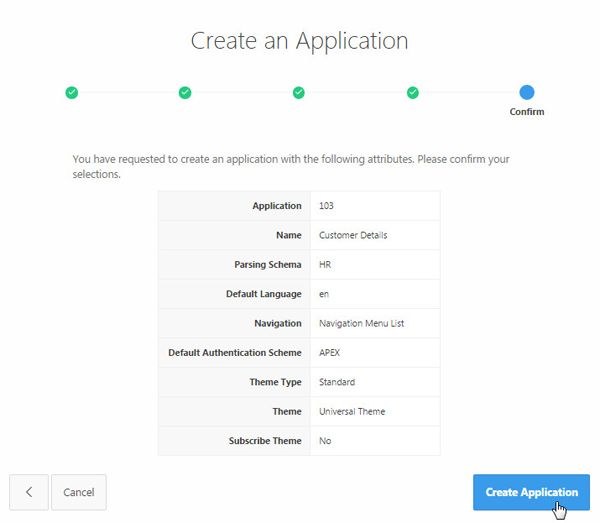
Description of this image -
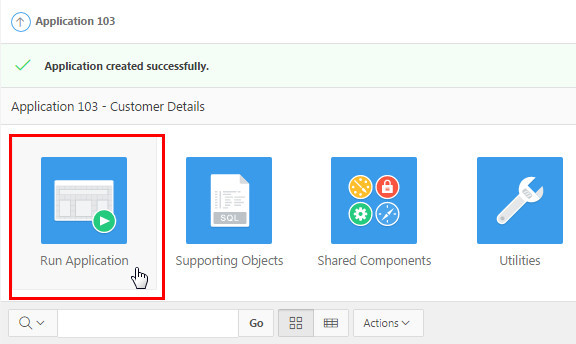
Click Run Application to see this application in action.
Description of this image -
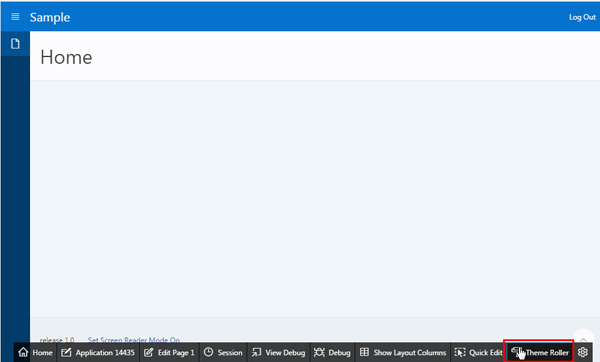
In the Sample application home page, click the Theme Roller button in the application's runtime toolbar.
Description of this image -
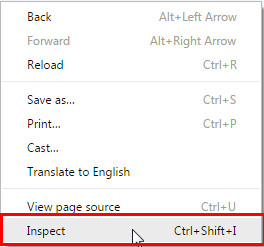
Right click anywhere on the screen and select Inspect to open the browser's developer tools.
Note: To copy the theme style from another application, make sure you open the Theme Roller window before selecting the Inspect option.
Description of this image -
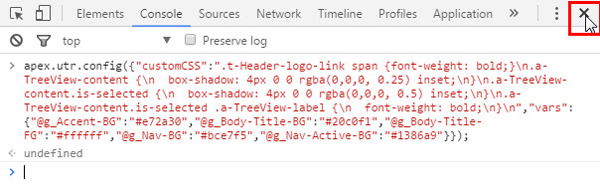
In the top menu, select Console, paste the code that you copied from the previous application, and click Enter.
apex.utr.config({"customCSS":".t-Header-logo-link span {font-weight: bold;}\n.a-TreeView-content {\n box-shadow: 4px 0 0 rgba(0,0,0, 0.25) inset;\n}\n.a-TreeView-content.is-selected {\n box-shadow: 4px 0 0 rgba(0,0,0, 0.5) inset;\n}\n.a-TreeView-content.is-selected .a-TreeView-label {\n font-weight: bold;\n}\n","vars":{"@g_Accent-BG":"#e72a30","@g_Body-Title-BG":"#20c0f1","@g_Body-Title-FG":"#ffffff","@g_Nav-BG":"#bce7f5","@g_Nav-Active-BG":"#1386a9"}});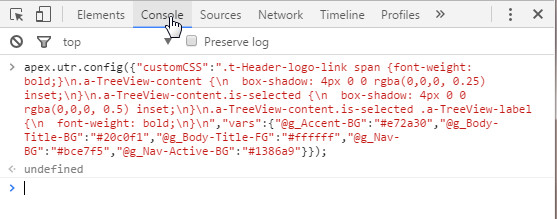
Description of this image -
The theme from the packaged application gets copied to this application. Close the browser's developer tools window.
Description of this image -
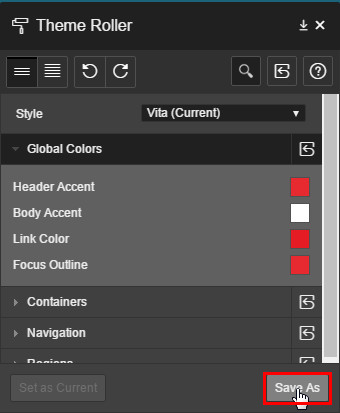
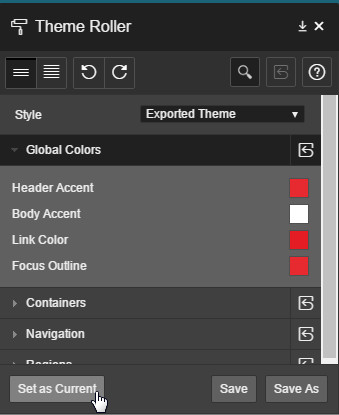
Save the current theme by clicking the Save As button in Theme Roller.
Description of this image -
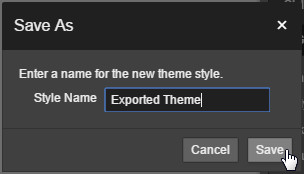
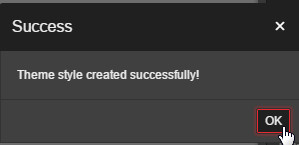
Enter Exported Theme for stye name and click Save.
Description of this image -
You will see a message pop-up saying that the theme is saved successfully. Click OK.
Description of this image -
Click Set as Current Theme in Theme Roller to make this theme as the current theme of this application.
Description of this image -
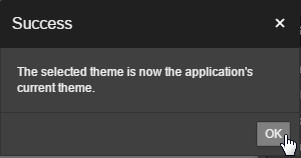
You get a pop-up message saying that The selected theme is now the application's current theme. Click OK. The theme is successfully imported to your current application.
Description of this image