Before You Begin
Purpose
This tutorial covers creating a RESTful Web Service and accessing the Web Service through an application in Application Express 5.1. It also covers consuming the Web Service using a REST client.
Time to Complete
Approximately 40 minutes.
Overview
Web Services enable applications to interact with one another over the web in a platform-neutral, language independent environment. In a typical Web Services scenario, a business application sends a request to a service at a given URL by using the protocol over HTTP. The service receives the request, processes it, and returns a response. Web Services are typically based on Simple Object Access Protocol (SOAP) or Representational State Transfer (REST) architectures. RESTful Web Services are result oriented. The scope of the Web Service is found in the URI and the method of the service is described by the HTTP method that is used such as GET, POST, PUT, and DELETE.The RESTful Web Service Wizard is a set of pages in
the SQL Workshop area of Oracle Application Express
that help you to create a RESTful Web Service
declaratively. Once you have defined a RESTful Web
Service, you can call it with a unique Uniform
Resource Identifier (URI). RESTful Web Services are
organized within Oracle APEX through a hierarchy of
a module, a resource template and handlers within a
template. The resource template includes a prefix
for the URI, which is completed with a final portion
of the URI defined by the handler.
This tutorial covers creating a RESTful Web Service
declaratively using Oracle Application Express's SQL
Workshop tool, and then consuming the same service
by creating an application and adding a Web Service
Reference to the RESTful Web Service. The RESTful
Web Service is also consumed using a REST client.
Please keep in mind the following while running this tutorial:
- Logging into your Oracle Application
Express workspace: Your Oracle
Application Express workspace may reside in an
on-premises Oracle Database or in Oracle Database
Cloud Services. The login credentials differ
depending on where your workspace is located:
- Logging into Oracle Application Express in a Oracle Database Cloud Service: Go to the Oracle Help Center for Cloud, and select Platform and Infrastructure. From here, select your Database Cloud Service and the Get Started page will appear.
- Logging in to Oracle Application Express on-premises: From your browser, go to the location of your on-premises installation of your Oracle Application Express workspace provided by your Workspace Administrator.
- Application ID: Screenshots in this tutorial show a blurred Application ID. Your Application ID can be any value assigned automatically while creating the application.
- Schema: If you are accessing an Oracle Application Express workspace in Database Schema Service, you have one schema assigned to you with a schema name that you cannot change. If you are accessing the workspace in an on-premises Oracle database, you may have more than one schema assigned to your workspace by the Oracle Application Express Instance Administrator.
What Do You Need?
Before starting this tutorial, you should:
- Have access to an Oracle Database 11.2.x.x or later release, including Enterprise Edition and Express Edition (Oracle Database XE), either on-premises or in a Database Cloud Service.
- Install Oracle Application Express Release 5.1 into your Oracle Database with RESTful Services configured in Oracle Application Express (for on-premises only).
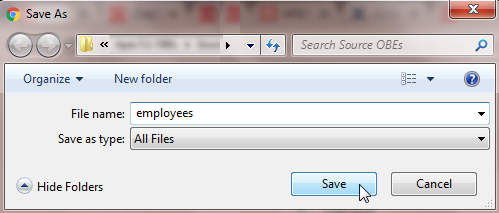
- Download and unzip the files.zip into your working directory.
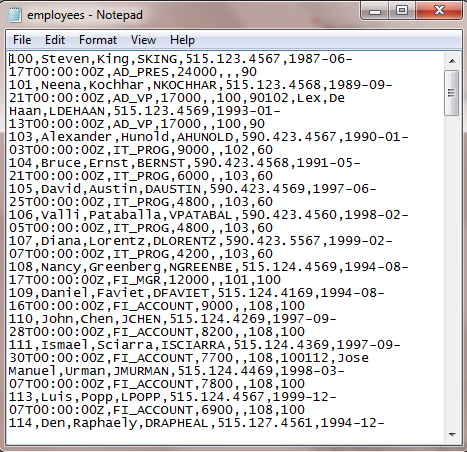
- Execute Create_Employees.sql from the extracted files, to create required database objects.
-
All files for this hands-on activity are located in the
Home/Desktop/APEX_Track/filesfolder. The following files are used in this hands-on activity:
APEX_ACL.sql
Create_Employees.sql
Execute Create_Employees.sql from the files folder, to create required database objects.
Creating a RESTful Web Service
In this topic, you create a RESTful Web Service using RESTful Services tool in SQL Workshop. The RESTful Web Service Wizard is a set of pages in SQL Workshop that help you to create a new RESTful Web Service declaratively. The RESTful Web Service calls a specific SQL statement in your database.
Creating a RESTful Web Service with GET and PUT Resource Handlers
To create a RESTful Web Service on the Employees table with sample GET and PUT service handlers, perform the below steps:
-
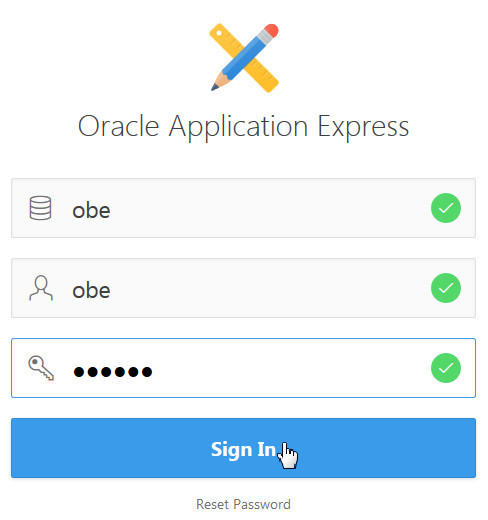
In the Application Express login page, enter the following login credentials and click Sign In:
-
Workspace: obe
-
Username: obe
-
Password: oracle
Description of this image -
-
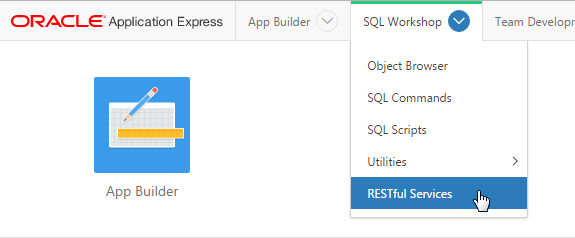
From the Oracle Application Express Home page, select the SQL Workshop tab and select RESTful Services.
Description of this image -
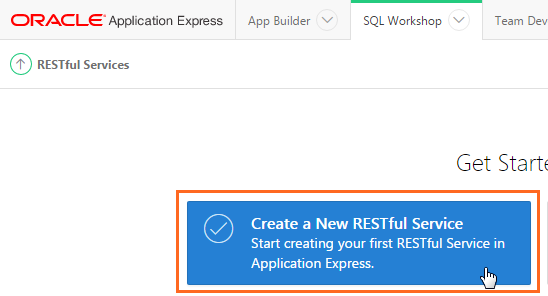
From the RESTful Services page, select the Create a New RESTful Service option.
Description of this image -
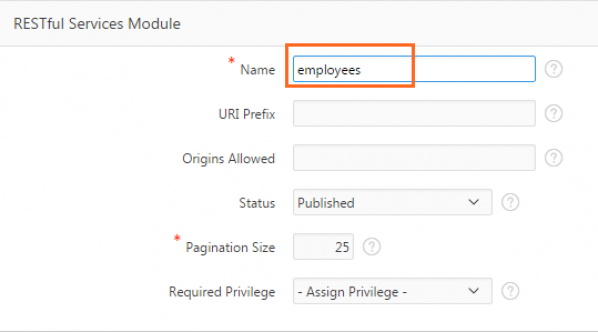
A page loads with entries grouped under three different categories named RESTful Services Module, Resource Template, and Resource Handler. Under RESTful Services Module, enter employees for Name, and scroll down further.
Description of this image -
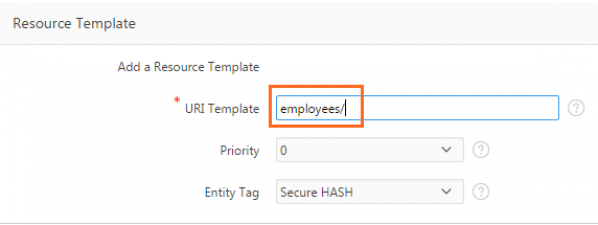
Under Resource Template, enter employees/ for URI Template to identify your Uniform Resource Identifier (URI), and scroll down further.
Description of this image -
Under Resource Handler, select GET for Method, Query for Source Type, CSV for Format. This identifies the HTTP method to be used for the Resource Handler.
Enter the following SQL query for Source, and click Create Module.
 select *
                                      from employees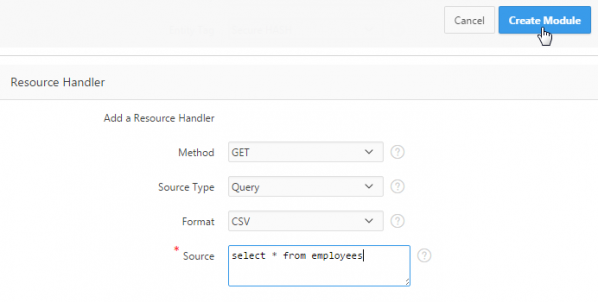
Description of this image -
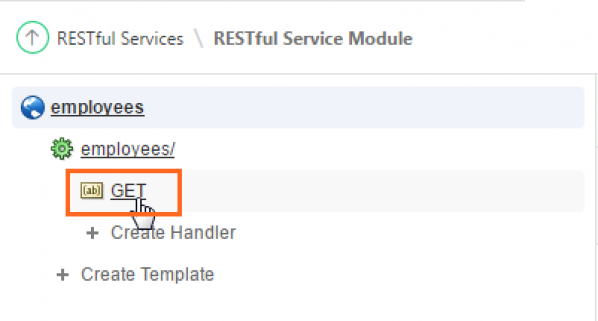
The GET Handler is created under employees/. To edit its properties, click GET under employees/.
Description of this image -
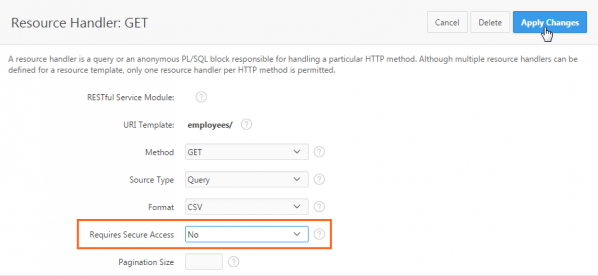
Select No for Requires Secure Access, and click Apply Changes.
Description of this image -
To test the behavior of the RESTful Service Handler, click Test.
Note: If your screen does not show a Test button, please ensure that RESTful Services are configured in your Oracle Application Express installation properly.
Description of this image -
You are prompted to save the file which you can then view using a CSV editor.
Description of this image -
The CSV format result set is displayed.
Description of this image -
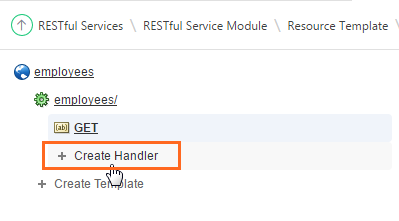
Let us now create a Handler for the POST method in the same Web Service. Click Create Handler under employees/.
Description of this image -
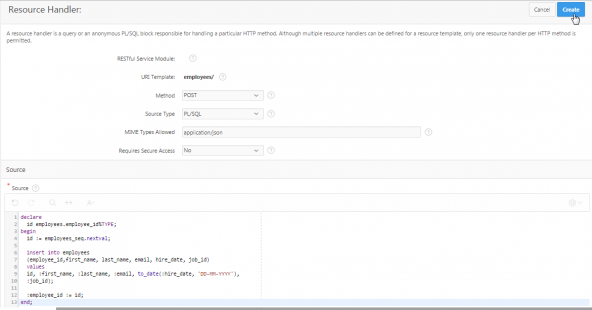
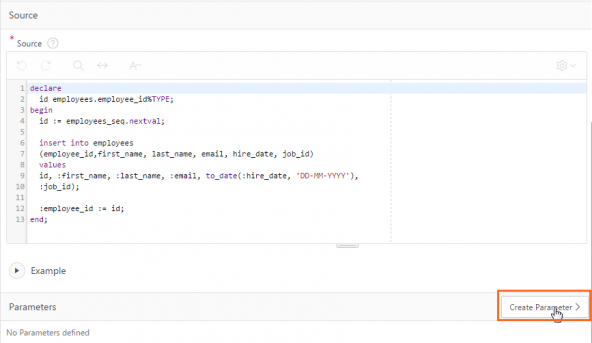
Select POST for Method and PL/SQL for Source Type. Enter application/json for MIME Types Allowed. Select No for Requires Secure Access. Enter the following PL/SQL code for Source, and click Create.
declare

                                        id employees.employee_id%TYPE;

                                      begin

                                        id := employees_seq.nextval;


                                        insert into employees

                                        (employee_id,first_name, last_name,
                                      email, hire_date, job_id)

                                        values

                                        (id, :first_name, :last_name,
                                      :email, to_date(:hire_date, 'DD-MM-YYYY'),


                                        :job_id);


                                        :employee_id := id;

                                      end;
Description of this image -
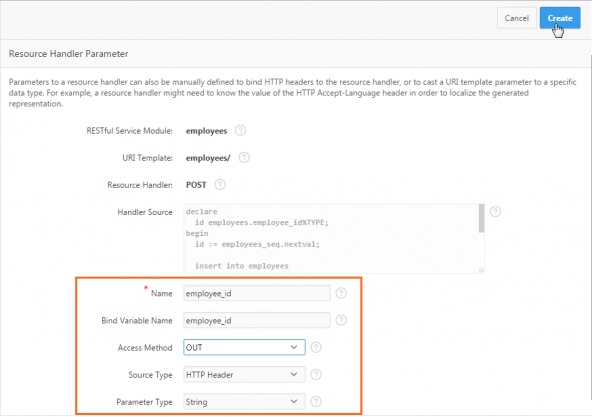
Scroll down the page, and click Create Parameter to add an OUT parameter to the handler that will return the newly created employee’s ID.
Description of this image -
Enter employee_id for Name and Bind Variable Name. Select OUT for Access Method, HTTP Header for Source Type, String for Parameter Type, and click Create.
Description of this image -
The OUT parameter is created.

Description of this image -
Click Create Parameter again to add the following IN parameters to the handler.
Name Bind Variable Name Access Method Parameter Type first_name
first_name IN
String
email
email
IN
String
last_name last_name IN String
hire_date
hire_date IN
String job_id
job_id IN
String 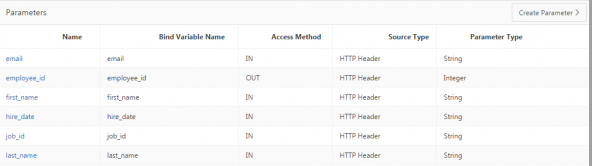
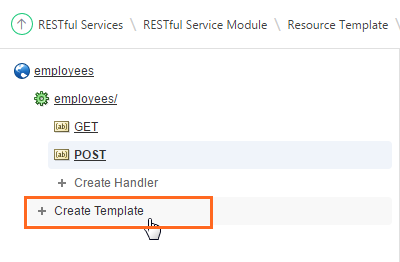
Description of this image In the next section, you create a new template to retrieve JSON result set based on Query One Row with a bind variable.
Creating a Resource Handler with Query One Row
In this section, you will create a RESTful Service that provides detailed information of an employee, given the employee id. The result is returned in JSON format. Perform the following steps:
-
Click Create Template.
Description of this image -
Enter employees/{id} for URI Template, and click Create.
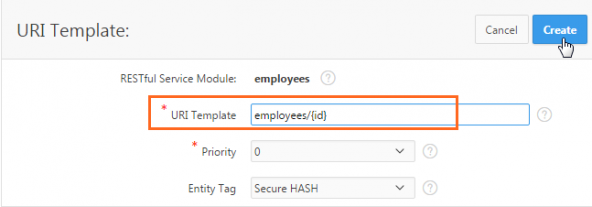
Description of this image -
Click Create Handler under employees/{id}.
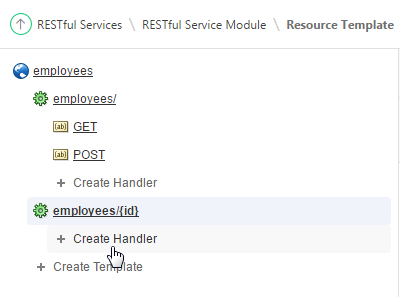
Description of this image -
Select GET for Method, Query One Row for Source Type, and No for Requires Secure Access.
Enter the following SQL Query for Source, and click Create.
select *
                                      from employees where employee_id = :id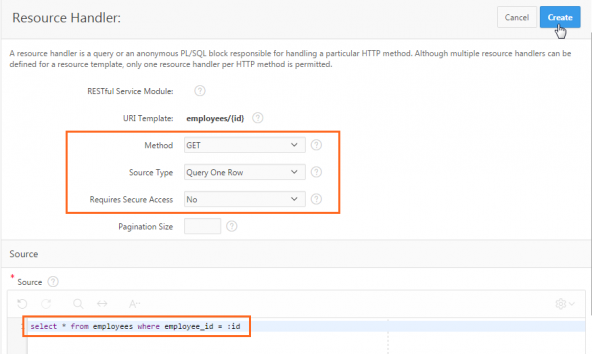
Description of this image -
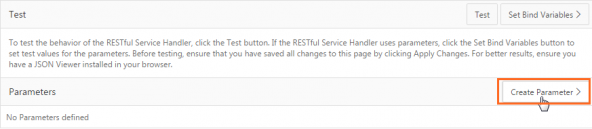
Scroll down and click Create Parameter.
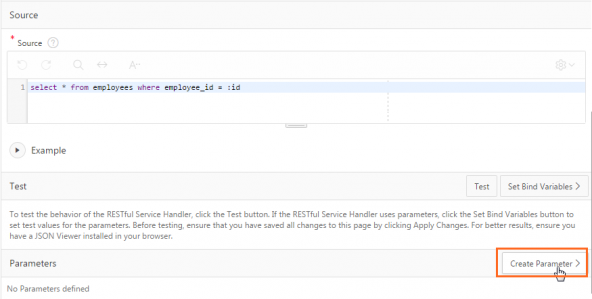
Description of this image -
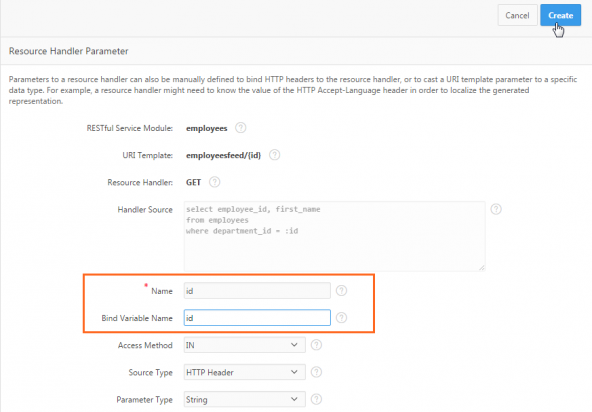
Enter id for Name and Bind Variable Name. Select IN for Access Method, HTTP Header for Source Type, String for Parameter Type, and click Create.
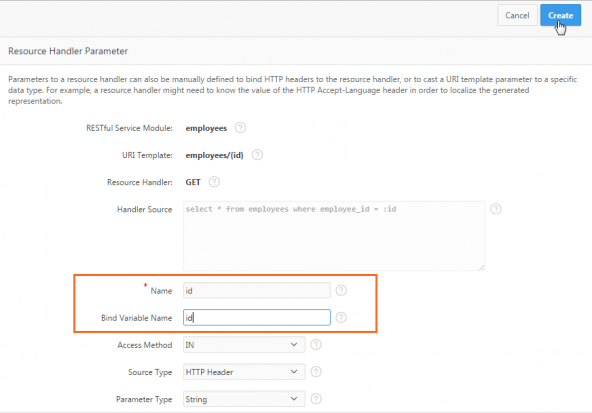
Description of this image -
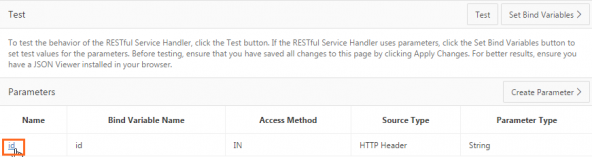
You want to change the Source Type. Under Parameters, click the id link under Name.

Description of this image -
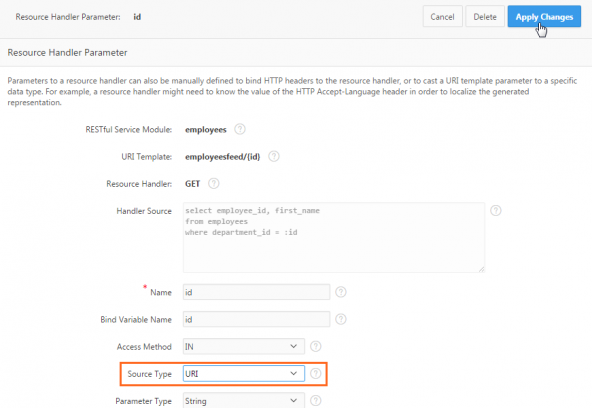
Select URI for Source Type, and click Apply Changes.
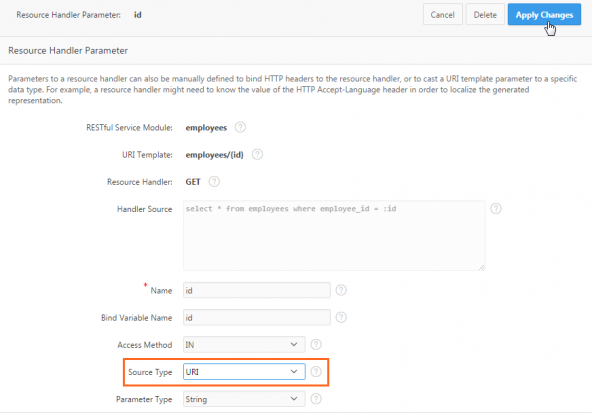
Description of this image -
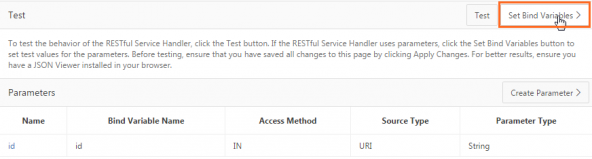
Before testing this handler, you have to set a bind variable to pass a value for the input parameter(id). Click Set Bind Variables >.
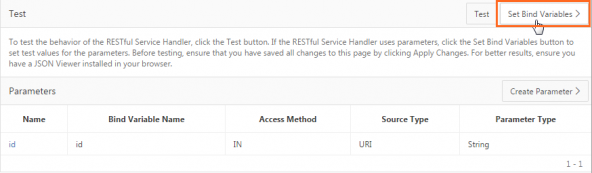
Description of this image -
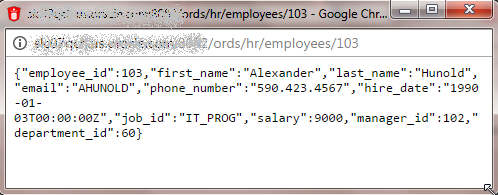
Enter 103 for :ID, and click Test.
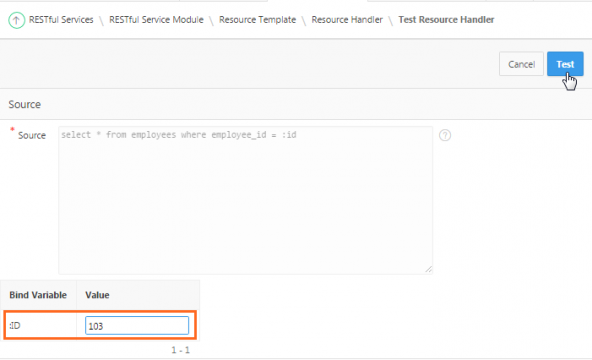
Description of this image -
Complete details of the employee with employee_id = 103 is displayed.
Description of this image
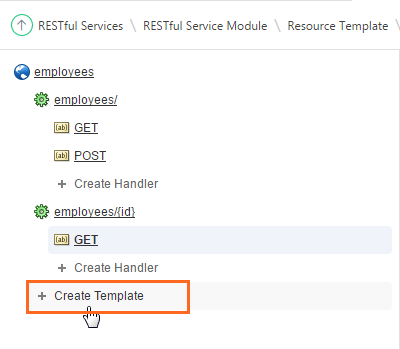
Creating a Resource Handler with Employees Feed
In this section, you will be creating a RESTful service of a feed source type. The feed results are rendered in JSON format. Each item in the feed contains a summary of a resource and a hyperlink to a full representation of the resource. Perform the below steps:
-
Click Create Template.
Description of this image -
Enter employeesfeed/ for URI Template, and click Create.
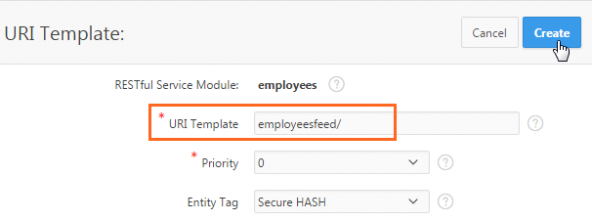
Description of this image -
Under employeesfeed/, click Create Handler.
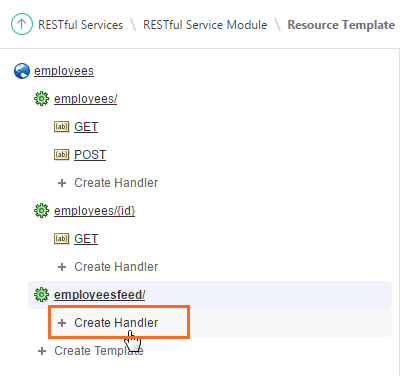
Description of this image
-
Select GET for Method, Feed for Source Type, and No for Requires Secure Access. Under Source, enter the following SQL query, and click Create.
select employee_id, first_name

                                        from employees

                                        order by employee_id, first_name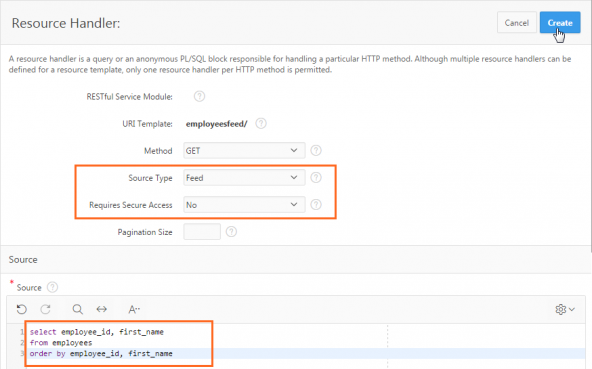
Description of this image -
Under
employeesfeed/, click GET to open the Resource Handler Editor.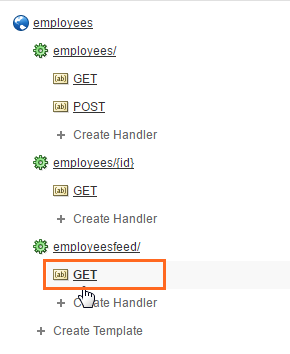
Description of this image -
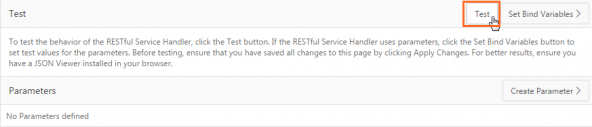
Scroll down the page, and click Test.
Description of this image -
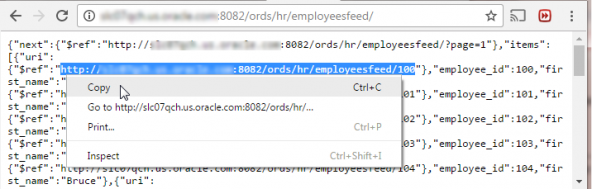
The results are rendered in JSON format. Each item consists of a URI which contains the base URI from this RESTful Service, and the value of employee_id used as the parameter. For the Feed source type, the first column must be a unique identifier. It will be transformed into a hyperlink when this RESTful Service is called.
In this example, employee_id is the first column and will turn into a hyperlink.
For example, in the screenshot shown below, the URI for an employee withemployee_id = 100ishttps://:Note: The URI shown in this example is specific to the database On-Premise subscription used for executing this tutorial, and it might be different for you. The value of the URI also depends on whether you are performing this tutorial On-Premises or on a Cloud Service. In general, the URI formats are as follows:<hostname>:<port>/ords/hr/employeesfeed/100
On-Premises http://localhost:<Port where ords is set up>/ords/<schema name>/<Resource Template Name>/<employee_id>
For example:http://localhost:9090/ords/hr/employeesfeed/100
where ords is set up on port 9090 during Oracle APEX installation, hr is the schema name, employeesfeed is the Resource Template name, and 100 is the employee_id.On a Cloud Service <Service URL as received in the Welcome email from Oracle Cloud>/<Resource Template Name>/<employee_id>
For example:https://databasetrial:where<user>.db.us2.oraclecloudapps.com/hr/employeesfeed/100https://databasetrial:is the Service URL for the cloud service subscription, employeesfeed is the Resource Template name, and 100 is the employee_id.<user>.db.us2.oraclecloudapps.com/hr/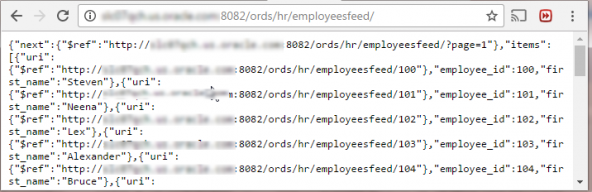
Description of this image -
Select the URI for one of the employee_ids, and copy it to clipboard.
Description of this image -
Open a browser, paste the copied URI, and press Enter. Notice that the details of that particular employee are returned as a JSON result set.

Description of this image
Creating a Resource Handler with Employees Feed for a Given Department
In this section, you will be creating a RESTful service of a feed source type given the Department ID. The feed results are rendered as JSON. Perform the below steps:
-
Click Create Template.

Description of this image -
Enter employeesfeed/{id}, and click Create.
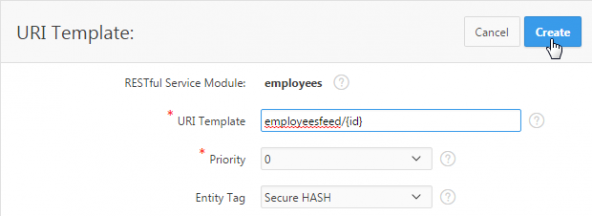
Description of this image -
Under employeesfeed/{id}, click Create Handler.
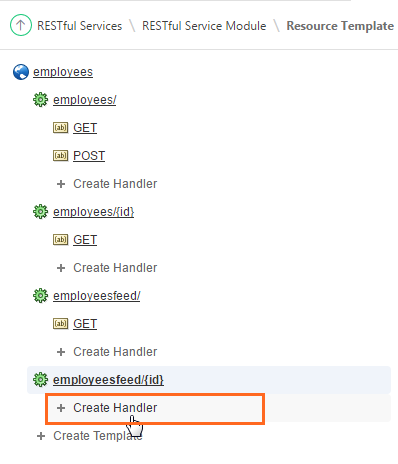
Description of this image -
Select Get for Method, Feed for Source Type, and No for Requires Secure Access. Under Source, enter the following SQL query, and click Create.
select
                                      employee_id, first_name

                                      from employees

                                      where department_id = :id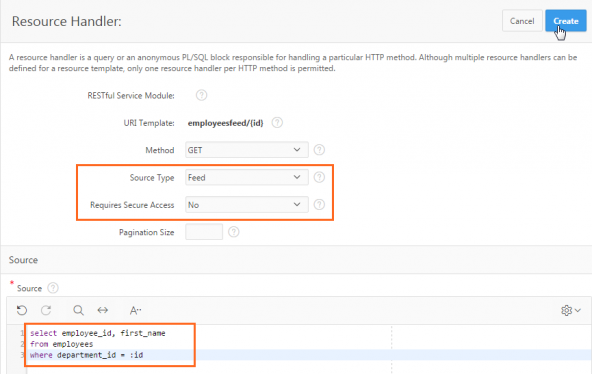
Description of this image -
Scroll down further, and click Create Parameter > to add an IN parameter to the handler that will receive the department_id.
Description of this image -
Enter id for Name and Bind Variable Name. Select IN for Access Method, HTTP Header for Source Type, String for Parameter Type, and click Create.
Description of this image -
You want to change the Source Type. Under Parameters, click the id link under Name.
Description of this image -
Select URI for Source Type, and click Apply Changes.
Description of this image -
Before testing this handler, you have to set bind variable to pass a value for the input parameter, id. Click Set Bind Variables >.
Description of this image -
Enter 60 for :ID, and click Test.
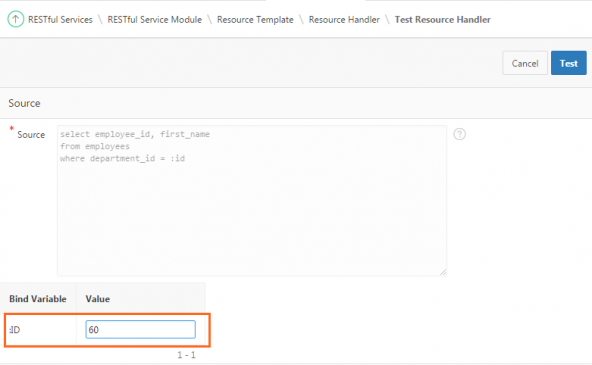
Description of this image -
The results are rendered in JSON format. Each item consists of a URI which contains the base URI from this RESTful Service, and the value of department_id used as the parameter. For the Feed source type, the first column must be unique identifier and will be transformed into a hyperlink when this RESTful Service is called.
In this example,department_idis the first column and will turn into a hyperlink.
For example, in the screenshot shown below, the URI for an employee with department_id = 60 ishttp://where page=1 indicates that these results are part of page 1. If there are many records in the result set, the results can span across page 2 and so on.<hostname>:<port>/ords/hr/employeesfeed/60?page=1
Note: The URI shown in this example is specific to the database On-Premise service subscription used for executing this tutorial, and it might be different for you. The value of the URI also depends on whether you are performing this tutorial On-Premises or on a Cloud Service. In general, the URI formats are as follows:On-Premises http://localhost:<Port where ords is set up>/ords/<schema name>/<Resource Template Name>/<department_id>?page=1
For example:http://localhost:9090/ords/hr/employeesfeed/60?page=1
where ords is set up on port9090during Oracle APEX installation,hris the schema name,employeesfeedis the Resource Template name and60is the department_id.On a Cloud Service <Service URL as received in the Welcome email from Oracle Cloud>/<Resource Template Name>/<department_id>?page=1
For example:https://databasetrial:<user>.db.us2.oraclecloudapps.com/hr/employeesfeed/60?page=1is the Service URL for the cloud service subscription,
wherehttps://databasetrial:/<user>.db.us2.oraclecloudapps.com/hremployeesfeed60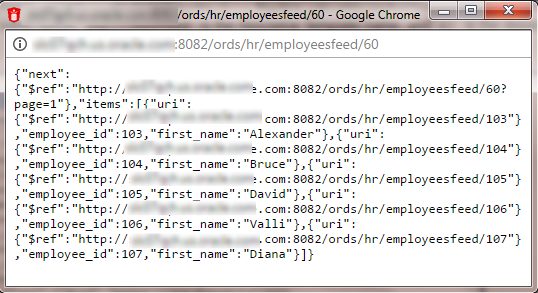
Description of this image
Creating a RESTful Web Service Reference in Oracle Application Express
In this topic, you consume the RESTful Web Service in Oracle Application Express by creating a database application and by creating a Web Service Reference in the application. You create a form and report page that uses the web service.
Note: If you are executing this
tutorial On-Premises, make sure you have granted the
connect privileges by executing the APEX_ACL.sql
script from the files.zip
folder that you had downloaded and unzipped in the
Prerequisites section of this tutorial.
Note: Make sure you have granted the
connect privileges by executing the APEX_ACL.sql
script from the files
folder.
-
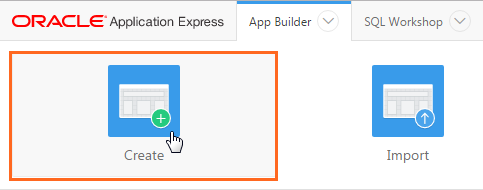
From the Oracle Application Express home page, click the down arrow next to App Builder, and select Database Applications.

Description of this image -
Click the Create icon.
Description of this image -
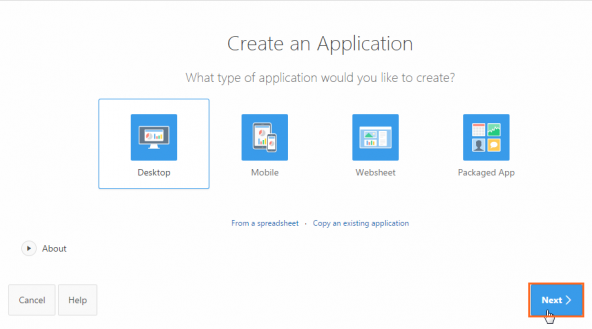
Accept the default, and click Next >.
Description of this image -
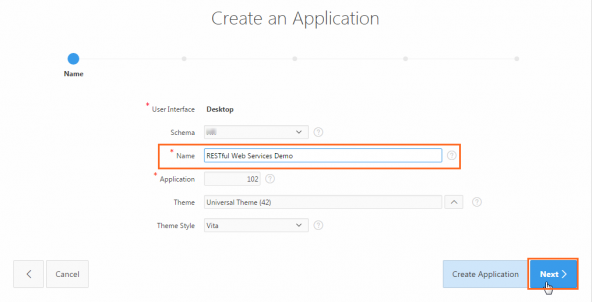
Enter RESTful Web Services Demo for Name, and click Next >.
Description of this image -
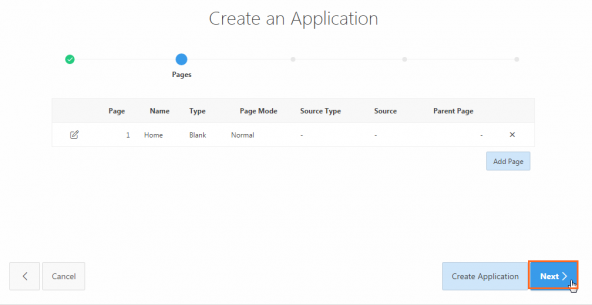
Click Next >.
Description of this image -
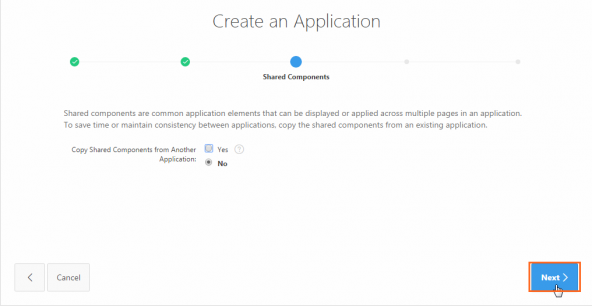
Accept the default, and click Next >.
Description of this image -
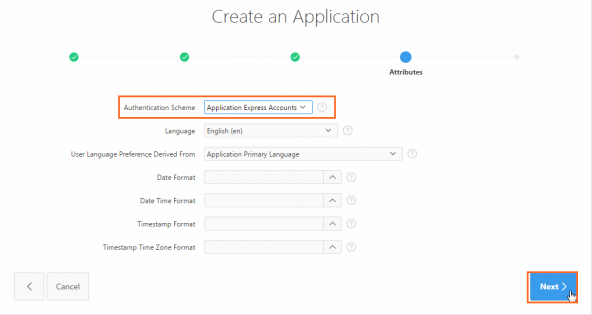
Select Application Express Accounts for Authentication Scheme, and click Next >.
Description of this image -
Click Create Application.

Description of this image -
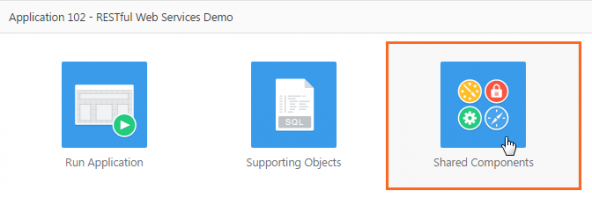
The application is created. Click Shared Components.
Description of this image -
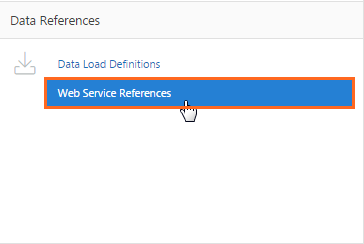
Under Data References, click Web Service References.
Description of this image -
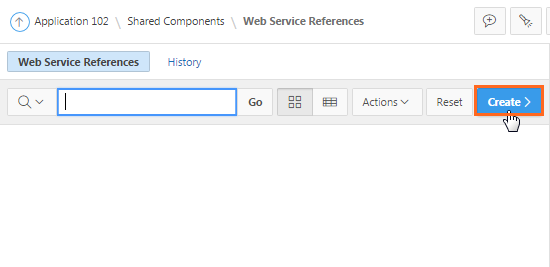
Click Create >.
Description of this image -
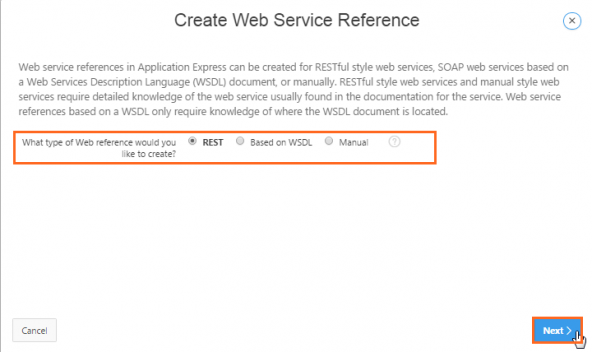
Select REST for What type of Web reference would you like to create, and click Next >.
Description of this image -
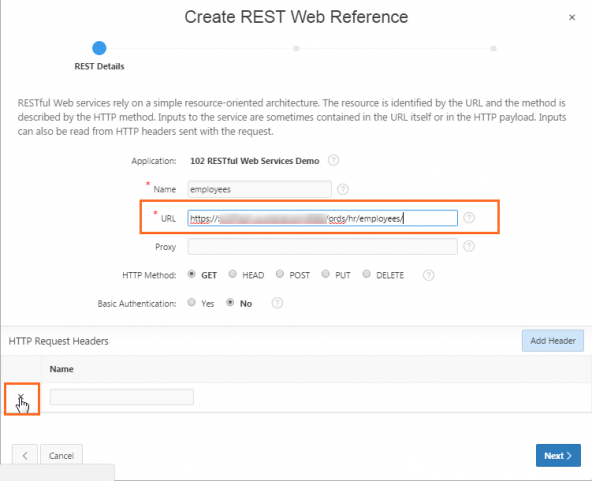
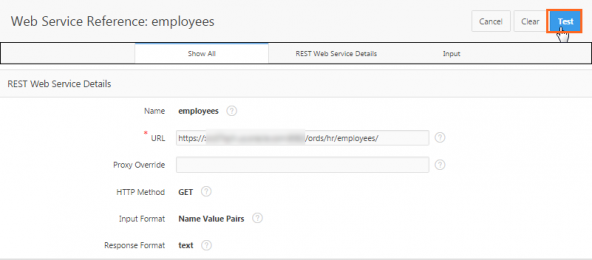
Enter employees for Name. Select GET for HTTP Method and No for Basic Authentication. For the URL, enter the Web Reference URI for the GET Service Handler which was created in the first section of this tutorial.
As explained in the below table, your URI depends on the location of your Oracle Application Express instance, whether On-Premises or on a Database Cloud Service.
This RESTful Web Service does not require an HTTP Header parameter. So, scroll down and click the Delete Header icon.On-Premises http://localhost:<Port where ords is set up>/ords/<schema name>/<Resource Template Name>/
For example:http://localhost:9090/ords/hr/employees/
where ords is set up on port 9090 during Oracle APEX installation, hr is the schema name, employees is the Resource Template name.On a Cloud Service <Service URL as received in the Welcome email from Oracle Cloud>/<Resource Template Name>/
For example:https://databasetrial:where<user>.db.us2.oraclecloudapps.com/hr/employees/
https: databasetrial:is the Service URL for the cloud service subscription and employees is the Resource Template name.
Description of this image -
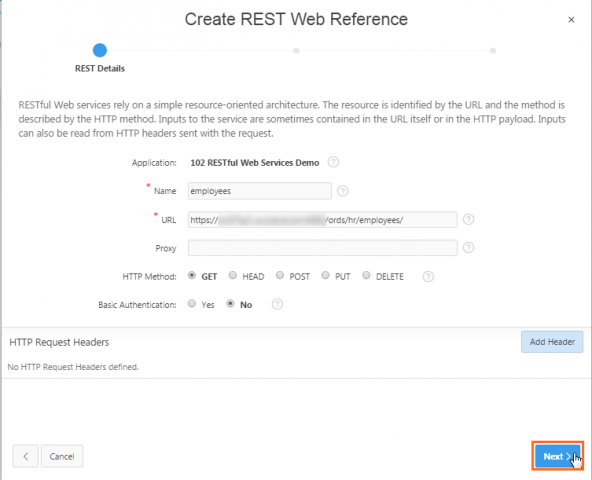
Click Next >.
Description of this image -
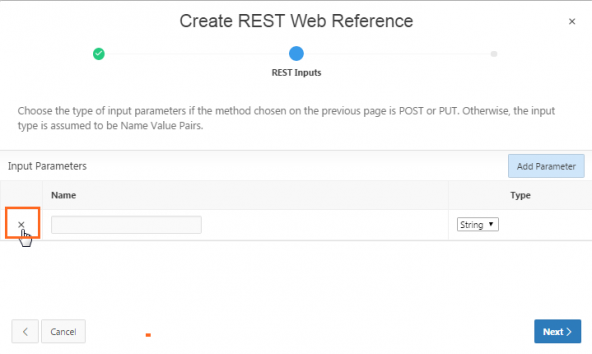
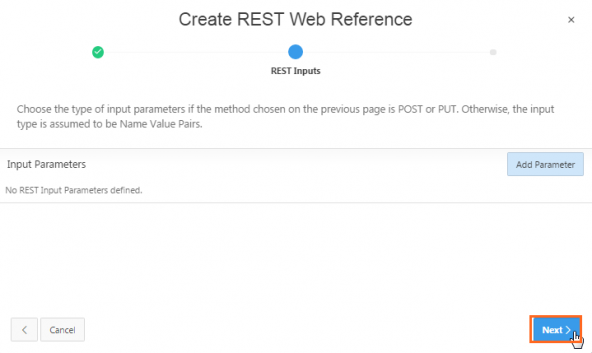
There are no parameters defined for the GET Service Handier. So, click the Delete Parameter icon for Input Parameters.
Description of this image -
Click Next >.
Description of this image -
Now, you have to define the REST Outputs. Select Text for Output Format. Enter comma for Parameter Delimiter, and \n for New Record Delimiter.
Under Output Parameters, enter Employee ID for Name and 1 for Path. Select String for Type, and click Add Parameter.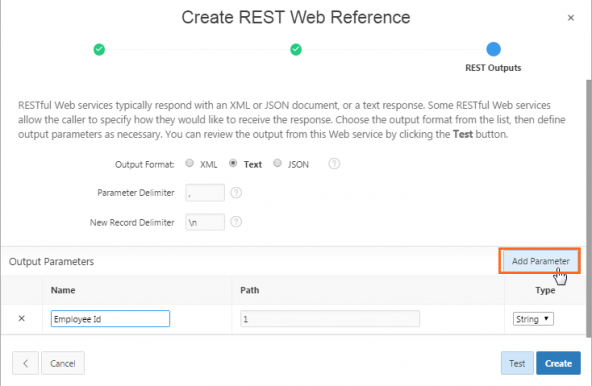
Description of this image -
Similarly, add the following Output Parameters, and click Create.
Name Path Type Name
2
String
Hire Date
6
String Job Id
7
String 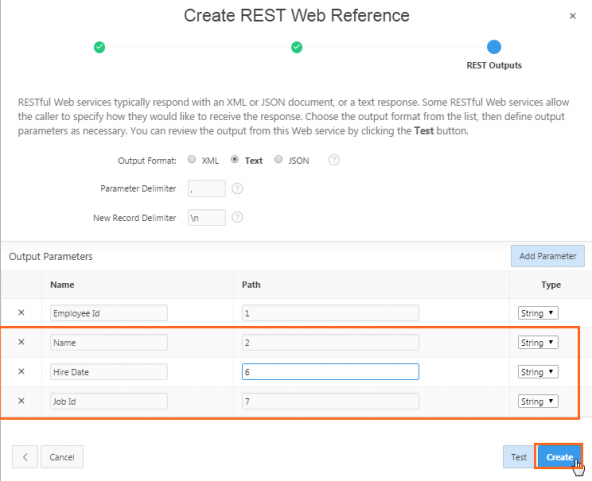
Description of this image -
Click the View Report icon.
Description of this image -
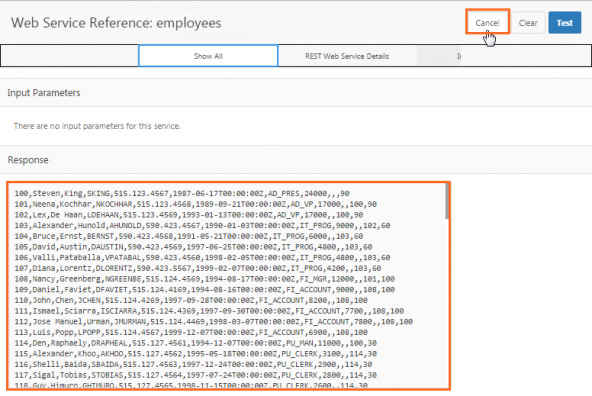
Click the Test icon for employees.
Description of this image -
Employees' details is displayed in the Response section. Click Cancel.
Description of this image -
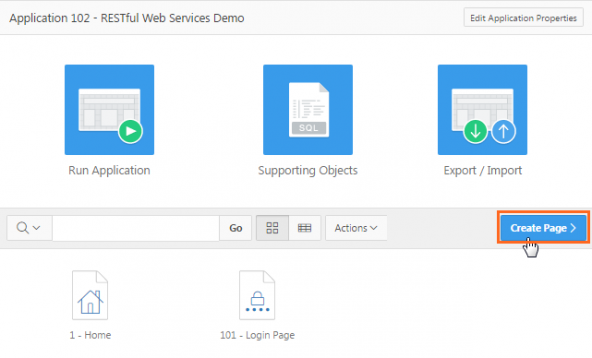
Click Application<n> in the breadcrumb.

Description of this image -
Click Create Page >.
Description of this image -
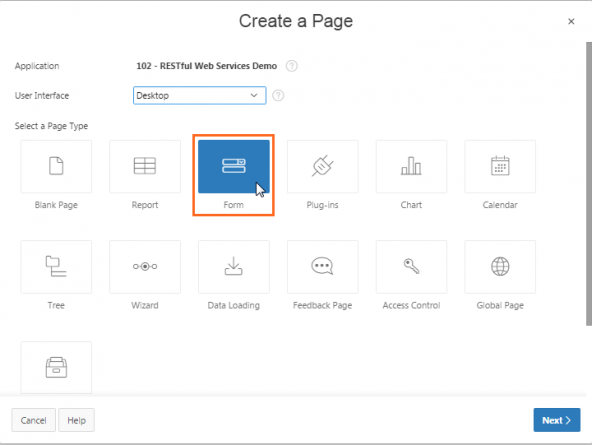
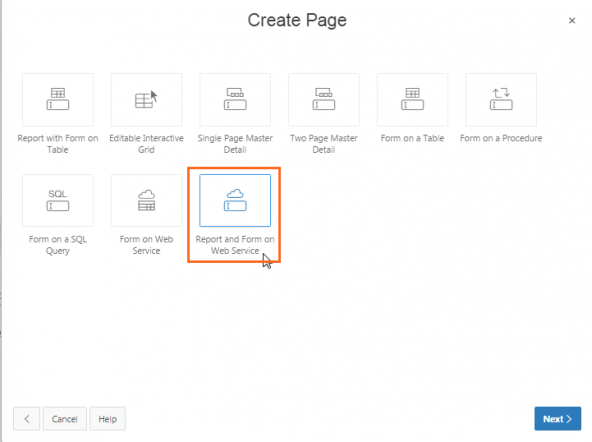
Click the Form icon.
Description of this image -
Click the Report and Form on Web Service icon.
Description of this image -
Select employees for Web Service Reference, doREST for Operation, and click Next >.
Note: Employees appears in the select list for Web Service Reference because you added it under Web Service References in Shared Components.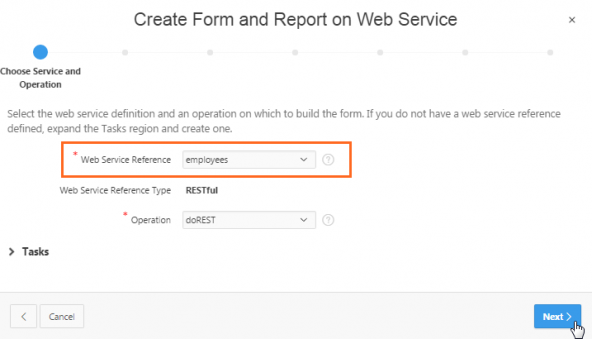
Description of this image -
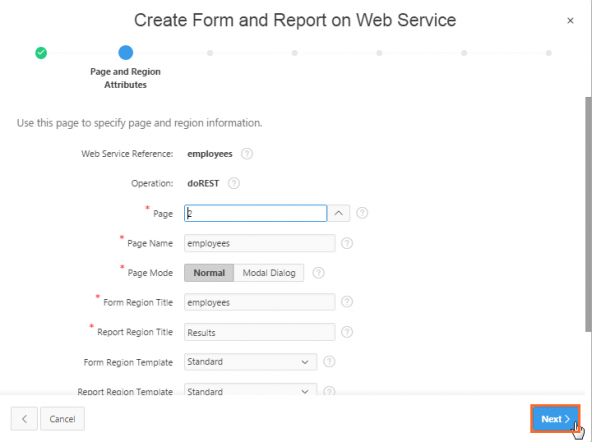
Click Next >.
Description of this image -
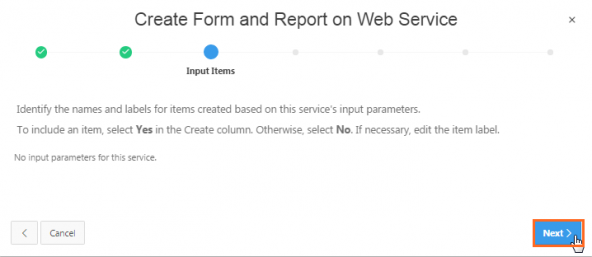
Click Next >.
Description of this image -
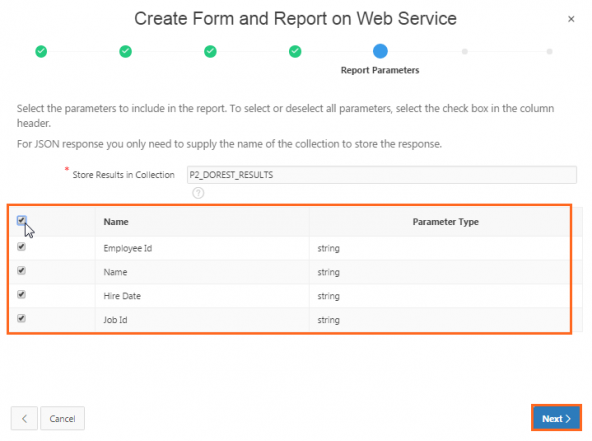
Select all four parameters, that is, employee Id, Name, Hire Date, and Job Id. Click Next >.
Description of this image -
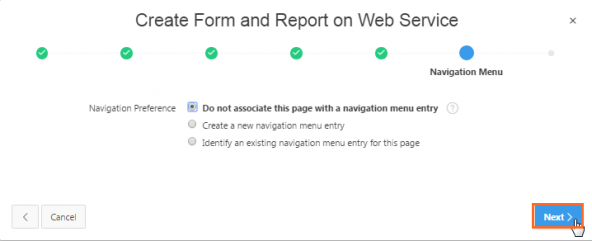
Accept the default an click Next >.
Description of this image -
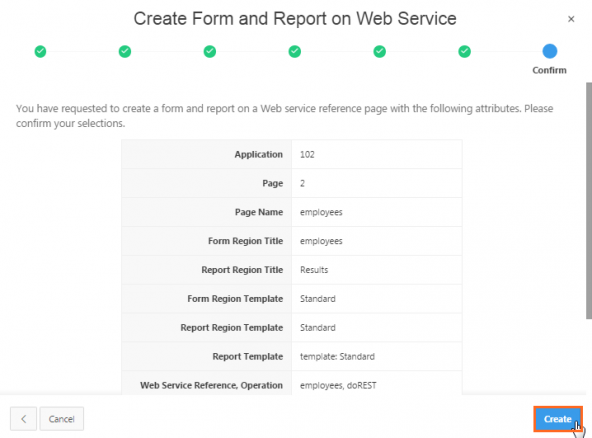
Click Create.
Description of this image -
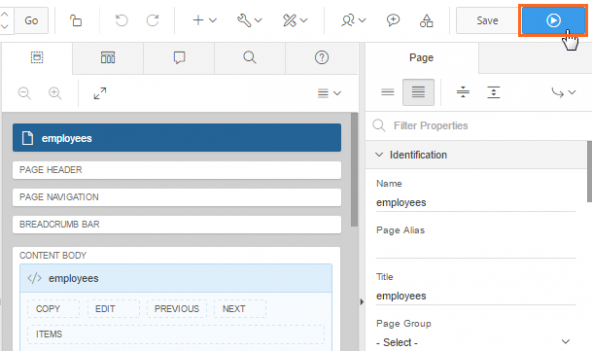
The new page is created. Click Save and Run Page.
Description of this image -
Enter your Oracle Application Express credentials, and click Log In.
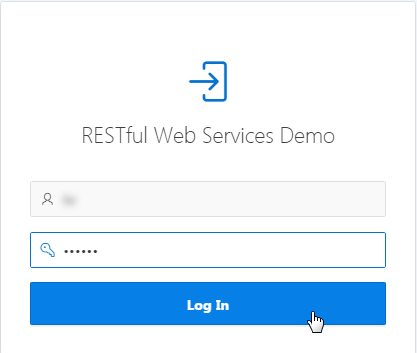
Description of this image -
Click Submit.
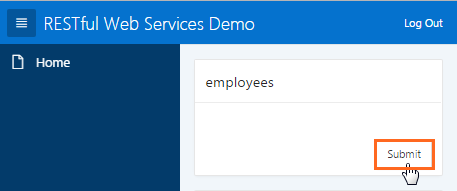
Description of this image -
The Web Service is executed, and the results displayed.
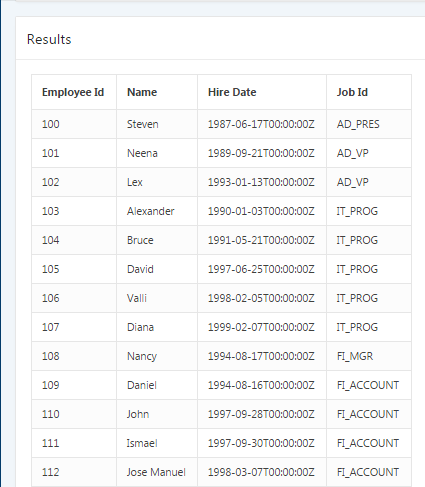
Description of this image
Consuming the RESTful Web Service Created in Oracle Application Express Using a REST Client
In this section, you consume the Web Service that you have created in Oracle Application Express, using a REST Client.
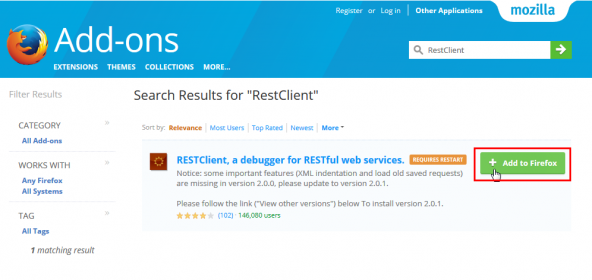
Note: For the purpose of this tutorial, we will be using the RESTClient add-on in Firefox to demonstrate how to consume the RESTful Web Service created in APEX. You can also use other REST Clients such as, REST Easy and RESTer to perform these steps in Firefox. If you are using Google Chrome, you can install add-ons such as Postman to perform the steps.
-
Open Firefox and install the RESTClient, a debugger for RESTful web services add-on to your browser.
Description of this image -
Open the installed add-on in your browser.
Description of this image -
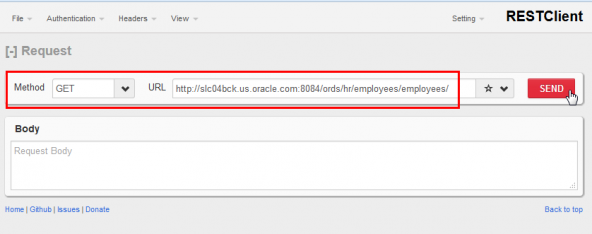
To fetch the details of an employee, select GET as the Request Method. For the URL, enter the Web Reference URI for the GET Service Handler which was created in the first section of this tutorial.
As explained in the below table, your URI depends on the location of your Oracle Application Express instance, whether On-Premises or on a Database Cloud Service. In this example,https://:is the URL used for the On-Premise machine.<hostname>:<port>/ords/hr/employees/employeesOn-Premises http://localhost:<Port where ords is set up>/ords/<schema name>/<Resource Template Name>/<Resource Handler>
For example:http://localhost:9090/ords/hr/employees/employees
where ords is set up on port 9090 during Oracle APEX installation, hr is the schema name, employees is the Resource Template name and employees is the Resource Handler.On a Cloud Service <Service URL as received in the Welcome email from Oracle Cloud>/<Resource Template Name>/<Resource Handler>
For example:https://databasetrial:<user>.db.us2.oraclecloudapps.com/hr/employees/
employeeswherehttps: databasetrial:is the Service URL for the cloud service subscription and employees is the Resource Template name and employees is the Resource Handler.Click SEND.
Description of this image -
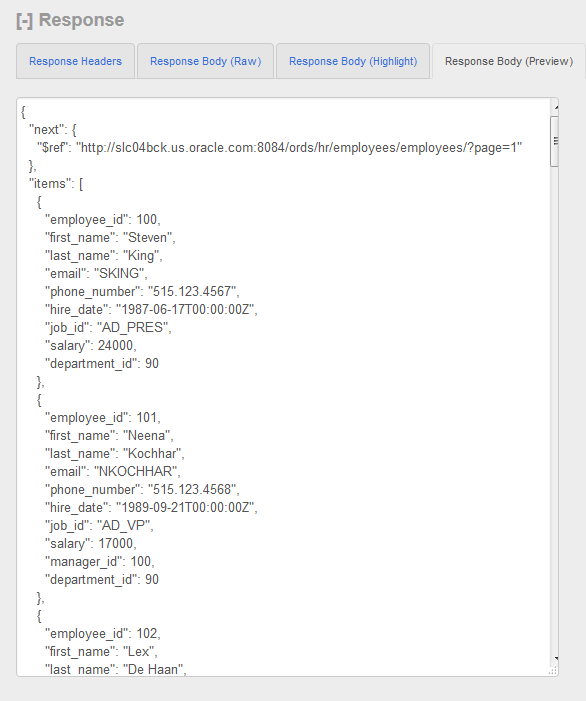
Select the Response Body (Preview) tab to view all the employee records.
Description of this image -
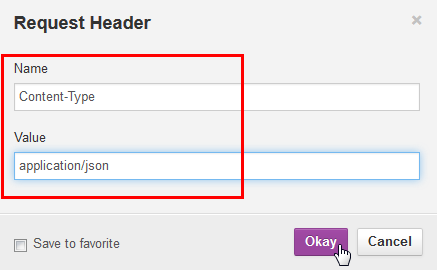
To insert new values into the employees table, under Headers, select Custom Header.
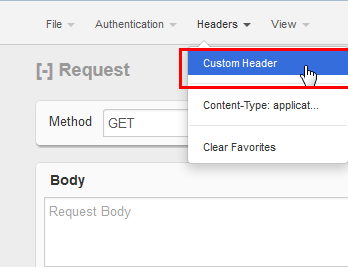
Description of this image -
Enter Content-Type as Name, application/json as Value, and click OK.
Description of this image -
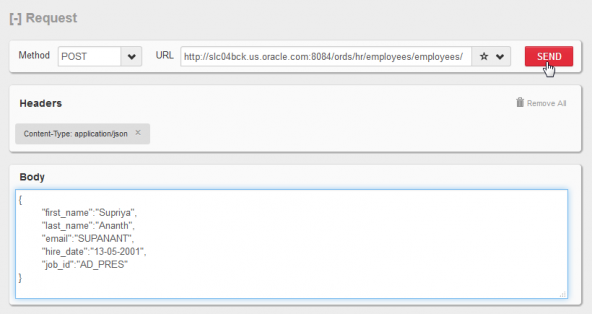
In the RESTClient page, enter POST as the request method, enter the same URL as that of the GET method, enter the following code in the Request Body, and click SEND.
{

                                  "first_name":"Supriya",

                                  "last_name":"Ananth",

                                  "email":"SUPANANT",

                                  "hire_date":"13-05-2001",

                                  "job_id":"AD_PRES"

                                   }
Description of this image -
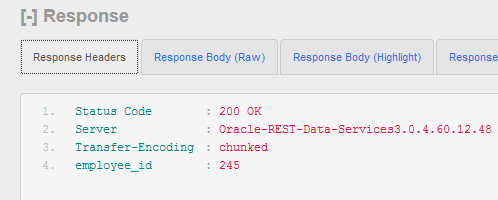
Under Response, select Responses Header. You see that the new employee's information is added into the Employees table. The newly created employee’s ID is returned back to the application.
Description of this image
Summary
In this tutorial, you have learned how to:
- Create a RESTful Web Service with various Resource Handlers using Oracle Application Express.
- Create a RESTful Web Service Reference in Application Express.
- Consume the
Web Service created in Application Express using
a REST client.