Before You Begin
Purpose
This tutorial shows you how to create different types of Dynamic Actions on a page in your application using Oracle Application Express 5.1.
Time to Complete
Approximately 60 minutes.
Overview
Oracle Application Express (Oracle APEX) is a rapid web application development tool for the Oracle database. Using only a web browser and limited programming experience, you can develop and deploy professional applications that are both fast and secure. Oracle Application Express is available with the Oracle Database, whether it's on-premises or in an Oracle Database Cloud Service.
Oracle Application Express 5.1 allows developers to create Dynamic Actions to define client-side behavior declaratively without the need to know JavaScript. Developers can create Dynamic Actions on an Item, Button, or Region of a page, just by defining the Event, Condition, Affected Elements, Action, and other properties of the Dynamic Action in the Property Editor on the Page Designer. Previously, this involved hand crafting JavaScript and AJAX but now many Dynamic Actions require almost zero coding using the Page Designer in Oracle Application Express 5.1.In this tutorial, you create and test different types of Dynamic Actions on a Form created in your application.
Please keep in mind the following while running this tutorial:
- Logging into your Oracle Application
Express workspace: Your Oracle
Application Express workspace may reside in an
on-premises Oracle Database or in Oracle Database
Cloud Services. The login credentials differ
depending on where your workspace is located:
- Logging into Oracle Application Express in a Oracle Database Cloud Service: To do this, go to the Oracle Help Center for Cloud, and select Platform and Infrastructure. From here, select your Database Cloud Service and the Get Started page will appear.
- Logging in to Oracle Application Express on-premises: From your browser, go to the location of your on-premises installation of your Oracle Application Express workspace provided by your Workspace Administrator.
- Application ID: Screenshots in this tutorial show a blurred Application ID. Your Application ID can be any value assigned automatically while creating the application.
- Schema: If you are accessing an Oracle Application Express workspace in Database Schema Service, you have one schema assigned to you with a schema name that you cannot change. If you are accessing the workspace in an on-premises Oracle database, you may have more than one schema assigned to your workspace by the Oracle Application Express Instance Administrator.
What Do You Need?
Before starting this tutorial, you should:
Have access to an Oracle Database 11g or later release, either on-premises or in a Database Cloud Service.
Install Oracle Application Express Release 5.1 into your Oracle Database (for on-premises only).
Download and unzip the files.zip into your working directory.
Execute
Create_Tables.sqlfrom the extracted files, to create the required database objects.Provision at least one Oracle Application Express user. See Creating New User Accounts in Oracle Application Express Administration Guide.
-
All files for this hands-on activity are located in the
Home/Desktop/APEX_Track/filesfolder. -
The following files are used in this hands-on activity:
Create_Tables.sql
item_type_plugin_com_oracle_apex_starrating_modern.sql
Execute Create_Tables.sql from the files folder to create the required database objects.
Creating a Database Application
-
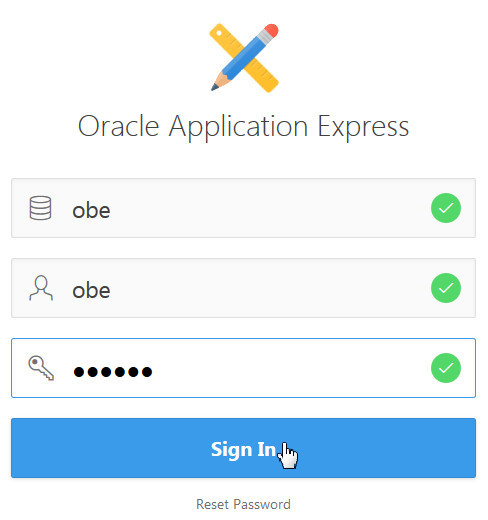
In the Application Express login page, enter the following login credentials and click Sign In:
-
Workspace: obe
-
Username: obe
-
Password: oracle
Description of this image -
-
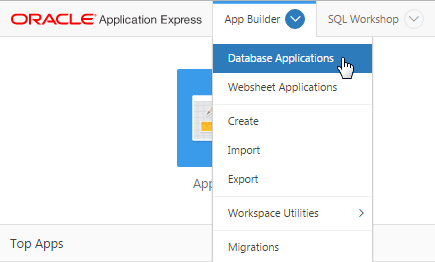
From the Oracle Application Express home page, click the down arrow next to App Builder, and select Database Applications.
Description of this image -
Click Create.

Description of this image -
Accept the default, and click Next >.

Description of this image -
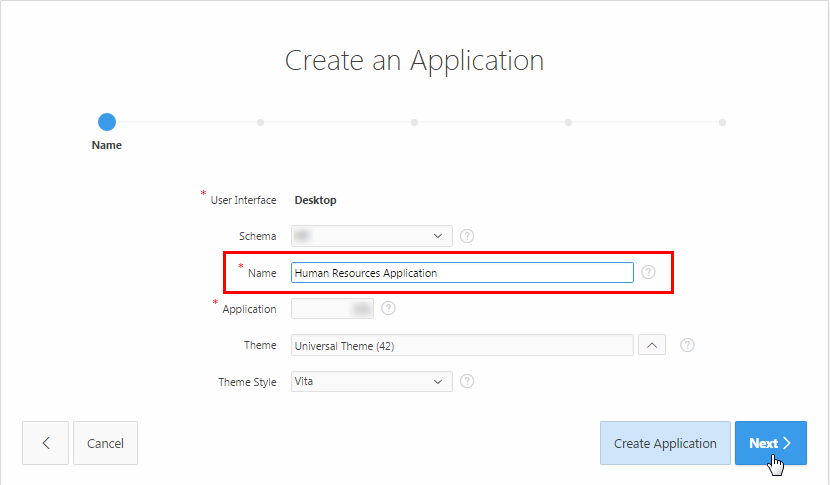
Enter Human Resources Application for Name, and click Next >.
Description of this image -
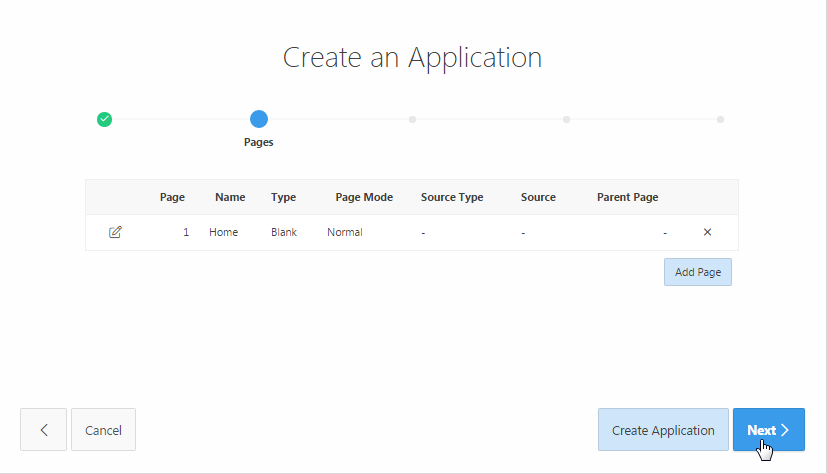
Click Next >.
Description of this image -
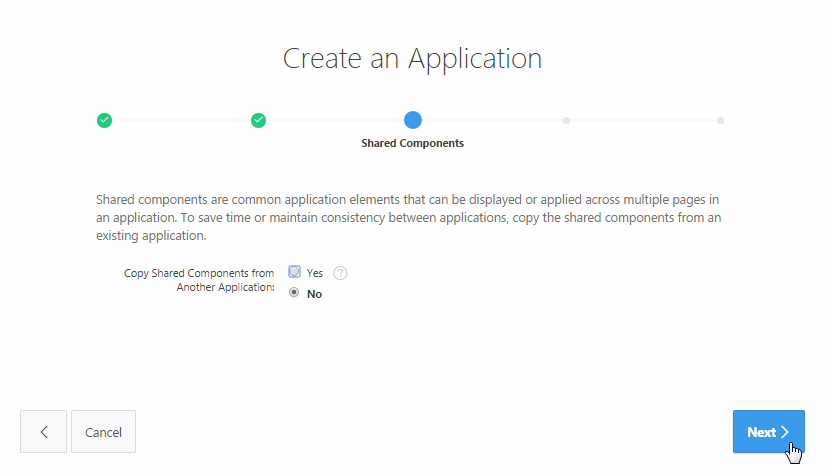
Accept the default, and click Next >.
Description of this image -
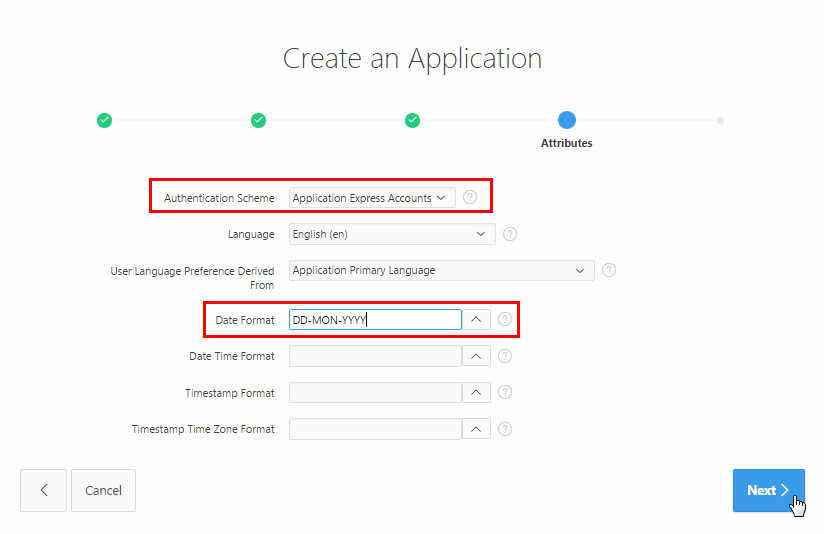
Select Application Express Accounts for Authentication Scheme, DD-MON-YYYY for Date Format, and click Next >.
Description of this image -
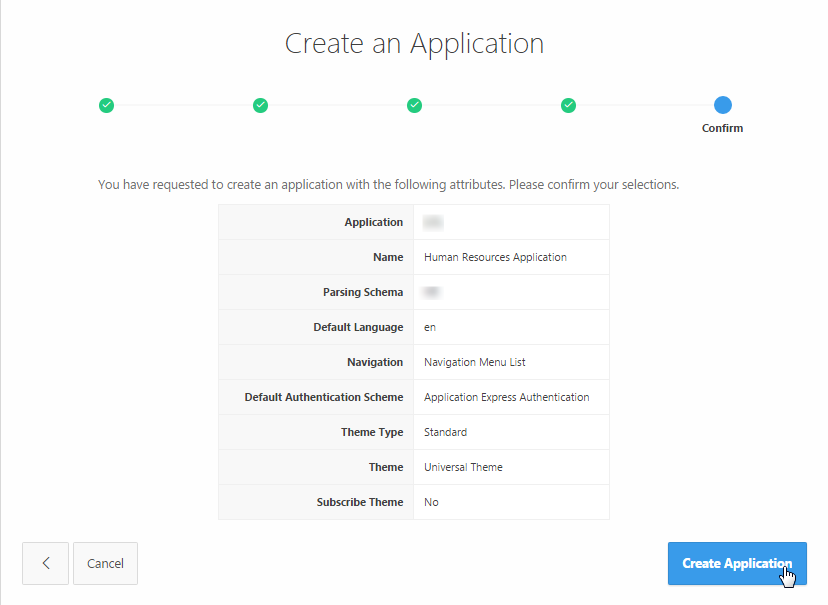
Click Create Application.
Description of this image -
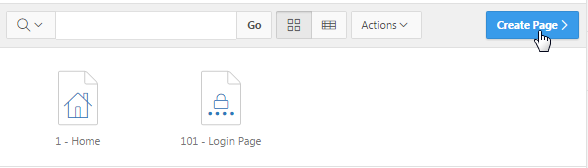
The Human Resources Application is created with two default pages. You want to create a Form and a Report page on the employees table. Click Create Page >.
Description of this image -
Click the Form icon.
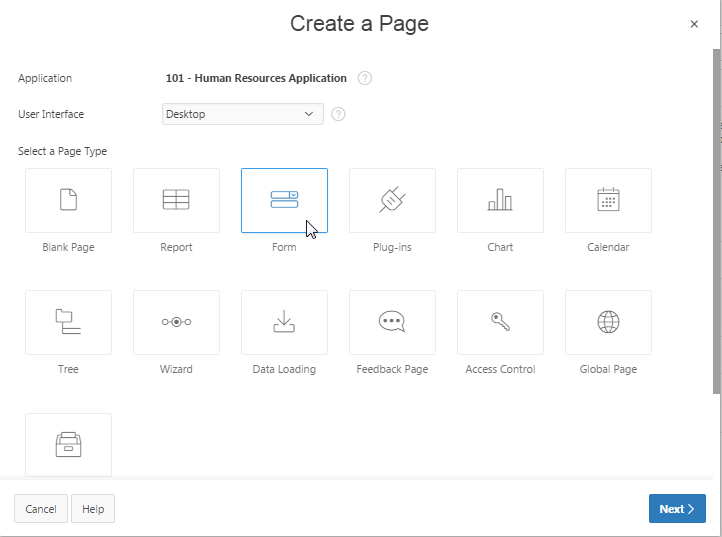
Description of this image -
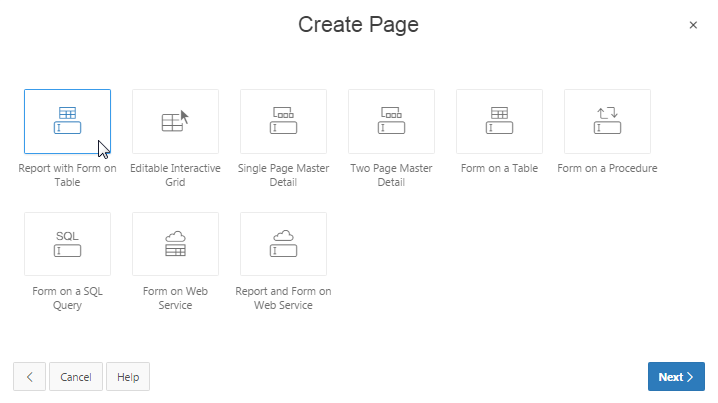
Click the Report with Form on Table icon.
Description of this image -
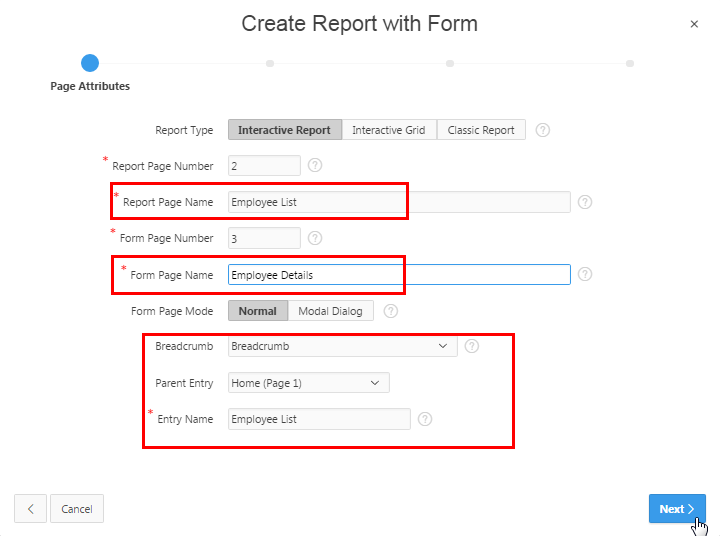
Enter Employee List for Report Page Name and Employee Details for Form Page Name. Select Breadcrumb for Breadcrumb, Home (Page 1) for Parent Entry, and click Next >.
Description of this image -
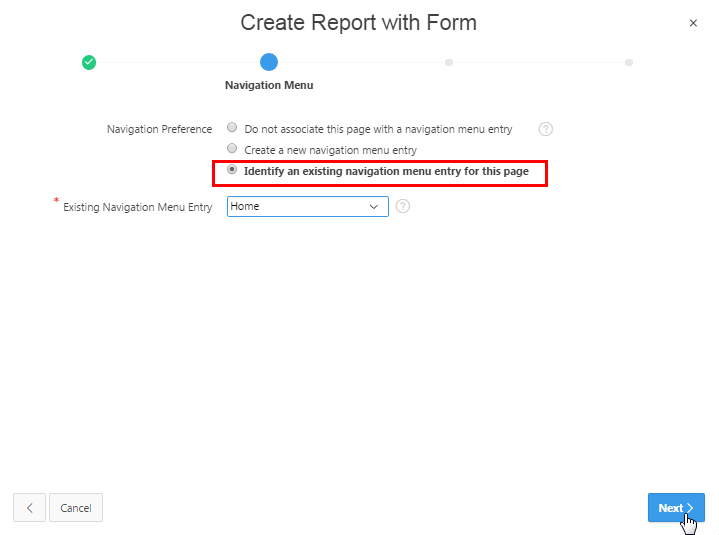
Select Identify an existing navigation menu entry for this page for Navigation Preference, Home for Existing Navigation Menu Entry, and click Next >.
Description of this image -
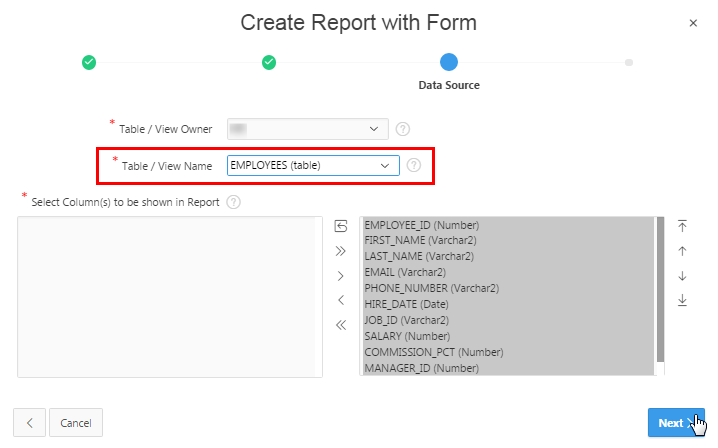
Select EMPLOYEES (table) for Table/View Name, ensure all the columns are selected,and click Next >.
Description of this image -
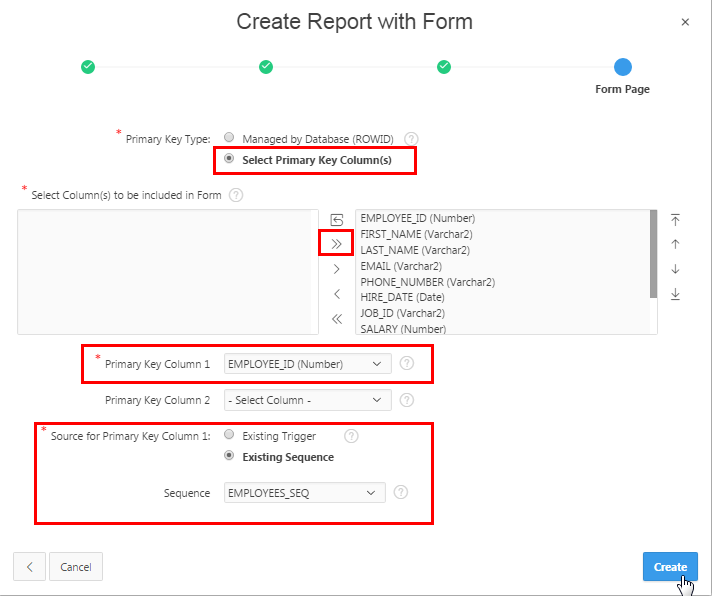
Perform the following actions:
- Choose Select Primary Key Column(s) for Primary Key Type
- Select all columns to be included in the form
- Select EMPLOYEE_ID (Number) for Primary Key Column 1
- Choose Existing Sequence for Source for Primary Key Column1 and select EMPLOYEES_SEQ for Sequence
- Click Create.
Description of this image -
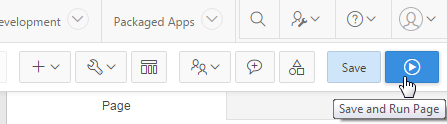
Click Save and Run Page.
Description of this image -
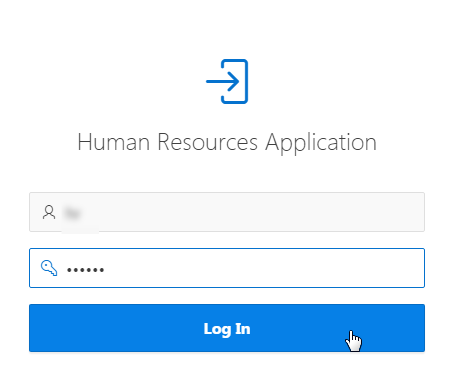
If the Log In screen appears, enter your Oracle Application Express credentials, and click Log In.
Description of this image -
Click the Edit icon before the first row.
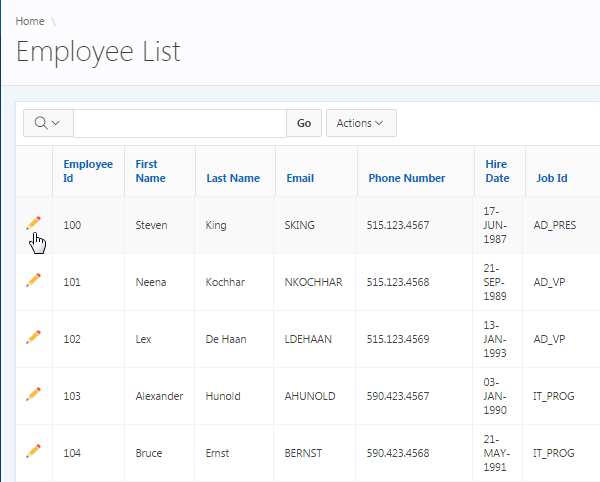
Description of this image -
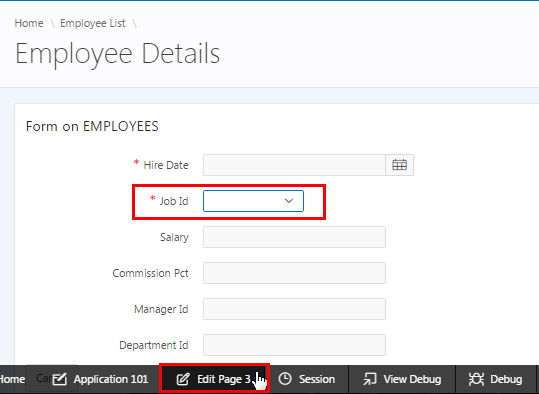
In the next section, you want to make few changes to the items on this form. Click Edit Page 3 in the developer toolbar.
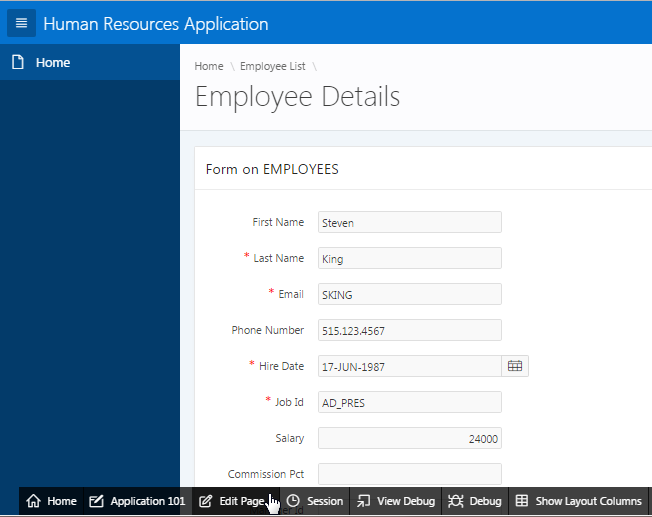
Description of this image
Making Changes to the Items on Your Form Page
-
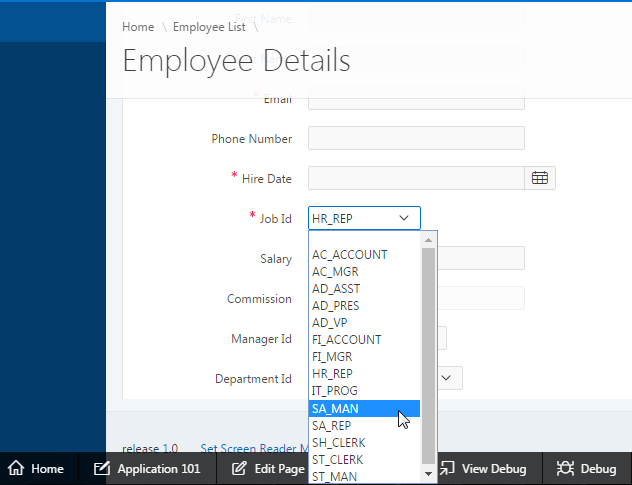
In the Rendering tab, under Items, click P3_JOB_ID.
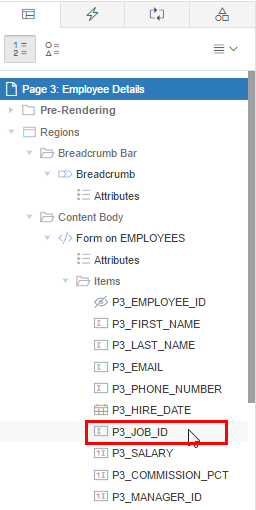
Description of this image -
In the property editor, under Identification, select Select List for Type. Under List of Values, select SQL Query for Type, and click the Code Editor: SQL Query icon.
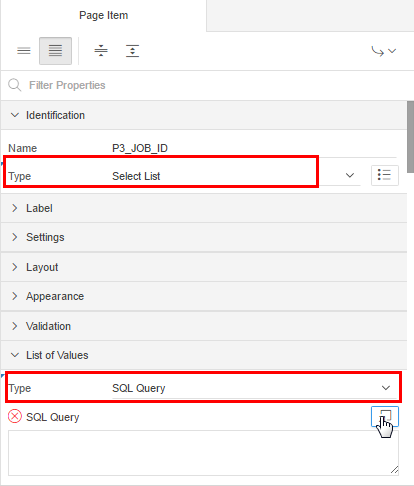
Description of this image -
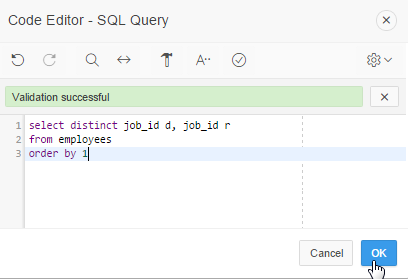
Enter the following SQL query in the Code Editor - SQL Query, and click the Validate icon.
select distinct job_id d, job_id r

                                    from employees

                                    order by 1
Description of this image -
Click OK.
Description of this image -
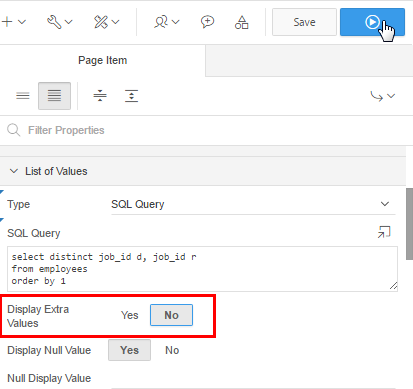
Under List of Values, select No for Display Extra Values, and click Save and Run Page.
Description of this image -
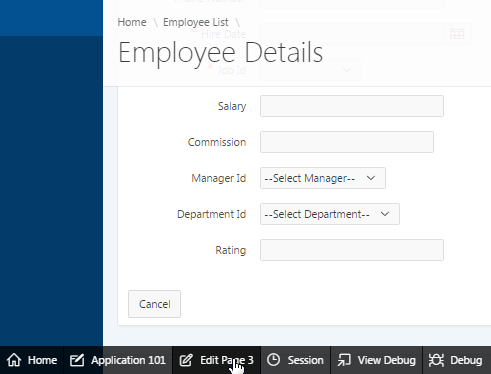
Notice that the Job changed to a select list on the form. To make changes to other items on the page, click Edit Page 3 in the developer toolbar.
Description of this image -
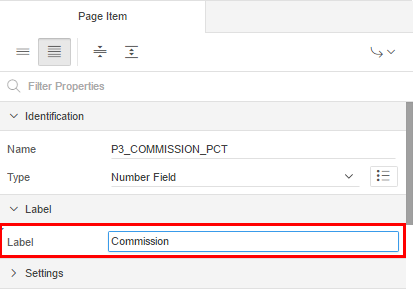
In the Rendering tab, under Items, select P3_COMMISSION_PCT. In its property editor, under Label, change the label to Commission.
Description of this image -
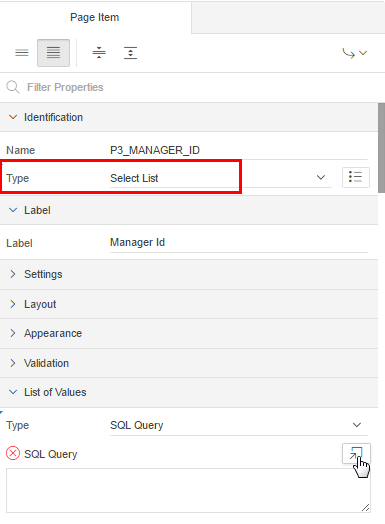
In the Rendering tab, under Items, select P3_MANAGER_ID. In its property editor, under Identification, select Select List for Type. Under List of Values, select SQL Query for Type, and click the Code Editor: SQL Query icon.
Description of this image -
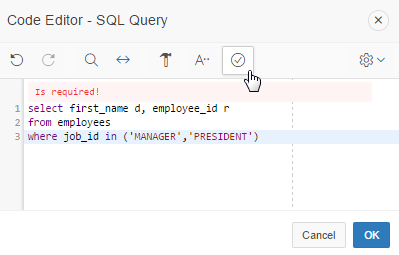
Enter the following SQL query in the Code Editor - SQL Query, and click the Validate icon.
select first_name d, employee_id r

                                    from employees

                                    where job_id in ('MANAGER','PRESIDENT')
Description of this image -
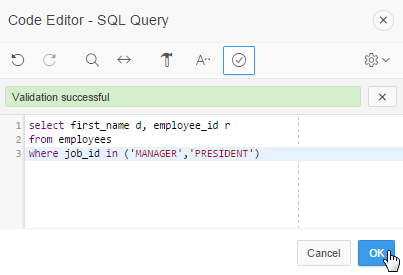
Click OK.
Description of this image -
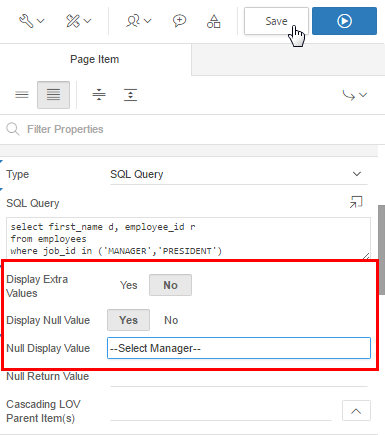
Under List of Values, select No for Display Extra Values, Yes for Display Null Values, enter --Select Manager-- for Null Display Value, and click Save.
Description of this image -
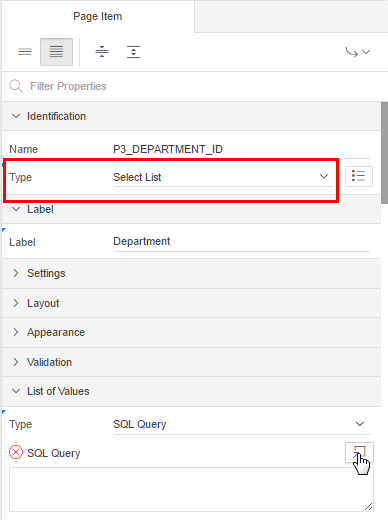
In the Rendering tab, under Items, select P3_DEPARTMENT_ID. In its property editor, under Identification, select Select List for Type. Under List of Values, select SQL Query for Type, and click the Code Editor: SQL Query icon.
Description of this image -
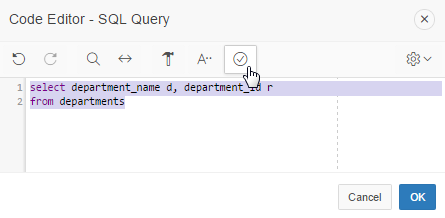
Enter the following SQL query in the Code Editor - SQL Query, and click the Validate icon.
select department_name d,
                                    department_id r

                                    from departments
Description of this image -
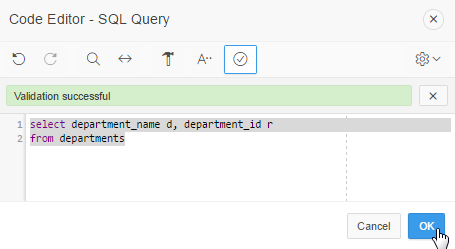
Click OK.
Description of this image -
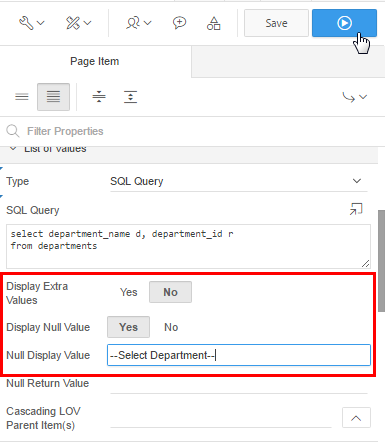
Under List of Values, select No for Display Extra Values, Yes for Display Null Values, enter --Select Department-- for Null Display Value, and click Save and Run Page.
Description of this image -
Notice that the Commission_pct field is labelled as Commission, and the Manager and Department fields are changed to Select Lists. In the next section, you want to create a Dynamic Action on this page, click Edit Page 3 in the developer toolbar.
Description of this image
Creating an Enable/Disable Declarative Dynamic Action
-
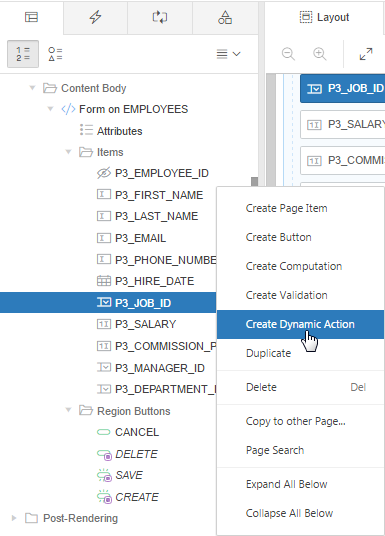
In the Rendering tab, right-click P3_JOB_ID, and select Create Dynamic Action.
Description of this image -
In the property editor of the new Dynamic Action, set the following properties as defined in the table below:
Property Group Property Name Property Value Comments Identification Name JOB EQUALS SALESMAN - When Event Change Whenever P3_JOB value changes, this Dynamic Action executes. When Selection Type Item(s) Value is set by default, because the Dynamic Action is created from P3_JOB_ID under Items. When Item(s) P3_JOB_ID Value is set by default, because the Dynamic Action is created from P3_JOB_ID under Items. When Client-side Condition Item = Value
To ensure that this Dynamic Action executes only when the value of P3_JOB changes to SALESMAN. When Value SA_MAN To ensure that this Dynamic Action executes only when the value of P3_JOB_ID changes to SA_MAN (salesman) 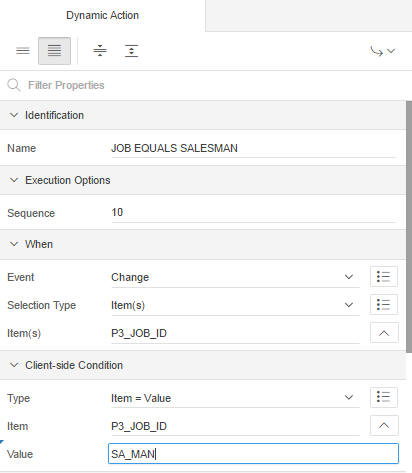
Description of this image -
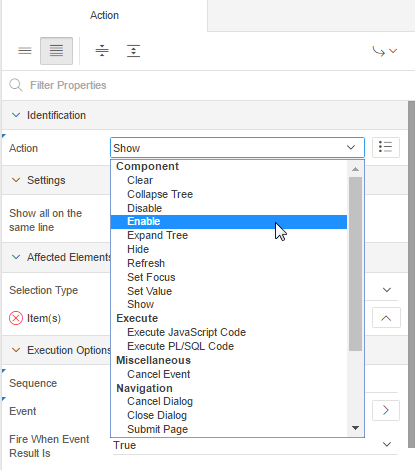
After setting the properties of the Dynamic Action, you want to define the action to be executed when the Event (Change) takes place and the Client-side Condition (Equals to SALESMAN) is True. Under JOB EQUALS SALESMAN, under True, click Show.

Description of this image -
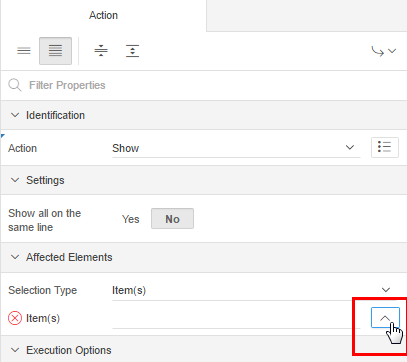
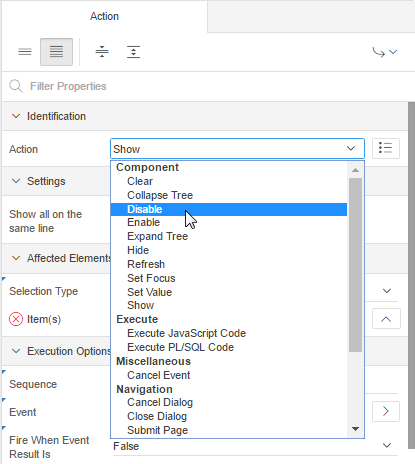
In the property editor, under Identification, select Enable for Action.
Description of this image -
Under Affected Elements, ensure that Selection Type is set to Item(s), and click the List of Values: Item(s) icon for Item(s).
Description of this image -
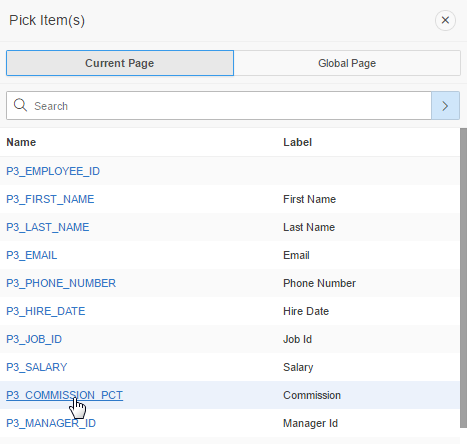
You want to enable the Commission field on the form, when P3_JOB_ID equals to SALESMAN. Therefore, click P3_COMMISSION_PCT in the Pick Item(s) dialog.
Description of this image -
You also want to disable the Commission field on the form when P3_JOB is not equal to SALESMAN. To create the False Action, right-click FALSE, and select Create FALSE Action.
Description of this image -
In the property editor, under Identification, select Disable for Action.
Description of this image -
Under Affected Elements, ensure that Selection Type is set to Item(s), and click the List of Values: Item(s) icon for Item(s).
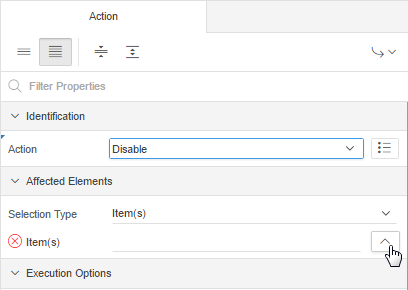
Description of this image -
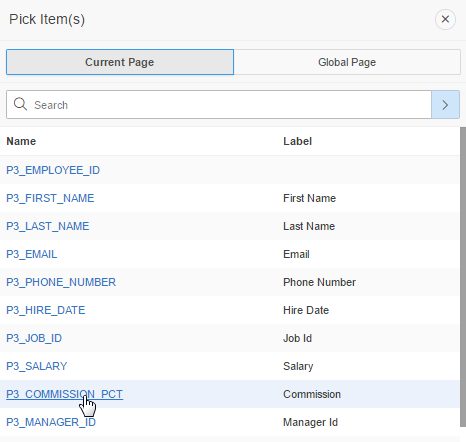
Click P3_COMMISSION_PCT in the Pick Item(s) dialog.
Description of this image -
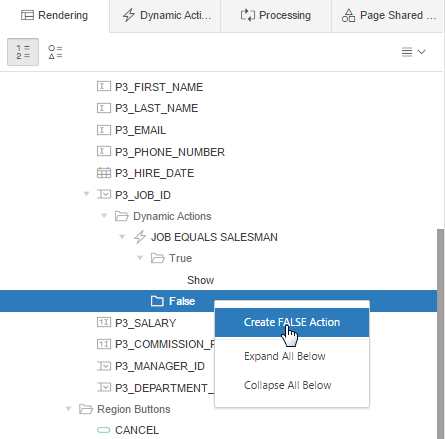
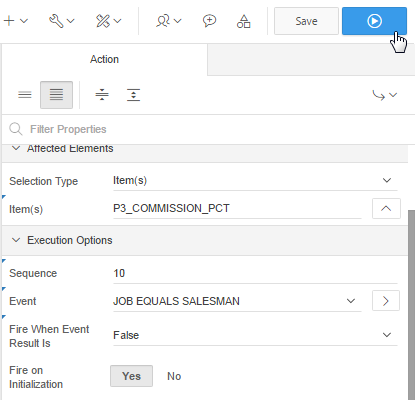
Notice that the properties under Execution Options are set by default. Ensure that Fire on Initialization is set to Yes, and click Save and Run Page.
Description of this image -
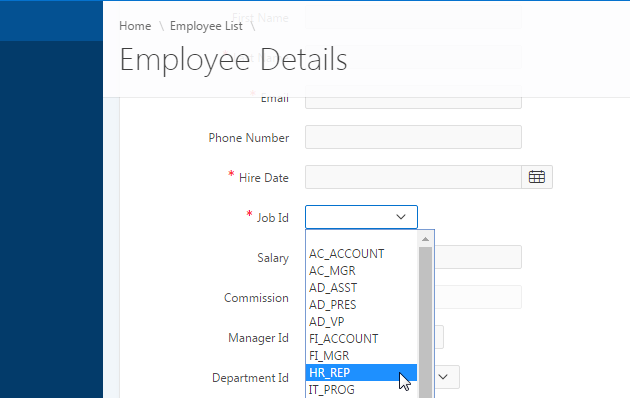
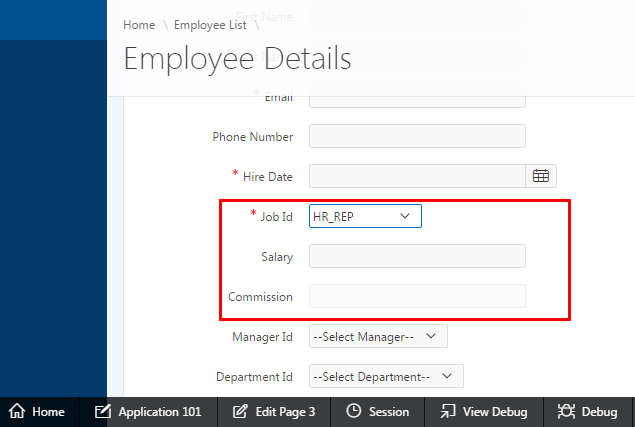
Select HR_REP for Job Id.
Description of this image -
Notice that the Commission field is automatically disabled.
Description of this image -
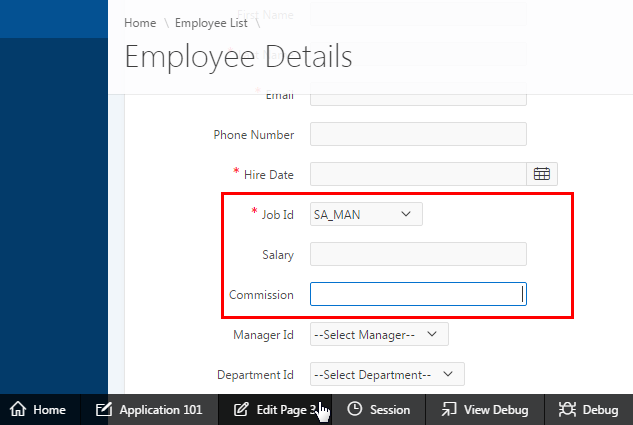
Now, select SA_MAN for Job Id.
Description of this image -
Notice that the Commission field is automatically enabled now. To create another Dynamic Action on the page, click Edit Page 3 in the developer toolbar.
Description of this image
Creating a Set Value Dynamic Action with a SQL Statement
-
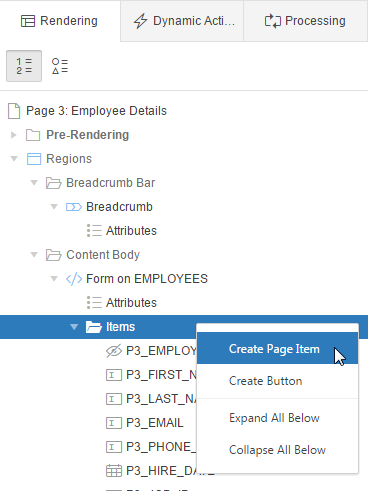
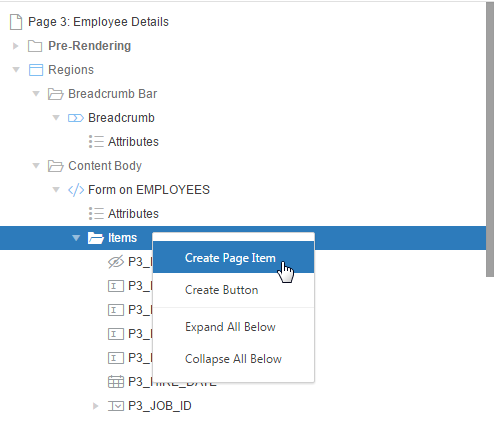
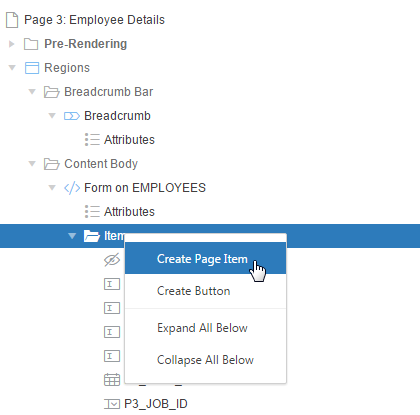
Firstly, you want to create two new items to display Location and Number of Employees values in the form. In the Rendering tab, right-click Items, and click Create Page Item.
Description of this image -
In the property editor, set the properties of the new item as per the following table, and click Save.
Property Group Property Name Property Value Identification Name P3_LOCATION Identification Type Display Only Label Label Location Settings Save Session State No Settings Show Line Breaks No Source Type Item Source Item P3_LOCATION 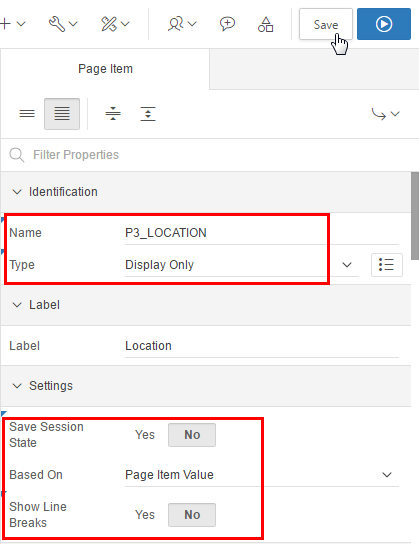
Description of this image 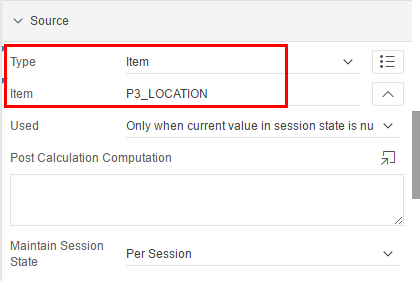
Description of this image -
To create another Display Only item, right-click Items, and click Create Page Item, in the Rendering tab.
Description of this image -
In the property editor, set the properties of the new item as per the following table, and click Save.
Property Group Property Name Property Value Identification Name P3_NUM_EMPLOYEES Identification Type Display Only Label Label Total Employees
Settings Save Session State No Settings Show Line Breaks No Source Type Item Source Item P3_NUM_EMPLOYEES 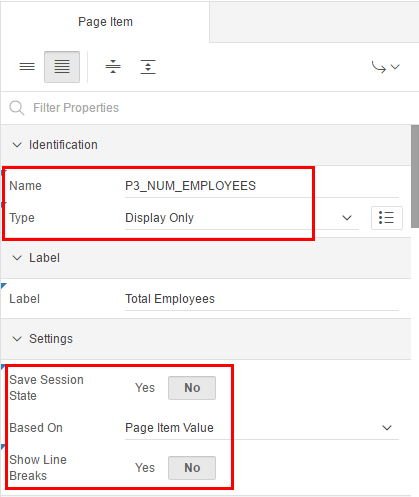
Description of this image 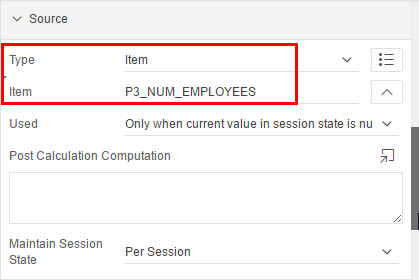
Description of this image -
You can also create a Dynamic Action from the Dynamic Actions tab. Click the Dynamic Actions tab.

Description of this image -
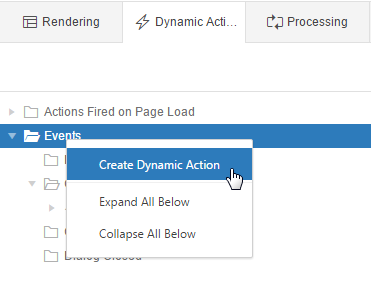
Right-click Events, and select Create Dynamic Action.
Description of this image -
In the property editor of the new Dynamic Action, set the following properties as defined in the table below, and click the List of Values: Item(s) icon for Item(s).
Property Group Property Name Property Value Comments Identification Name Get Department Details
- When Event Change To ensure that the Dynamic Action executes on a Change Event. When Selection Type Item(s) To ensure that the Dynamic Action executes when Change Event occurs on a Item. 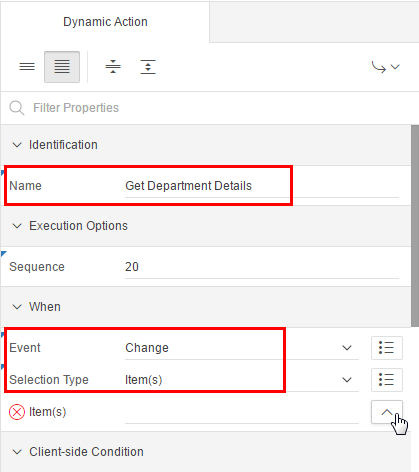
Description of this image -
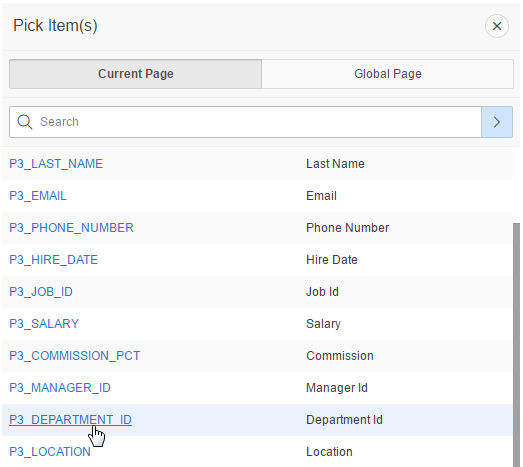
You want this Dynamic Action to be executed when the value of the Department field changes. Therefore, select P3_DEPARTMENT_ID in the Pick Item(s) dialog.
Description of this image -
After setting the properties of the Dynamic Action, you want to define the action to be executed when the Event (Change) takes place. Under Get Department Details, under True, click Show.
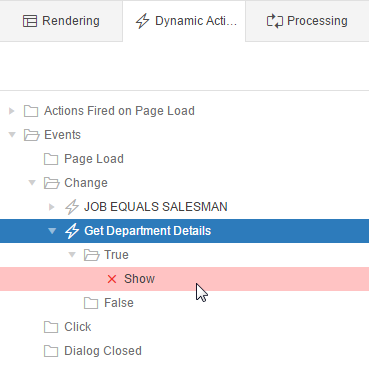
Description of this image -
In the property editor, under Identification, select Set Value for Action.
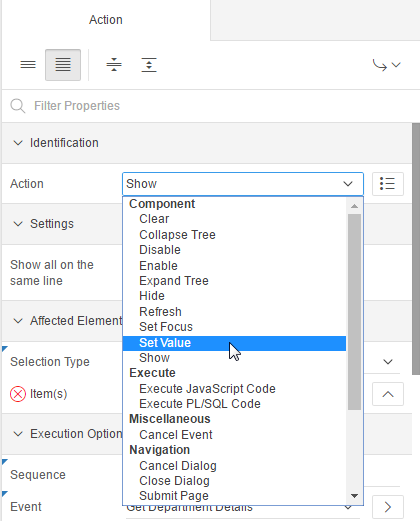
Description of this image -
Under Settings, select SQL Statement for Set Type, and click the Code Editor: SQL Statement icon.
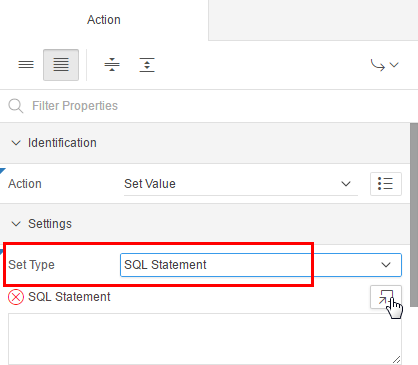
Description of this image -
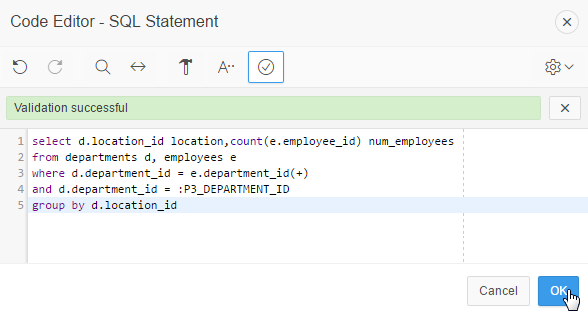
Enter the following SQL query in the Code Editor - SQL Statement, and click the Validate icon.
select
                                  d.location_id location,count(e.employee_id)
                                  num_employees

                                  from departments d, employees e

                                  where d.department_id = e.department_id(+)

                                  and d.department_id = :P3_DEPARTMENT_ID

                                  group by d.location_id
Description of this image -
Click OK.
Description of this image -
To ensure that the SQL statement entered above executes successfully, you have to submit P3_DEPARTMENT_ID item used as a host variable in the above query. Click the Items to Submit icon.
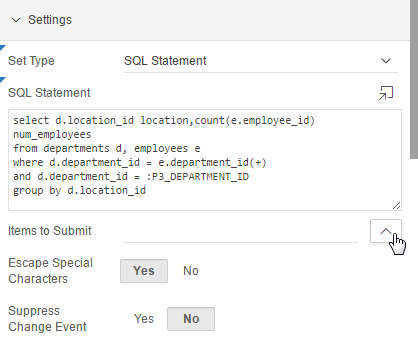
Description of this image -
Select P3_DEPARTMENT_ID.
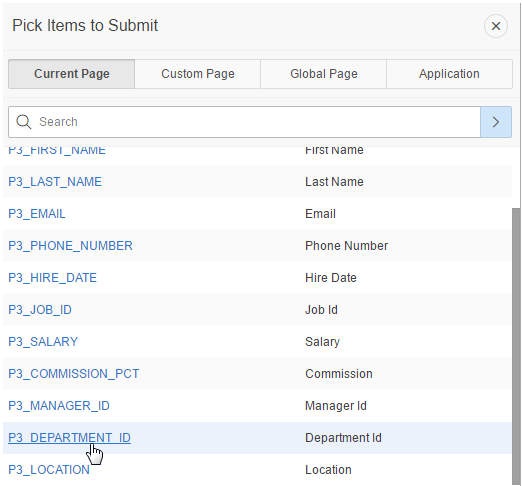
Description of this image -
You want to set the value of Location field in the form, when this Dynamic Action executes. Under Affected Elements, ensure that Selection Type is set to Item(s), and click the Item(s) icon for Item(s).
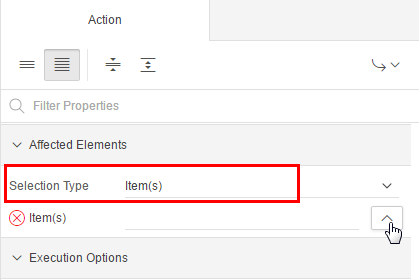
Description of this image -
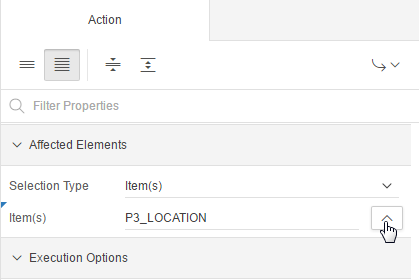
Select P3_LOCATION.

Description of this image -
You also want to set the value of Total Employees field in the form, when this Dynamic Action executes. Click the Item(s) icon for Item(s), again.
Description of this image -
Select P3_NUM_EMPLOYEES.
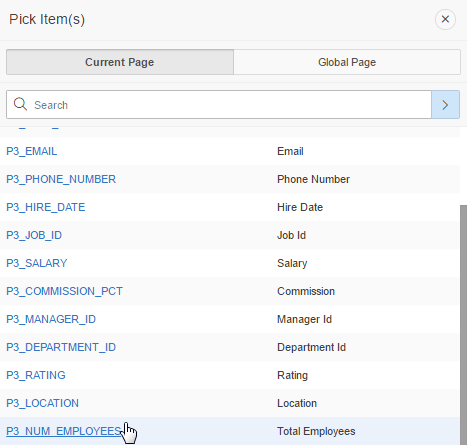
Description of this image -
Click Save and Run Page.

Description of this image -
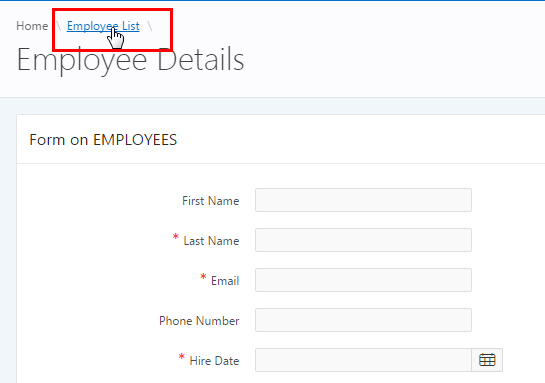
Click Cancel, to open the Employee List.
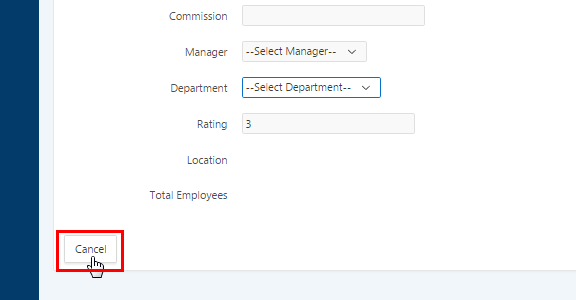
Description of this image -
Click the Edit icon beside the first row in the Employee List.
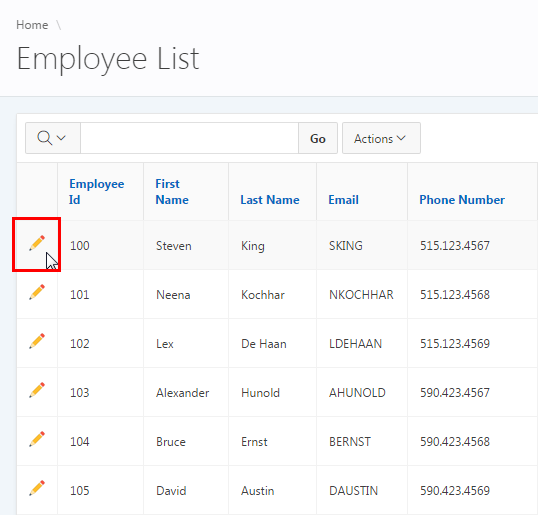
Description of this image -
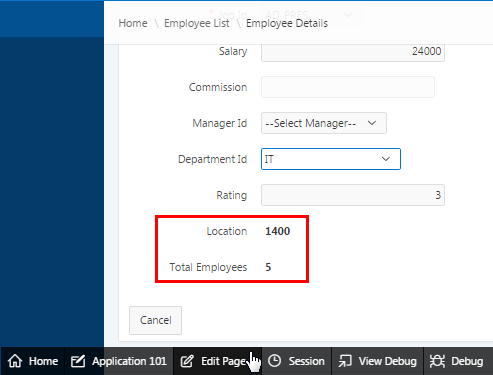
The Employee Details form opens for editing. Notice that the value of Location and Total Employees is automatically set based on the value of Department field on the form.

Description of this image -
Select IT for Department_id, and notice the values of Location and Total Employees changes automatically. In the next section, you want to create a similar Dynamic Action using PL/SQL. Click Edit Page 3 in the developer toolbar.
Description of this image
Creating a Set Value Dynamic Action with PL/SQL
-
Firstly, you want to create a new item to display Bonus in the form. In the Rendering tab, right-click Items, and click Create Page Item.
Description of this image -
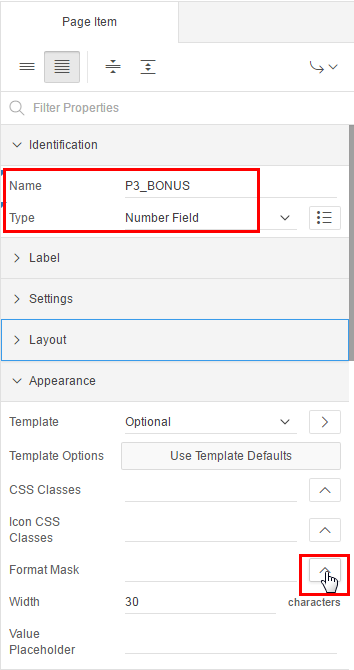
In the property editor, under Identification, enter P3_BONUS for Name, and select Number Field for Type. Under Appearance, click the Format Mask icon for Format Mask.
Description of this image -
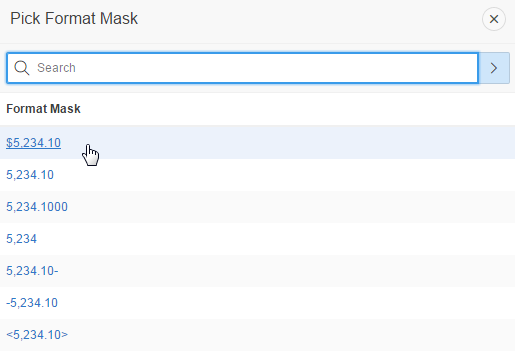
Select $5,234.10.
Description of this image -
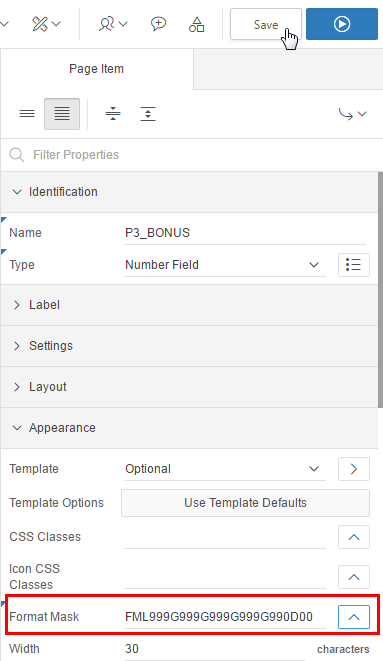
Click Save.
Description of this image -
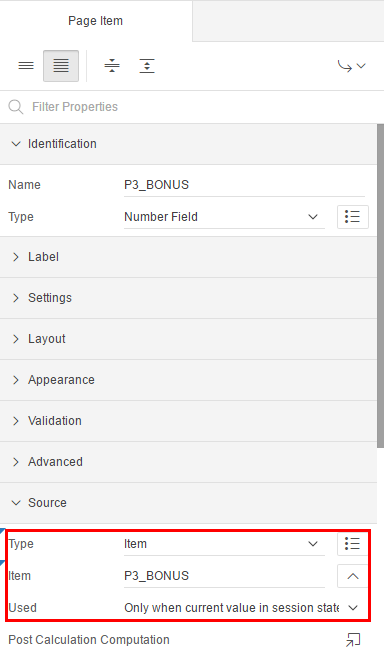
Under Source, select Item for Type, P3_BONUS for Item, and Only when current value in session state is null for Used.
Description of this image -
To create the Dynamic Action, click the Dynamic Actions tab.
Description of this image -
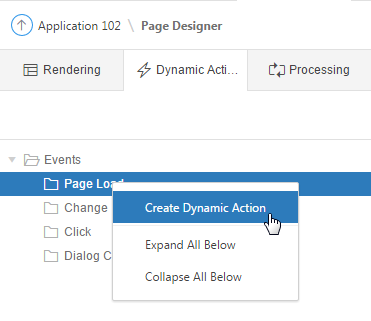
You want to create a Dynamic Action that executes every time the page loads. Therefore, right-click Page Load and select Create Dynamic Action.
Description of this image -
In the property editor, under Identification, enter Calculate Bonus for Name. Notice that the Event is already selected as Page Load.

Description of this image -
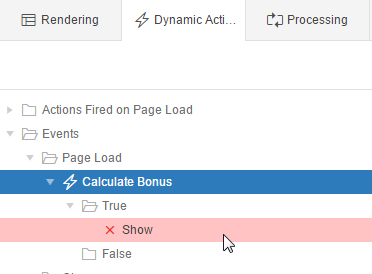
After setting the properties of the Dynamic Action, you want to define the action to be executed when the Event (Page Load) takes place. Under Calculate Bonus, under True, click Show.
Description of this image -
In the property editor, under Identification, select Set Value for Action. Under Settings, select PL/SQL Function Body for Set Type, and click the Code Editor: PL/SQL Function Body icon.
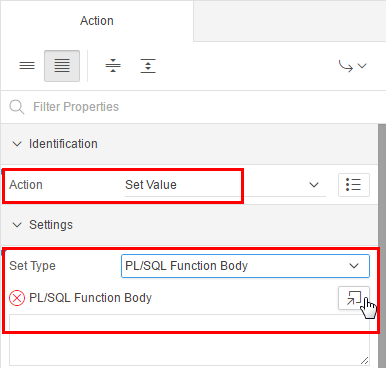
Description of this image -
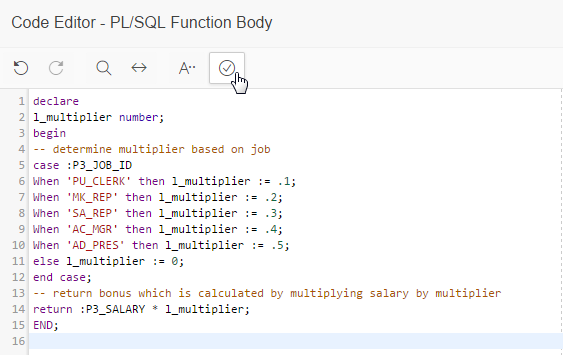
Enter the following SQL query in the Code Editor - PL/SQL Function Body, and click the Validate icon.
declare

                                  l_multiplier number;

                                  begin

                                  -- determine multiplier based on job

                                  case :P3_JOB_ID

                                  When 'PU_CLERK' then l_multiplier := .1;

                                  When 'MK_REP' then l_multiplier := .2;

                                  When 'SA_REP' then l_multiplier := .3;

                                  When 'AC_MGR' then l_multiplier := .4;

                                  When 'AD_PRES' then l_multiplier := .5;

                                  else l_multiplier := 0;

                                  end case;

                                  -- return bonus which is calculated by
                                  multiplying salary by multiplier

                                  return :P3_SALARY * l_multiplier;

                                  END;
Description of this image -
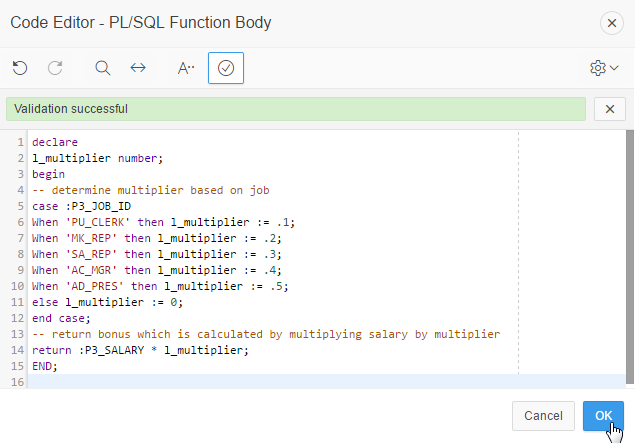
Click OK.
Description of this image -
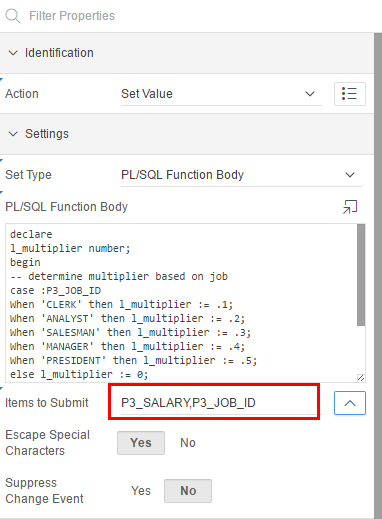
To ensure that the PL/SQL code entered above executes successfully, you have to submit P3_SALARY and P3_JOB_ID items used as a host variables in the above code. Click the Page Items to Submit icon, and select P3_SALARY. Click the Items to Submit icon again, and select P3_JOB_ID also.
Description of this image -
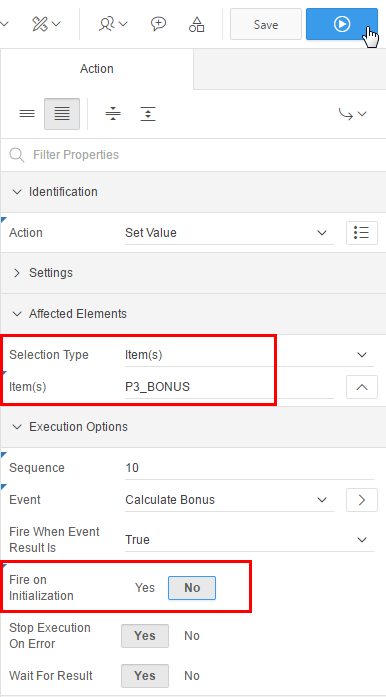
You want to set the value of Bonus field in the form, when this Dynamic Action executes. Under Affected Elements, ensure that Selection Type is set to Item(s), click the List of Values: Item(s) icon for Item(s), and select P3_BONUS. Under Execution Options, select No for Fire on Initialization, and click Save and Run Page.
Description of this image -
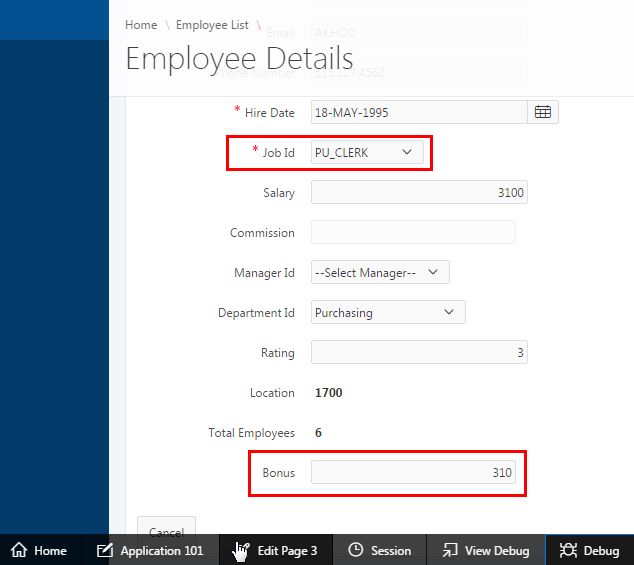
Notice that the value of Bonus is calculated and displayed in the Bonus Field as soon as the page loads. In the next section, you want to create a Dynamic Action which uses Plug-in, click Edit Page 3 in the developer toolbar.
Description of this image
Using a Plug-in in a Dynamic Action
-
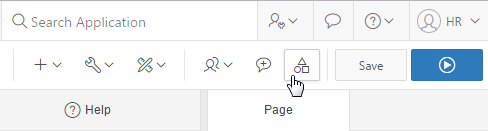
To install the Plug-in as a shared component, click the Shared Components icon.
Description of this image -
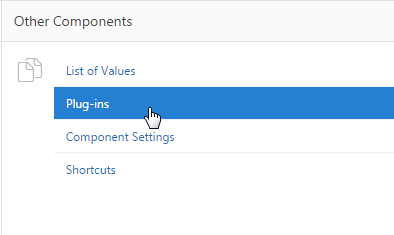
Under Other Components, click Plug-ins.
Description of this image -
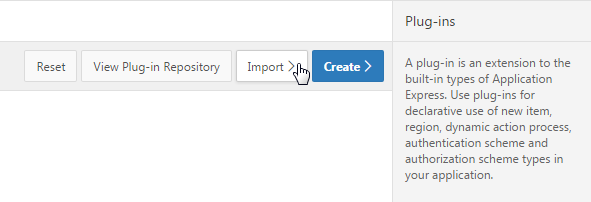
The Plug-in import file is provided with files.zip mentioned in the prerequisites section of this tutorial. Click Import.
Description of this image -
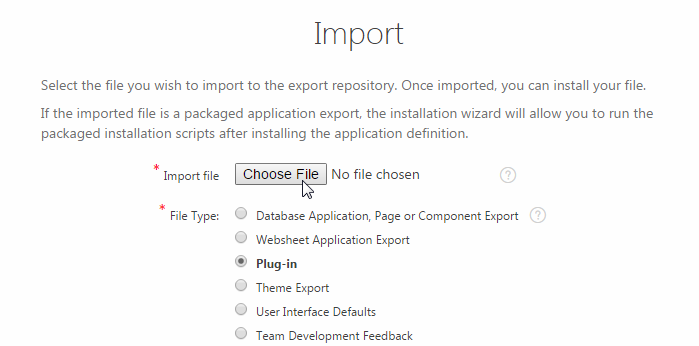
Click Choose File. Ensure that the File Type is Plug-in.
Description of this image -
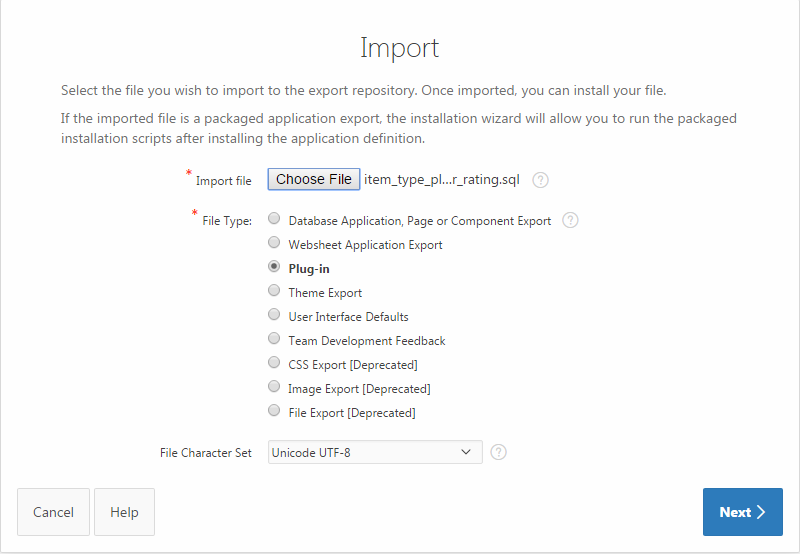
Browse to your working directory where files.zip is downloadedfiles directory, and select item_type_plugin_com_oracle_apex_starrating_modern.sql file. Click Next >.
Description of this image -
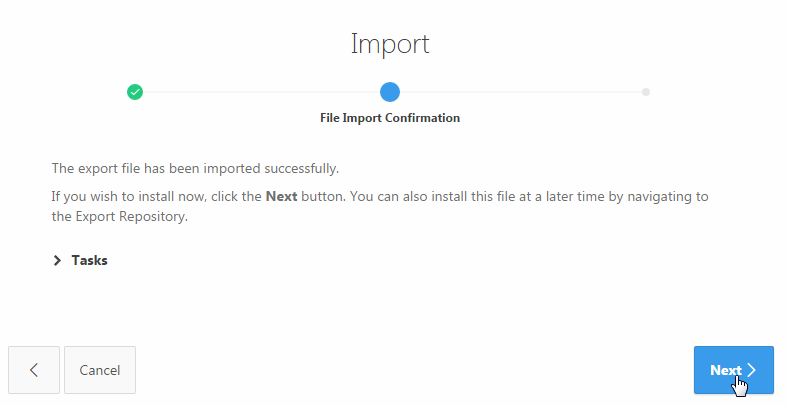
Click Next >.
Description of this image -
Click Install Plug-in.
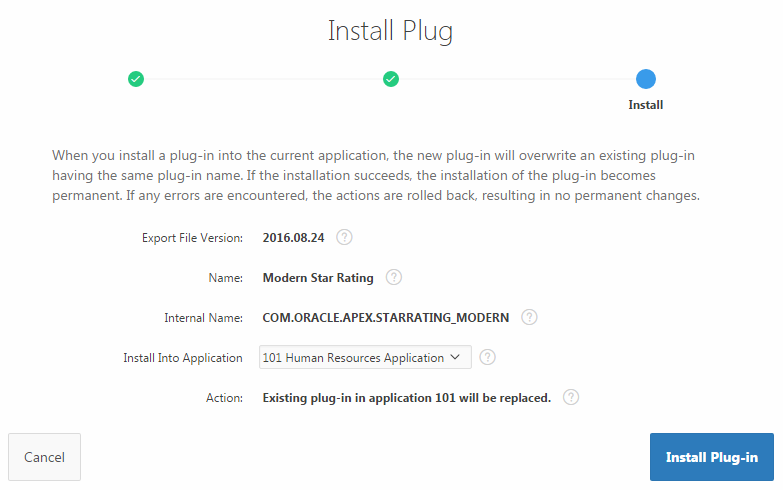
Description of this image -
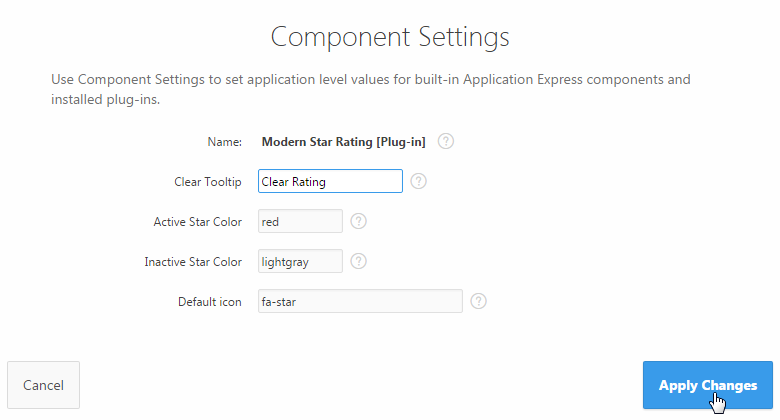
The Slider Plug-in is installed. In the Component Settings window, click Apply Changes.
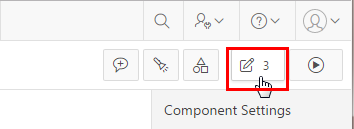
Description of this image - Click the Edit Page 3 icon.
Description of this image -
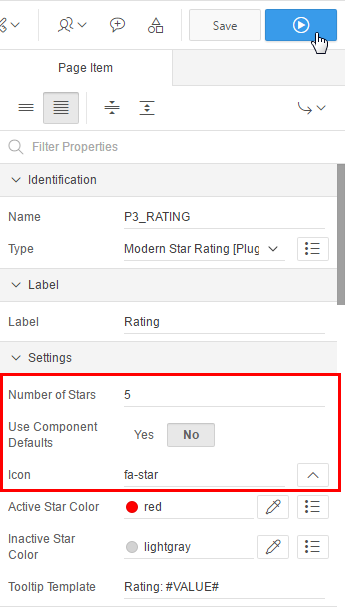
In the Rendering tab, under Items, select P3_RATING. In its property editor, under Identification, select Modern Star Rating [Plug-In] for Type.
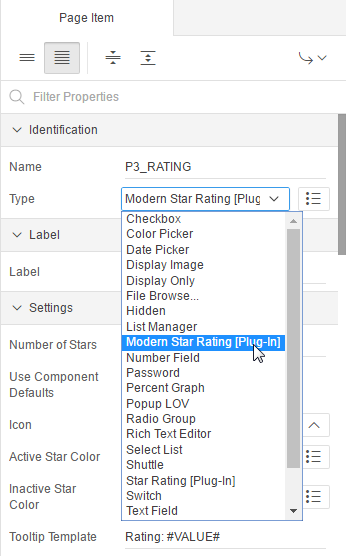
Description of this image -
Under Settings, enter 5 for Number of Stars, select No for Use Components Default, select fa-star for icon, and click Save and Run Page.
Description of this image -
In the page navigation, click Employee List to view the report.
Description of this image -
click the Edit icon next to Employee Id 100.

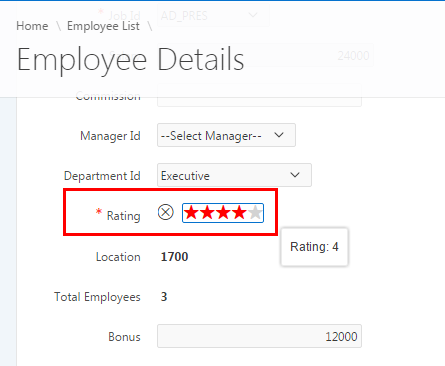
Description of this image -
You see that the employee rating is displayed using the Modern Star Rating plug-in instead of a number. Update the employee rating to 4.
Description of this image
Creating a Dynamic Action on a Button
-
Before creating the Dynamic Action, you want to see the current functionality of the form when the Apply Changes button is clicked. Click Apply Changes.
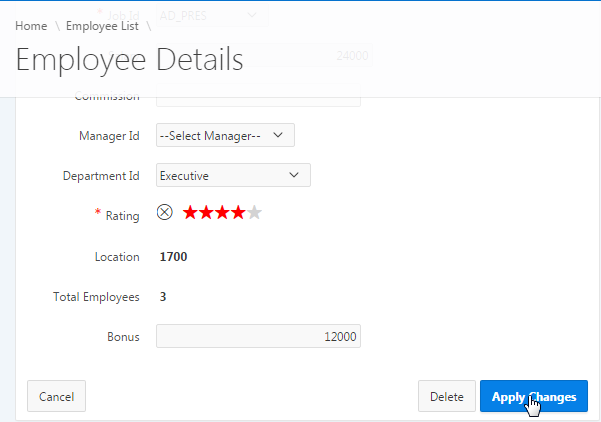
Description of this image -
The changes are saved to the database and you are returned to the Employee List. Notice that the salary of the edited row is updated with the new value. You can also notice that the few seconds before you are redirected to the Employee List, the Apply Changes button is remains enabled. Because of this, it is possible that the user can click the same button multiple times.
To avoid this situation, you want to create a dynamic action on the Apply Changes button. Click the edit icon of the employee you just edited.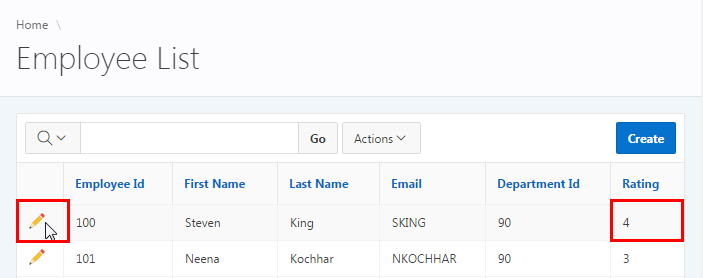
Description of this image -
Click Edit Page 3 in the developer toolbar.
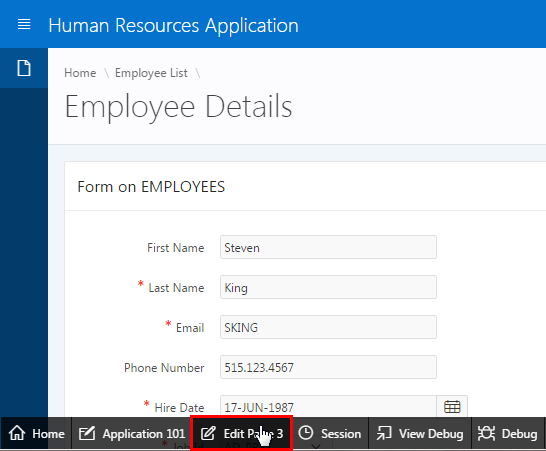
Description of this image -
In the Rendering tab, under Region Buttons, right-click Save, and select Create Dynamic Action.
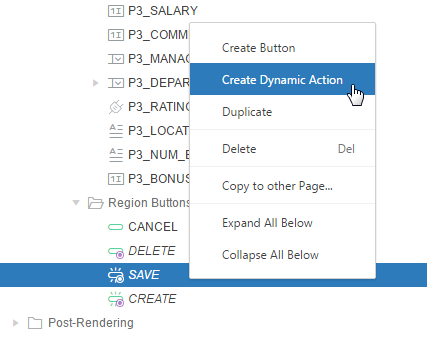
Description of this image -
In the property editor, under Identification, enter Submit Page for Name. Notice that values of Event, Selection Type and Button are already populated, under Execution Options.
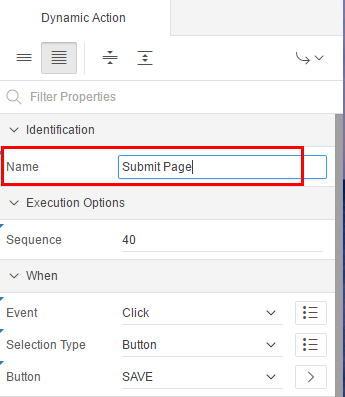
Description of this image -
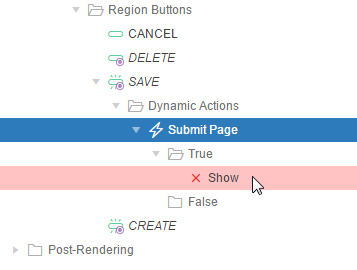
After setting the properties of the Dynamic Action, you want to define the action to be executed when the Save button is clicked. Under Submit Page, under True, click Show.
Description of this image -
In the property editor, under Identification, select Submit Page for Action. Under Settings, enter SAVE for Request/Button Name. Under Execution Options, select No for Fire on Initialization, and click Save.
Note: The value entered in the Request/Button Name should be exactly same as the name of the button on which you are creating the Dynamic Action.
Description of this image -
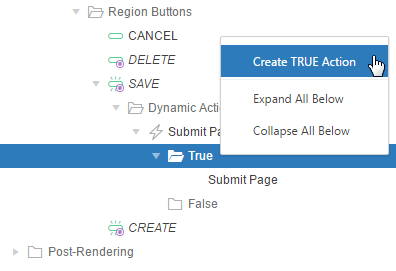
Along with page submission, you want to disable the Apply Changes button, once it is clicked. To achieve this, you have to create another True Action for the same event. Under Submit Page, right-click True, and select Create TRUE Action.
Description of this image -
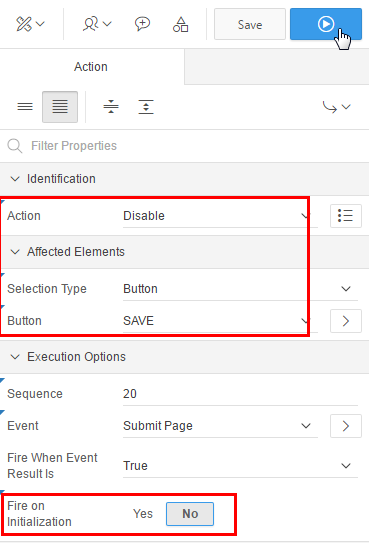
In the property editor, under Identification, select Disable for Action. Under Affected Elements, select Button for Selection Type, and SAVE for Button. Under Execution Options, select No for Fire on Initialization, and click Save and Run Page.
Description of this image -
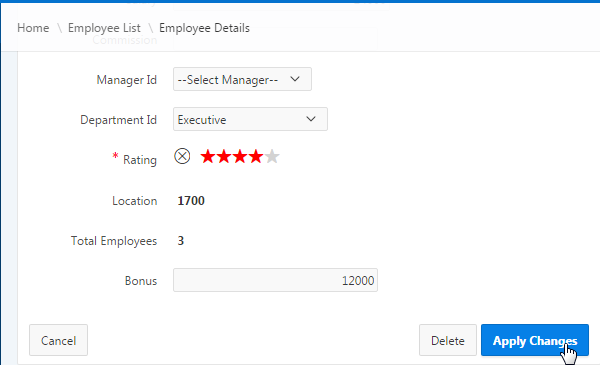
The Employee Details form loads. Click Apply Changes.
Description of this image -
Notice that page gets submitted and in the mean time, the Apply Changes appears disabled.
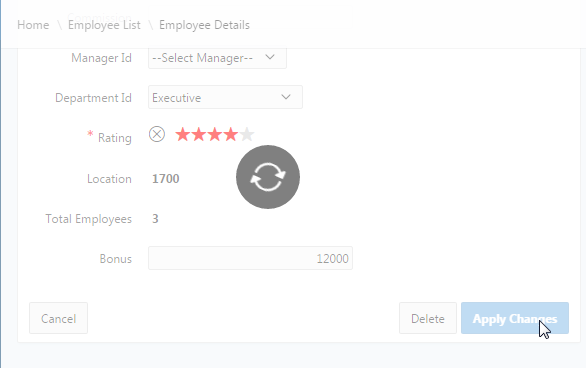
Description of this image -
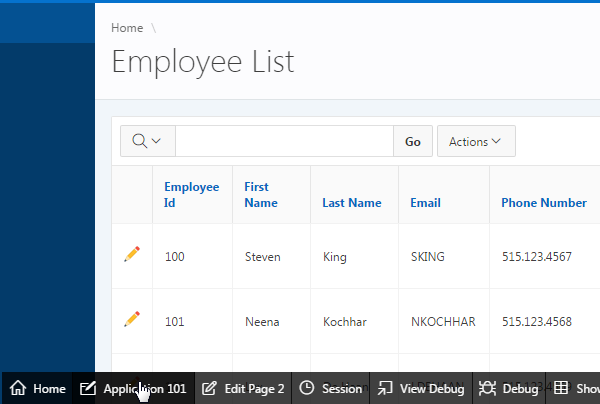
After the page is submitted, you are redirected to the Employee List report. Click Application<n> in the developer toolbar.
Description of this image
Summary
In this tutorial, you have learned how to:
- Create a database application with a form and a report page
- Edit the properties of items on a form page
- Create a Enable/Disable Dynamic Action on a page item
- Create a Set Value Dynamic Action using a SQL statement
- Create a Set Value Dynamic Action using PL/SQL
- Create a Dynamic Action using a Plug-in
- Create a Dynamic Action on a button