 Oracle
Application Express 18.1: Creating a Web Source Module (1 of 2)
Oracle
Application Express 18.1: Creating a Web Source Module (1 of 2) Before You Begin
This 15-minute tutorial shows you how to create a Web Source Module and also create a calendar using Oracle Application Express 18.1. Web Source Modules act as a reference to one or multiple external web services. A module can contain one or many Web Source Operations which are the references to a concrete external web service.
This
is the first tutorial in the Oracle
Application Express 18.1: Creating a Web Source Module
Series. Read the tutorials in sequence:
- Oracle
Application Express 18.1: Creating a Web Source Module
(1 of 2)
- Oracle Application Express 18.1: Creating a Web Source Module (2 of 2)
Background
Web Source Modules enable developers to access Representational State Transfer (REST) services or generic JSON data feeds in applications and use the data in Application Express components such as reports, interactive reports, and interactive grids.
Unlike Web Service References, a Web Source Module contains metadata about the web service which can be used by Application Express Components or PL/SQL processes to invoke the service and to process the responses. Web Source Modules contain multiple operators that differ depending upon the Web service target. For REST services, an operation is a specific service handler (such as, GET, PUT, POST, or DELETE). Developers assign an operation on a database action, such as Fetch Multiple Rows, Fetch Single Row, Insert Row, Update Row, and Delete Row. However, you can assign each Database Operation only once to a Web Source Operation.
What Do You Need?
Accessing Your Development Environment
How you sign in and access Oracle Application Express depends upon where Oracle Application Express resides. Oracle Application Express may reside in a local on-premises Oracle Database or in a hosted environment, such as the Oracle Cloud. The sign in credentials you use to sign in differ depending upon the installation type.
- Free Workspace: Give Oracle Application Express a test run by signing up for a free workspace. To request an evaluation workspace, go to Database Cloud Service, and click Get Started.
- Oracle Cloud: Develop and deploy applications without worrying about infrastructure, repair, and downtime. Oracle Application Express is available in Exadata Express Cloud Service and Database Cloud Service. However, you need to manually customize your databases to install and enable Oracle Application Express. To learn more, see Database Cloud Service
- Oracle Application Express On-premises: Install Oracle Application Express directly within any Oracle Database and then sign in to your workspace using your sign in credentials. For details on your sign in credentials, contact your administrator or see Oracle Application Express Installation Guide.
- Oracle Application Express Pre-Built VM:
Install a Pre-Built Virtual Machine (VM) which includes an
Oracle Database and Oracle Application Express 18.1. To learn
more, see Hands-On Labs.
Once the VM is installed, start the VM: - Click Start to start the browser.
- Click the APEX browser bookmark.
- When prompted to sign in, enter the sign in credentials (unless given other credentials to use):
- Workspace:
obe - Userame:
obe - Password:
oracle
 Create
an Application
Create
an Application
In this section you create a new empty application with just a Global page, Home page, and a Login page. Later, you will add pages to it.
To create an application:
- Sign in to Oracle Application Express 18.1 by entering the credentials (workspace, username, and password).
- In the Workspace homepage, click App Builder.

Description of the illustration app_builder.png - Click Create.
- Select New Application from the Create an
Application window.
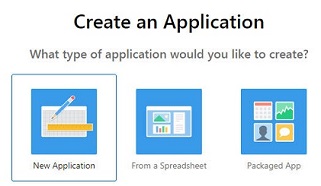
Description of the illustration create_app.png - The Create an Application page opens. In the
Name field, enter
USGS Earthquake. This application will display the magnitude and time of when earthquakes occurred in the following sections.
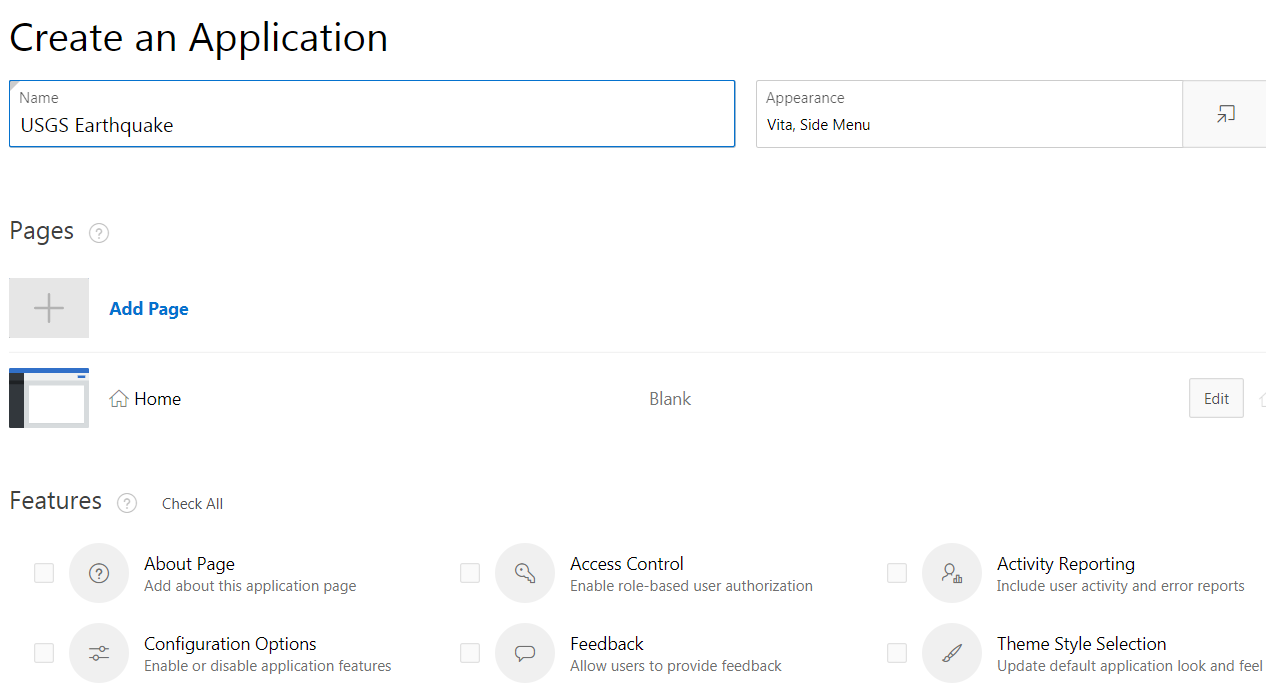
Description of the illustration create_usgs_page.png - Select Create Application. The Application home page appears.
 Create
a Web Source Module
Create
a Web Source Module
In this section you use the GeoJSON API to demonstrate steps for creating web source for your application.
To create a Web Source Module:
- On the Application home
page, click Shared
Components.
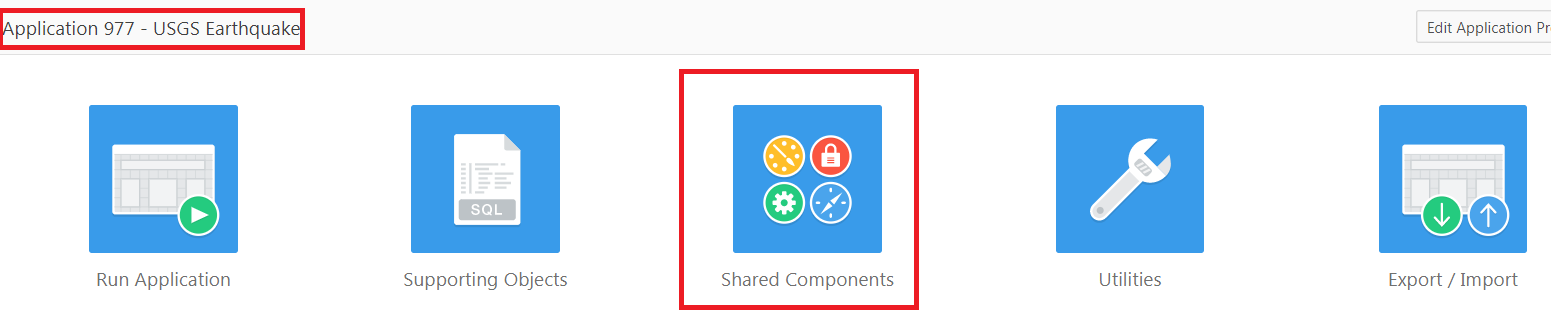
Description of the illustration shared_comp.png - Under Data Sources, select Web
Source Modules.
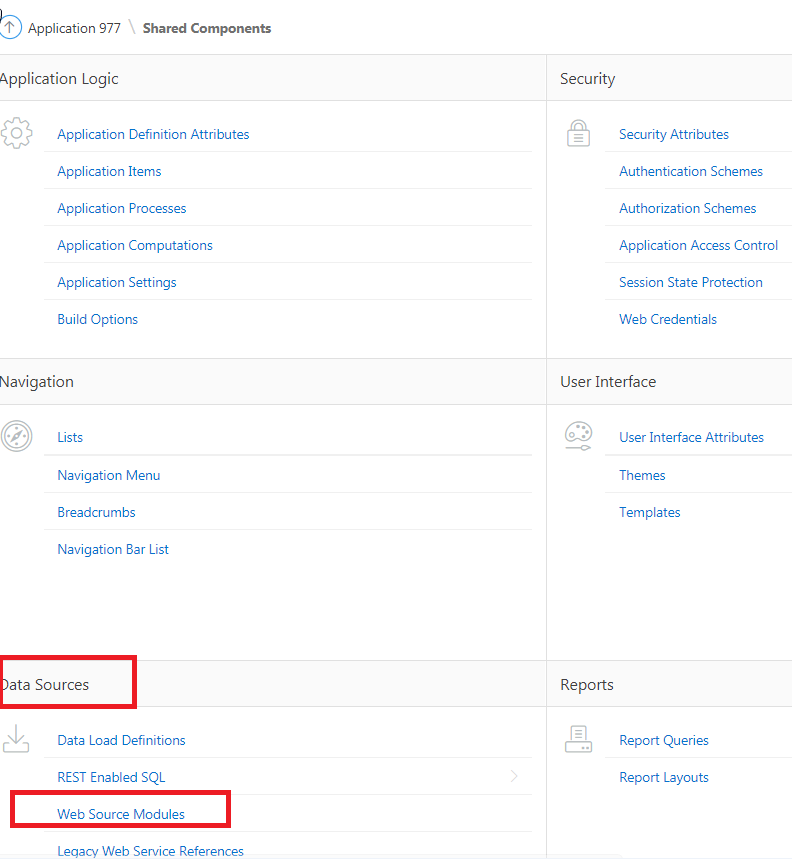
Description of the illustration shared_components_web_source.png - The Web Source Modules page appears. Click Create.

Description of the illustration web_source_modules.png - On
the Create Web Source Module - Method page, define the
following attributes:
- Create Web Source Module: Select From Scratch.
- Click Next.
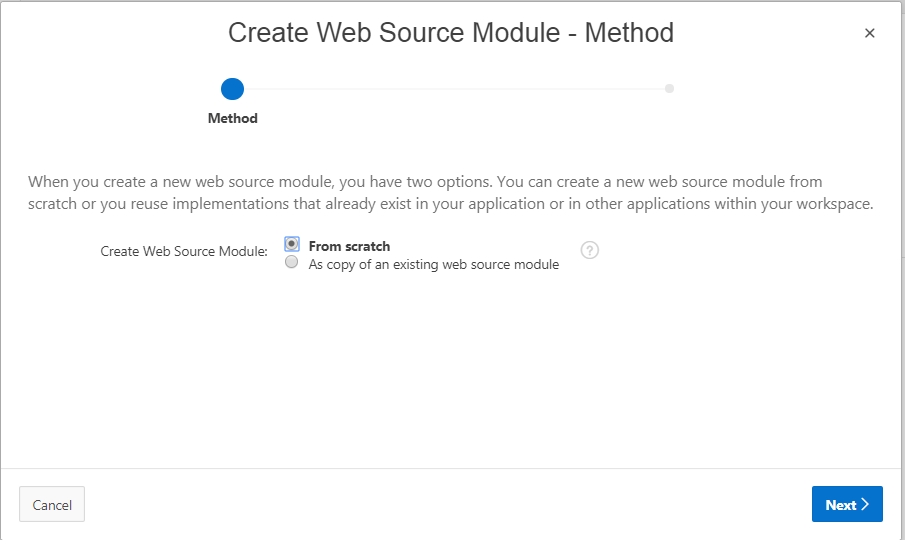
Description of the illustration web_source_from_scratch.png - On the Create Web Source - General page, define the
following attributes:
- Web Source Type - Select Simple HTTP.
- Name - Enter a descriptive name for
this Web Source Module,
USGS_Earthquake_WS. - URL Endpoint - Enter
https://earthquake.usgs.gov/earthquakes/feed/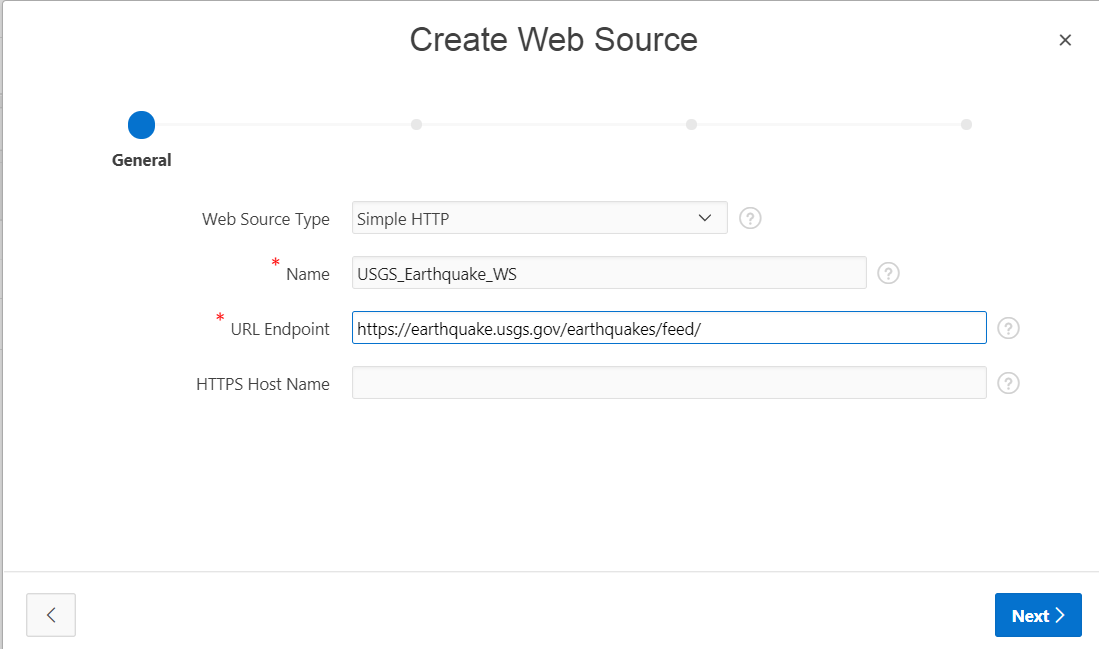
Description of the illustration create_web_source.png - Click Next.
Note that Application Express tests the URL endpoint once you click Next. If the URL is incorrect, an error message displays. If that is the case, click Back and correct the URL. If the URL works, Remote Server page appears.
- On the Create Web Source - Remote Server page, define
the following attributes:
- Remote Server: Select Create New
- Base URL - Enter the Base URL of the
chosen Remote Server object:
https://earthquake.usgs.gov/earthquakes/feed/ - Service URL Path - Enter the
service-specific URL Path for the Web Source Module:
v1.0/summary/4.5_month.geojson Click Next.
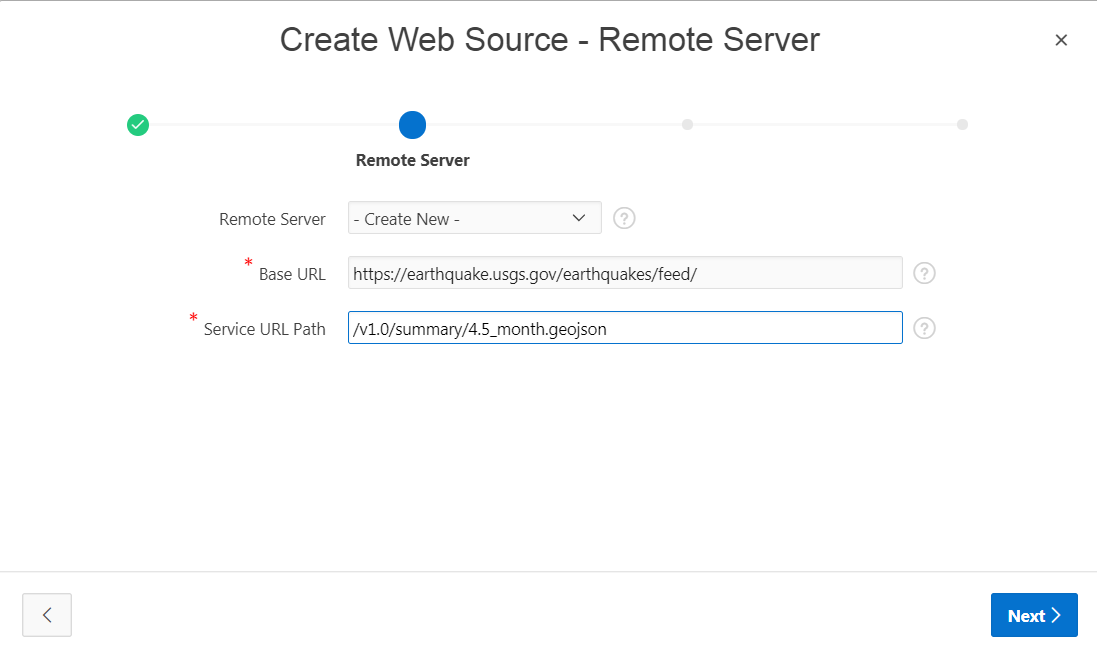
Description of the illustration web_source_remote_server.png - On the Authentication page, define the following attributes:
- Select No (as we are using a public
API)
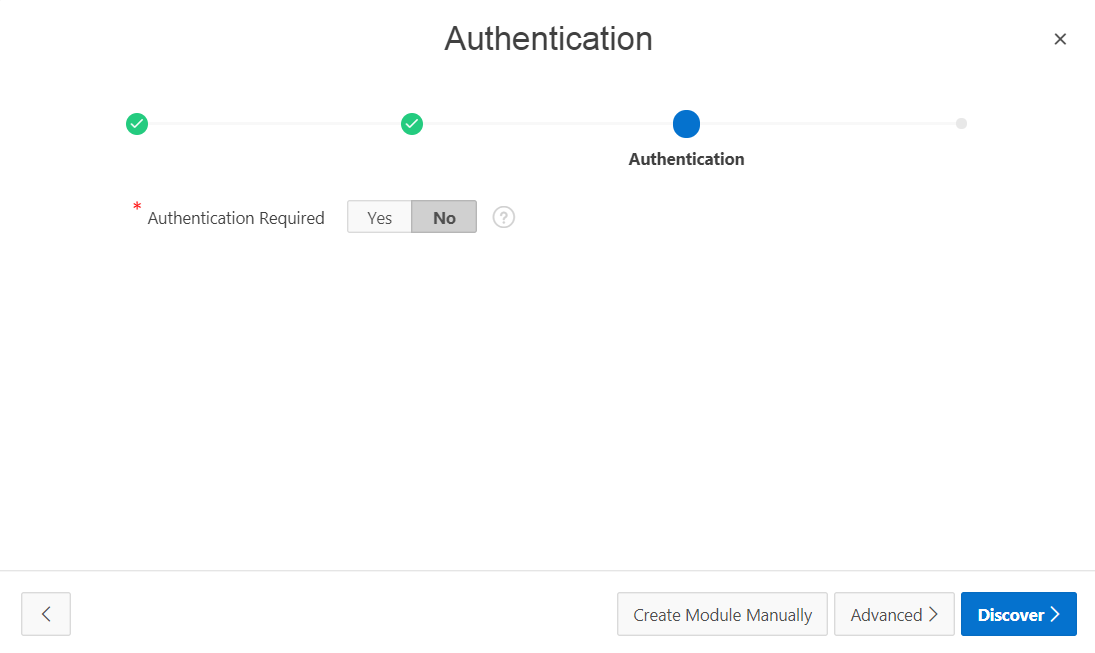
Description of the illustration authentication.pn - Click Discover.
- Select No (as we are using a public
API)
- The Web Source Discovery page opens. You can see that
different columns are populated, for example, Place,
Magnitude, and Time of the Earthquake.
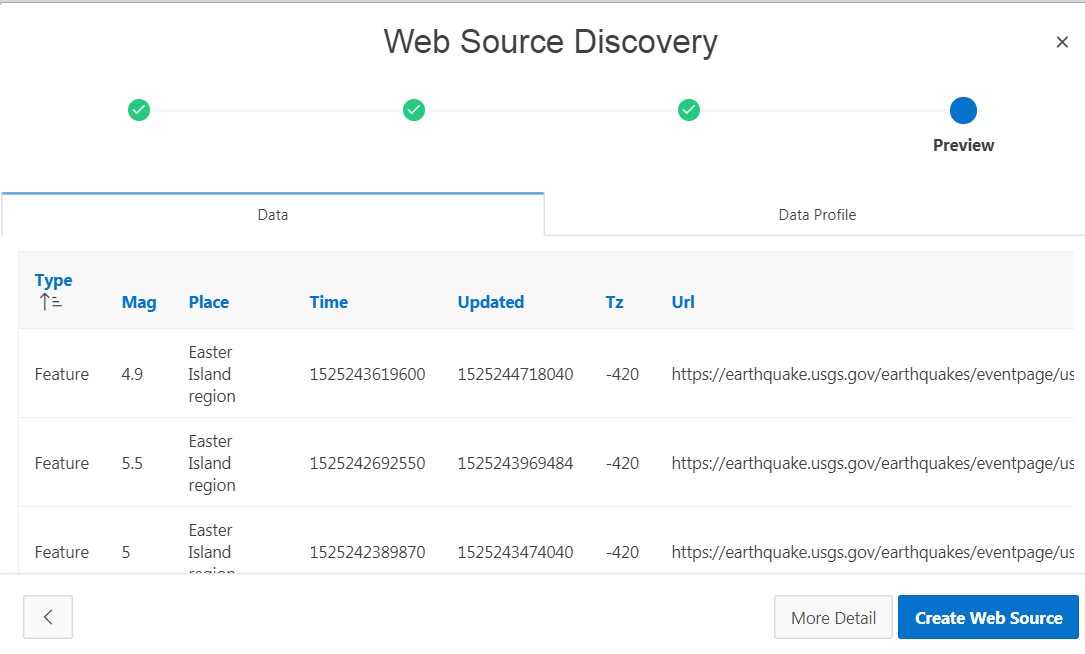
Description of the illustration web_source_discovery_page.png - Click Create Web Source. The Web
Source Module is created.
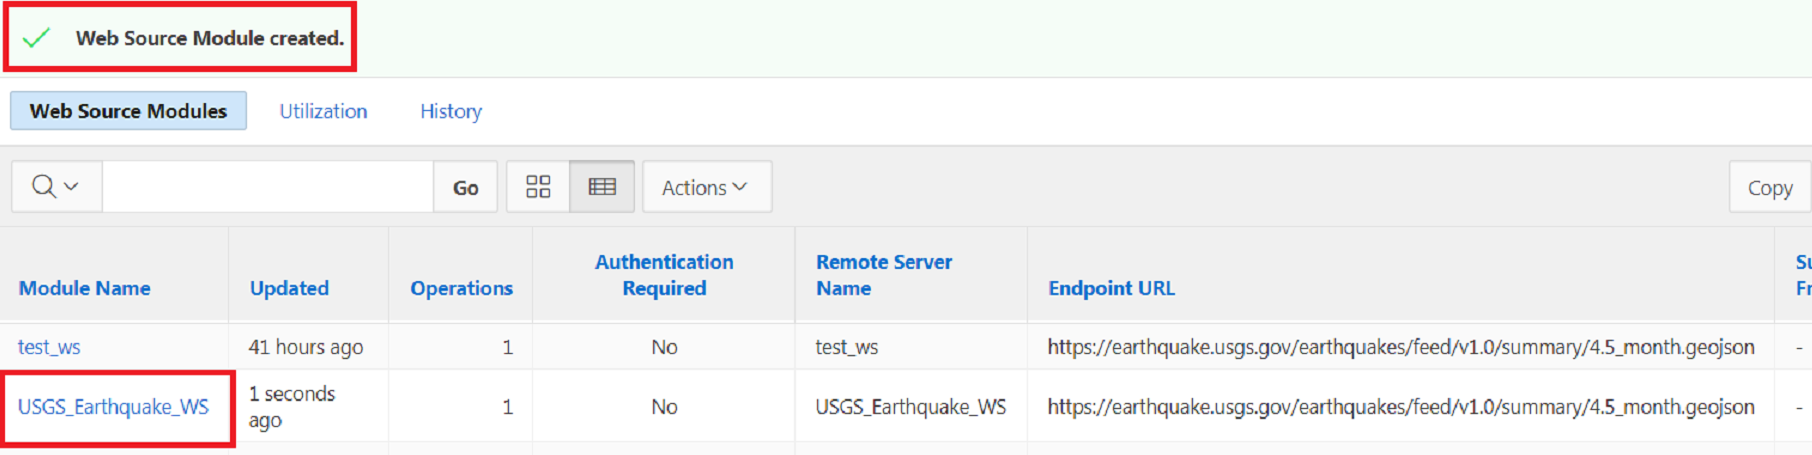
Description of the illustration web_source_module_created.png
- Click Create Web Source. The Web
Source Module is created.
 Edit a
Web Source Module
Edit a
Web Source Module
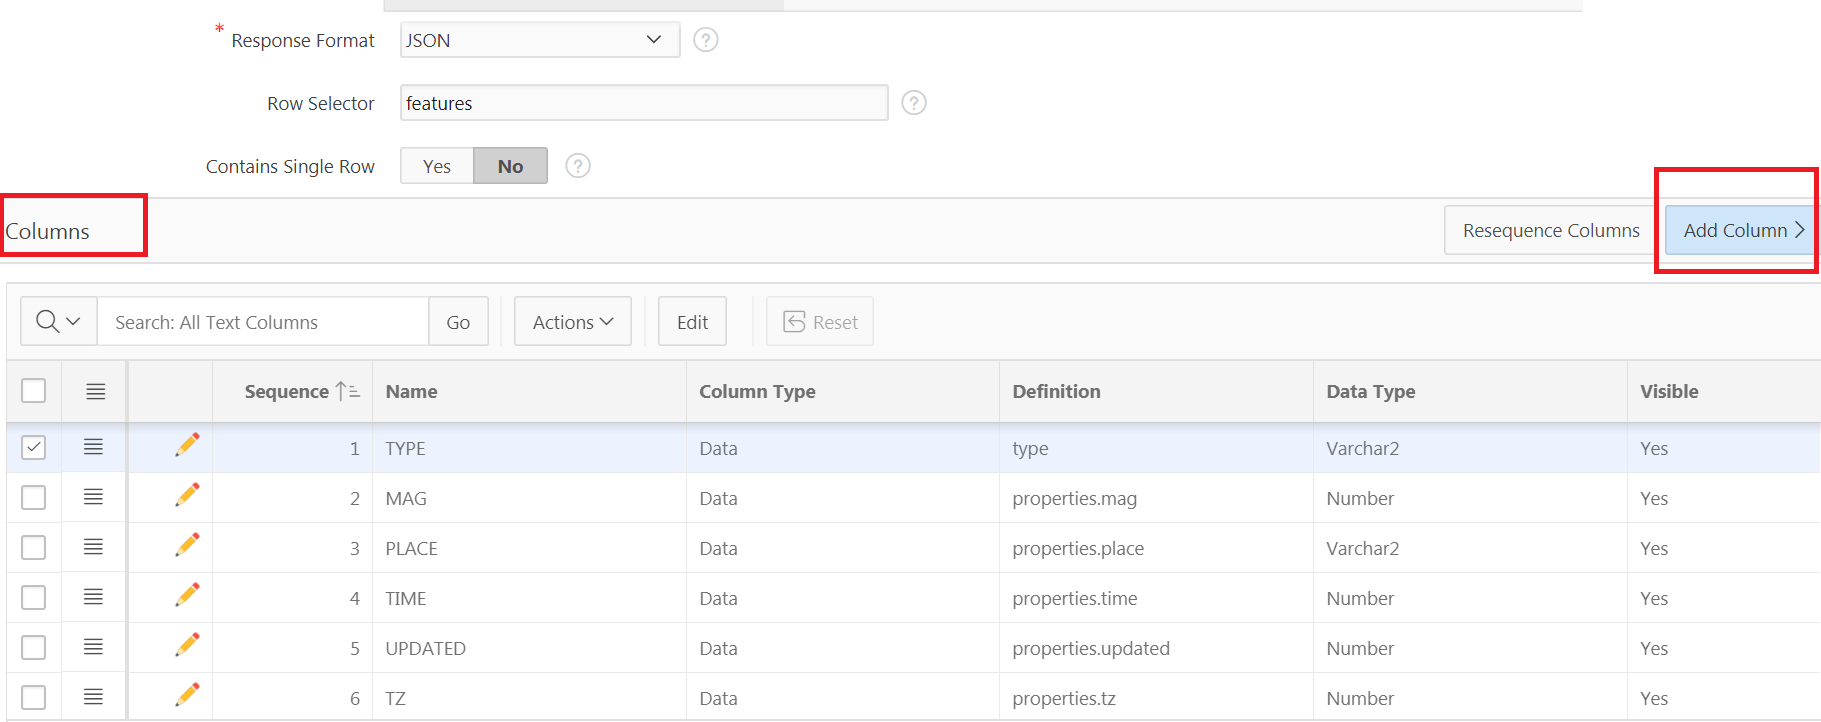
To edit the Web Source and add standard date/time for use in the charts or reports:
- On the Web Source Modules
page, select the Module Name. Choose Edit
Data Profile at the bottom of the page.

Description of the web_source_edit_profile.png - Click Add Column.
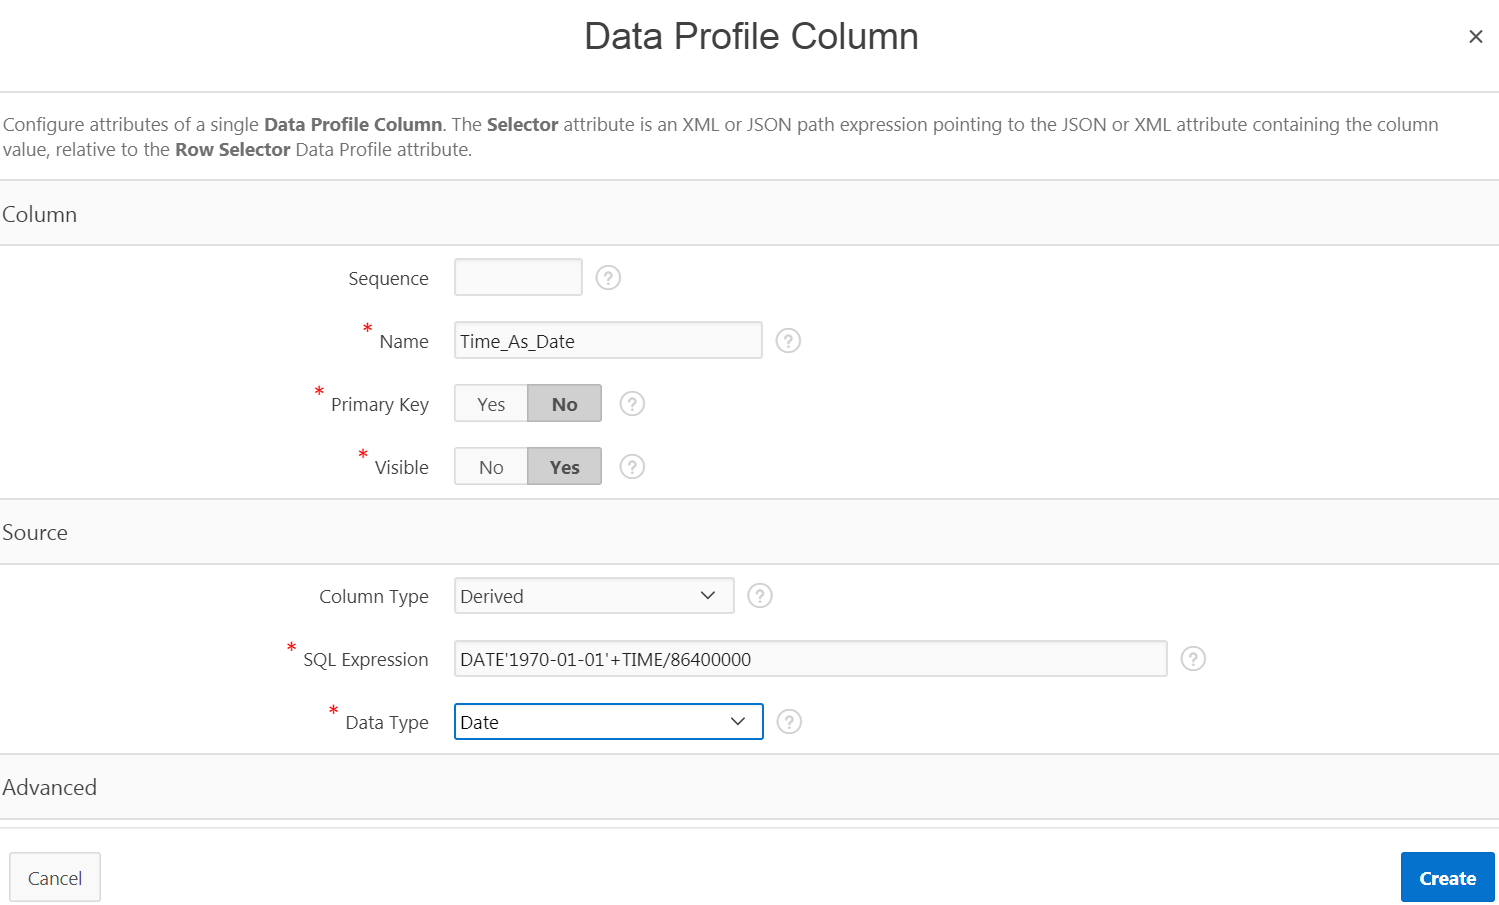
Description of the edit_add_column.png - On the Data Profile Column page, define the following
attributes:
- Name: Enter
Time_As_Date - Column Type: Select Derived
- SQL Expression: Enter
DATE'1970-01-01'+TIME/86400000 - Data Type: Select Date
- Click Create. The Data Profile page appears.
- Click Apply Changes to save your changes.
Description of the data_profile.png - Name: Enter
 Add a
Calendar Page
Add a
Calendar Page
To update the web source and include a new calendar page:
- Click the Application ID
USGS Earthquaketo navigate to the application home page. - Click Create Page.
- Select Calendar.
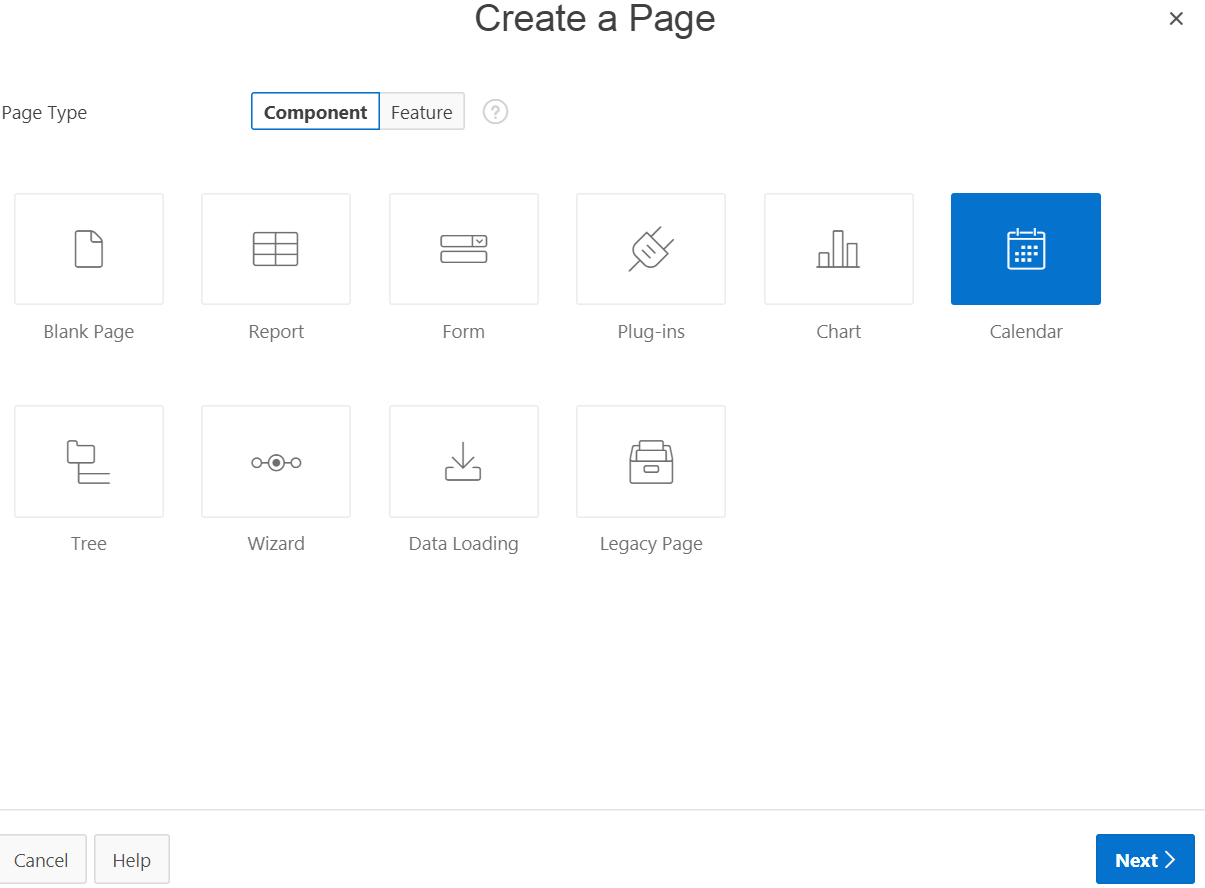
Description of the calendar_page.png - On the Create Page - Page Attributes page, define the
following attributes:
- Page Name: Enter
Latest_Earthquakes - Additional attributes appear. Accept the defaults.
- Click Next.
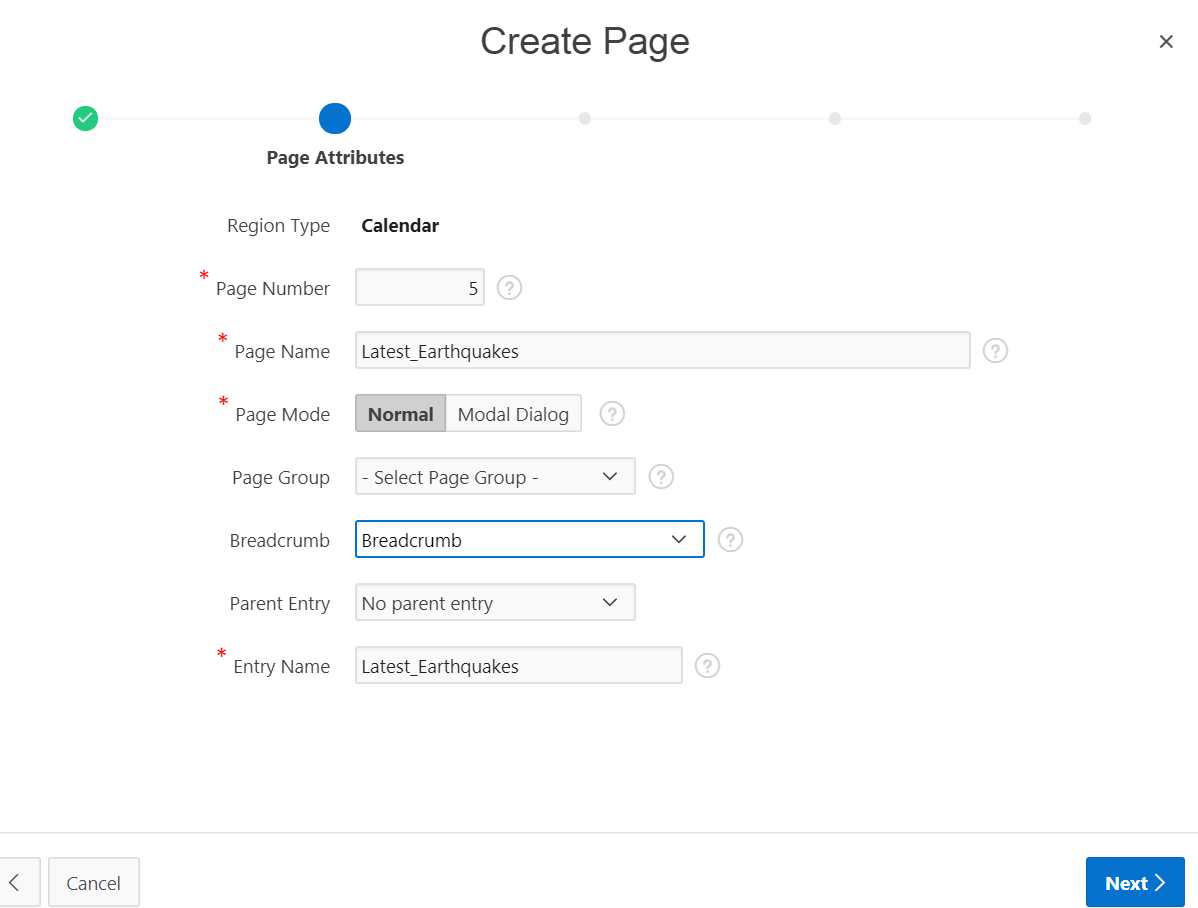
Description of the calendar_create_page.png - Page Name: Enter
- On the Create Page -
Navigation Menu page, define the following attributes:
- Navigation Preference: Select Create a new navigation menu entry
- Additional attributes appear. Accept the defaults.
- Click Next.
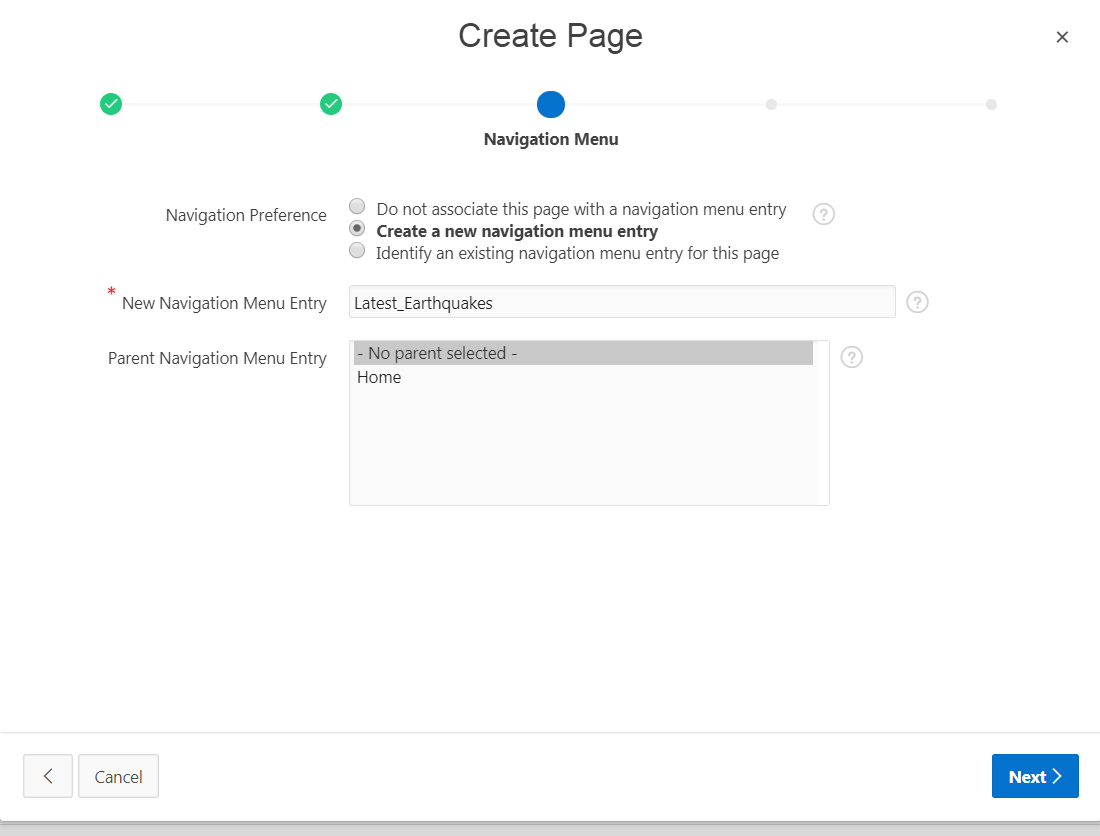
Description of the calendar_nav_menu.png - On the Create Page - Source
- Data Source: Select Web Source
- Web Source Module: Select
USGS_Earthquake_WS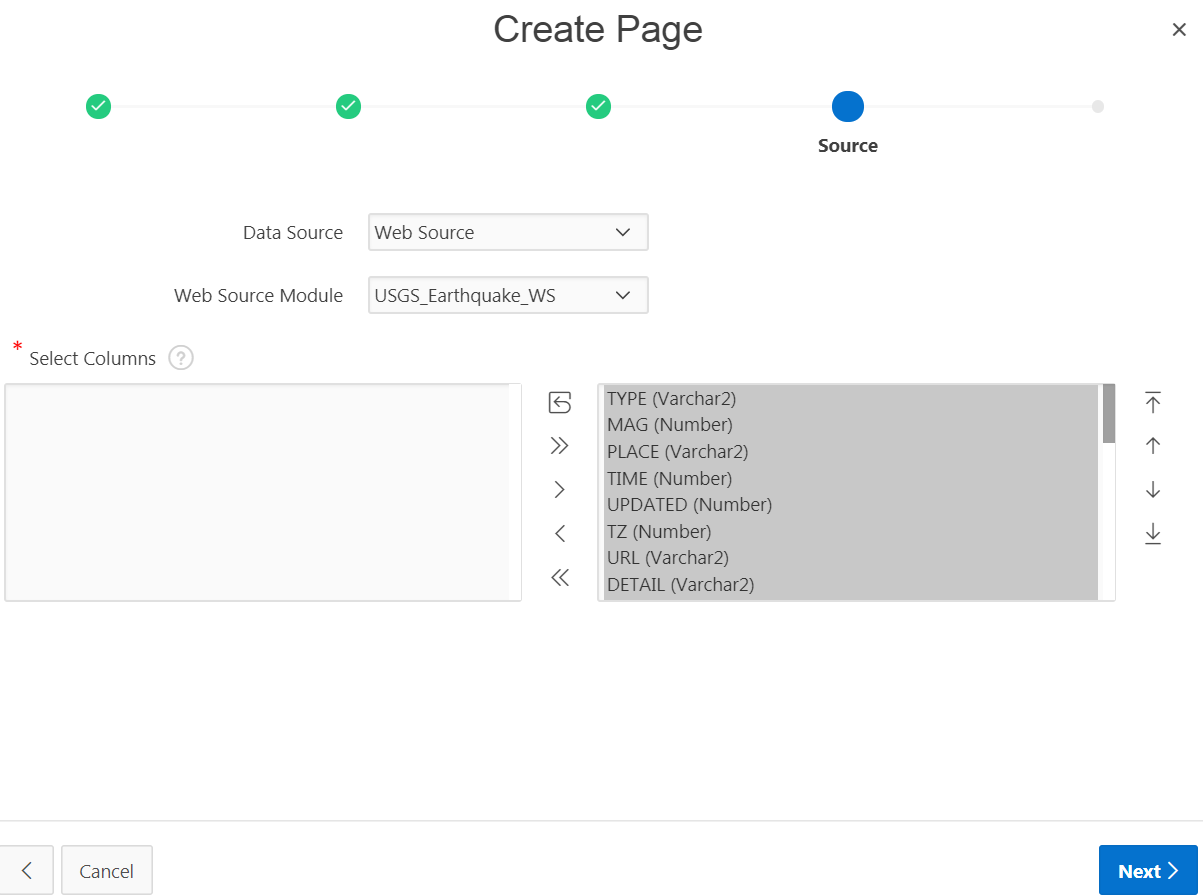
Description of the calendar_source.png - Click Next.
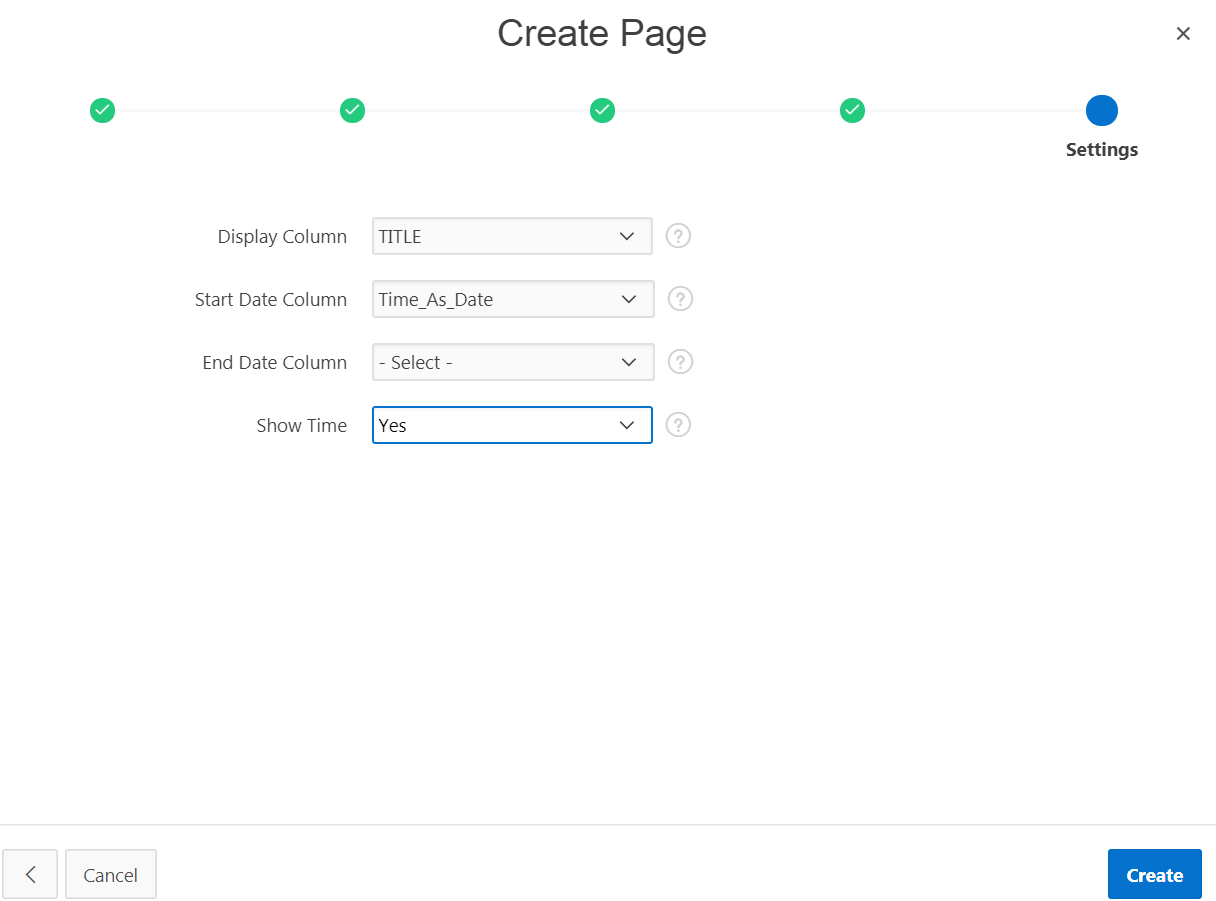
- On the Create Page - Settings page, define the following
attributes:
- Display Column: Select TITLE
- Start Date Column: This is populated by
default. Ensure it shows
Time_As_Date. - Show Time: Select Yes
- Click Create. The new Calendar Page (
Latest_Earthquakes) is created. - Click Save and Run page.
- Enter your sign in credentials (workspace,username, and
password). You can see the calendar entries for all the
days of the Month/Week.
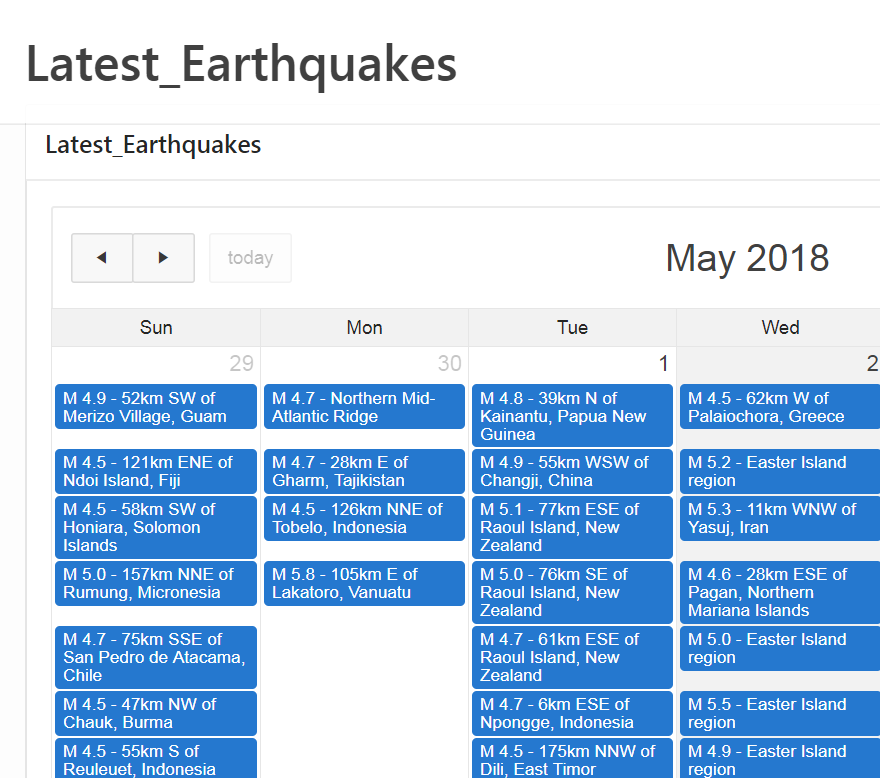
Description of the calendar_entries.png
Description of the calendar_settings.png
 Edit
Calendar Page
Edit
Calendar Page
To highlight in a different color the earthquakes with magnitude greater than 5:
- From the runtime
environment, return to the App Builder by
clicking Edit Page
Latest_Earthquakesin the Developer Toolbar. The Page Designer opens.
- In
the Rendering tab, select the
Latest_Earthquakescalendar region.
- In
the Property Editor, edit the following:
- Local
Post Processing: Type -
Select SQL Query
- Local
Post Processing: SQL Query
- Click the Code Editor and add the following SQL
statement after
Time_As_Date,:case when mag > 5 then 'apex-cal-red' else 'apex-cal-orange' end css_class
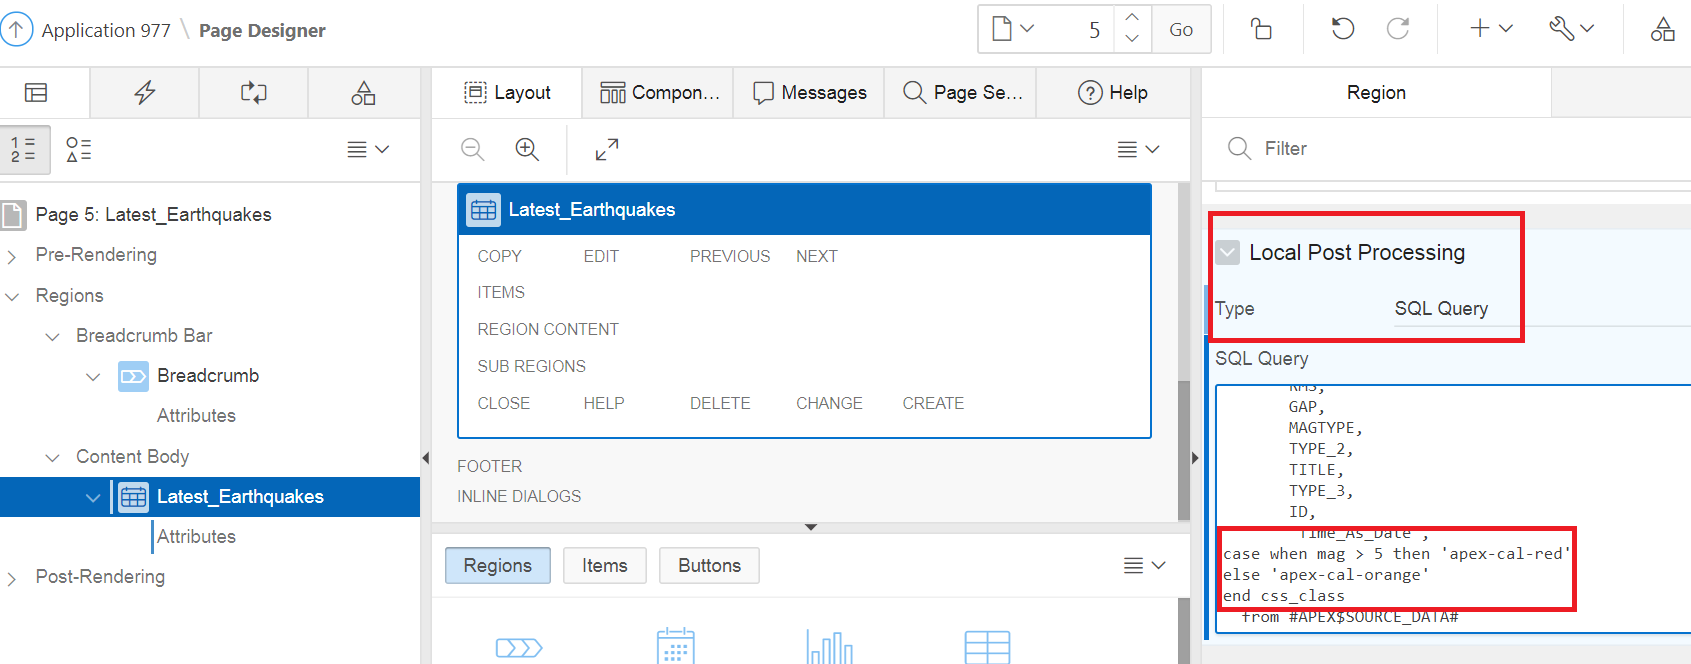
Description of the local_post_processing.png
- Local
Post Processing: Type -
Select SQL Query
- In the Rendering tab, select
Latest_Earthquakescalendar region. Select Attributes. - In the property editor, edit the following:
- Enter
cssin the search filter. - Settings: CSS Class -
Enter
CSS_CLASS.
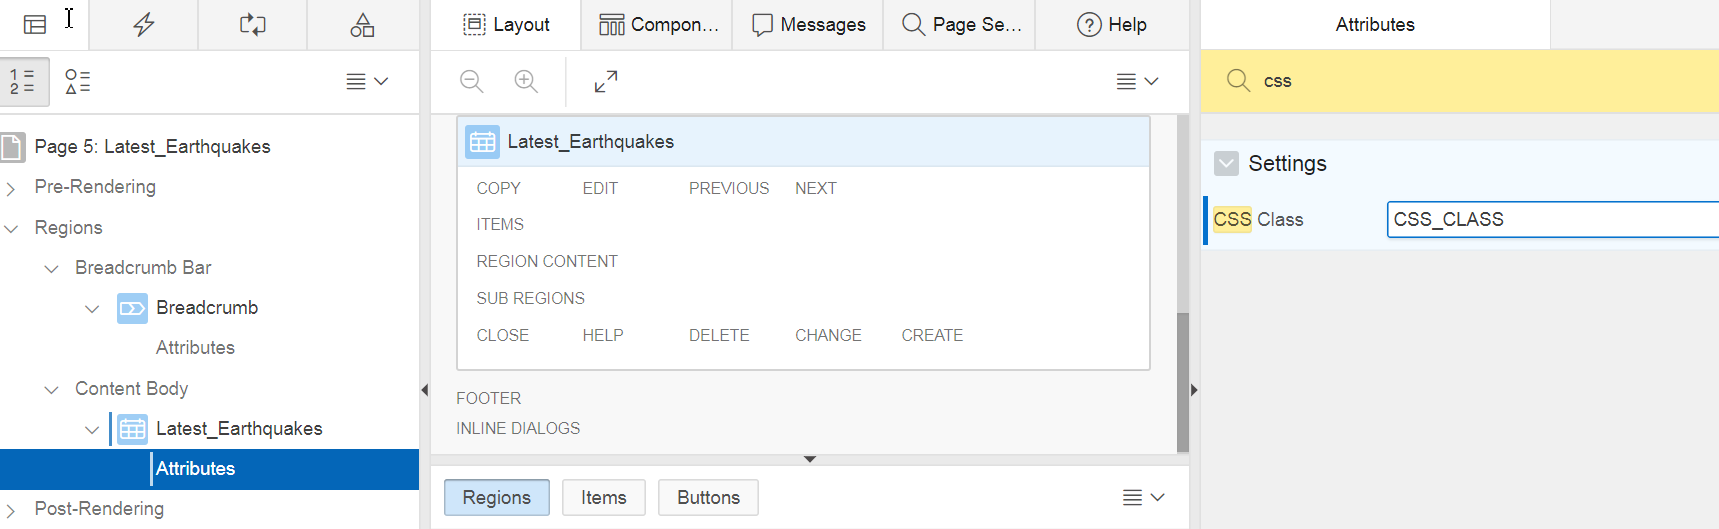
Description of the css_class.png - Click Save and Run page. You can see
that the calendar displays different colors on the basis
of the earthquake magnitudes.
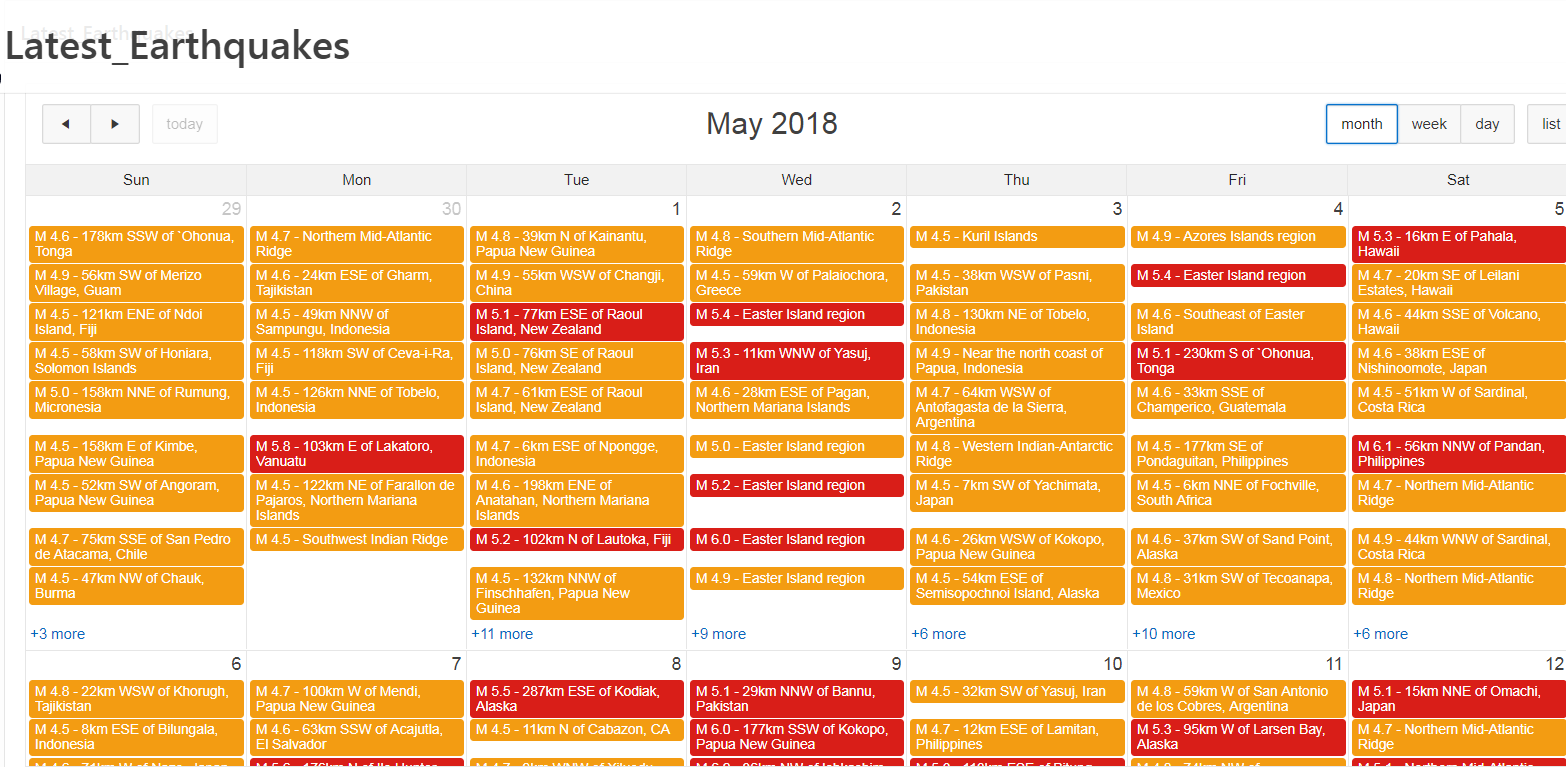
Description of the calendar_with_different_magnitude.png
- Enter
 Next
Tutorial
Next
Tutorial
Oracle Application Express 18.1: Creating a Web Source Module (2 of 2)